
Step-by-step: How to use IBM MQ in Python, part 1
This is part one of a mini-series about working with IBM MQ as a Zato and Python user. This installment will cover installation and configuration whereas the next one will delve into programming tasks.
Zato is a Python-based multi-protocol API integration platform, message broker and backend application server and IBM MQ is one of the protocols and products that it supports out of the box, making it possible to integrate with IBM MQ systems, including JMS ones, using little or no programming at all.

Step-by-step
This is what the article will include. The end result will be a working Zato-IBM MQ installation, capable of both receiving and sending messages from IBM MQ queue managers.
- Installing a Zato environment
- Enabling IBM MQ connections in Zato
- Installing IBM MQ Client
- Installing PyMQI
- Configuring Zato connection definitions
- Zato outgoing connections
- Zato channels
Installing a Zato environment
The first step is to [install a Zato package](/en/docs/4.1/admin/guide/install/index.html. To work with IBM MQ, you can choose any of the systems supported by Zato. Ubuntu will be used here but everything works the same no matter if it is Ubuntu, RHEL or any other OS.
Next, you need to create a Zato environment. The easiest way is to use a quickstart cluster which sets up a working Zato cluster in one command.
Alternatively, you can follow [the tutorial]/en/tutorials/main/01.html) that will guide you through the same process in more details
Enabling IBM MQ connections in Zato
Once you have have a Zato environment ready, you need to stop all of its servers and enable IBM MQ connections in server configuration files
Stop all the servers
Open file server.conf in each server
Find stanza [component_enabled]
Set ibm_mq=True in the stanza
Do not start all the servers back just yet
Installing IBM MQ Client
To make it possible to connect to queue managers via TCP, it is required to install a software package called an IBM MQ Client. This package contains runtime libraries that let applications, such as Zato, to use TCP connections with IBM MQ.
Download the client and follow its installation procedure as described by IBM
Installing PyMQI
With the client package in place, it is now possible to install PyMQI, which is a low-level IBM MQ Client library for Python - it was not possible to install it in previous steps because it required the IBM MQ Client as its prerequisite
To install PyMQI, navigate to Zato installation directory and use pip to download PyMQI:
This concludes the OS-level preparations and installation steps
Now all the servers can be brought back using the zato start command
Configuring Zato connection definitions
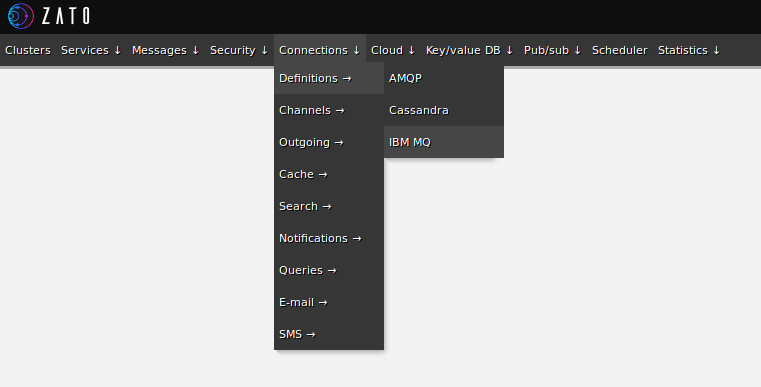
Log in to the Zato Dashboard and navigate to Connections -> Definitions -> IBM MQ
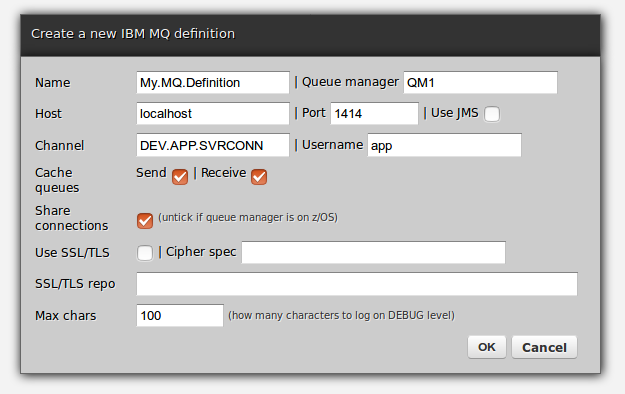
A connection definition is a reusable piece of configuration, a common set of information that can be used in more than one place, in this context, it allows one to create both incoming MQ connections (Zato channels) and outgoing ones. Note that Zato channels share the name with MQ channels but they are an unrelated concept, only distantly similar.
Create a definition by filling out the form as below. You need to change the connection's password because by default it is a randomly generated one that cannot be used. Afterwards, you can click Ping to confirm that connections to your remote queue manager work correctly.

Zato outgoing connections
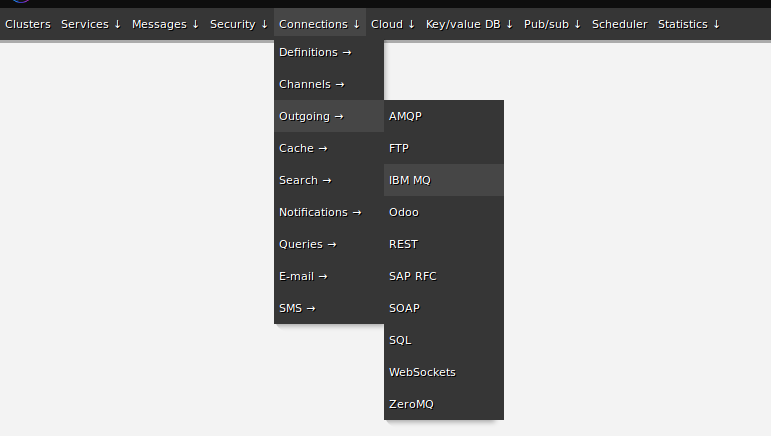
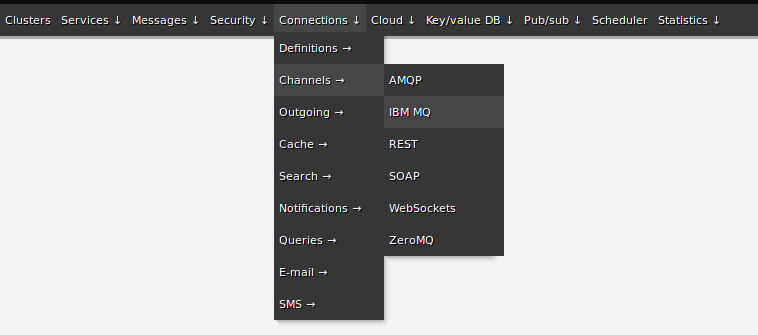
In web-admin, create a new IBM MQ outgoing connection via Connections -> Outgoing -> IBM MQ
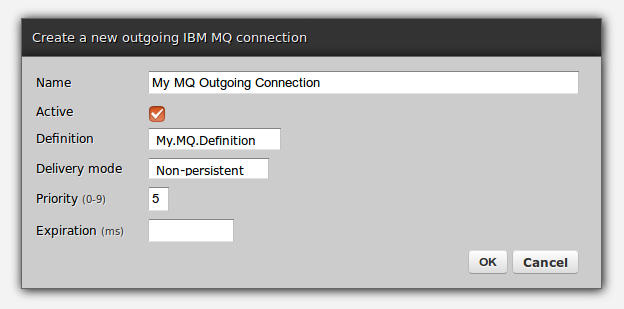
An outgoing connection lets one push and send messages to other systems, in this case it will let you send messages to MQ queues
A single connection is tied to a particular connection definition, which means that it is related to a queue manager the definition points to, but it can be used with any number of MQ queues as needed
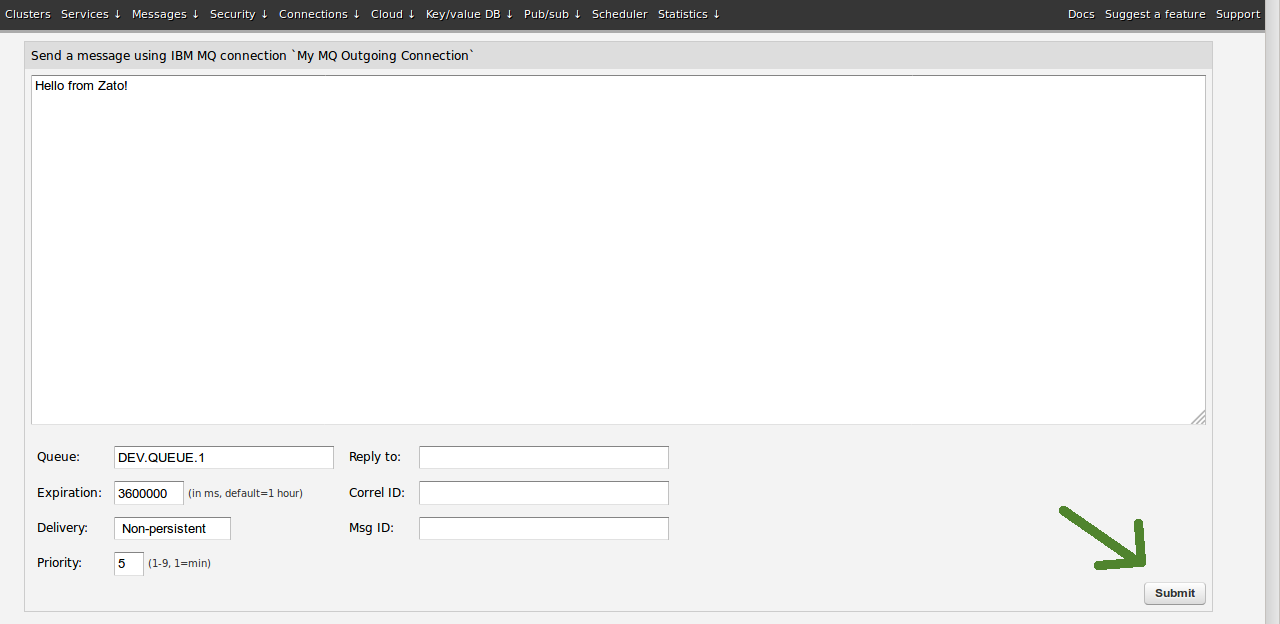
Once a connection is defined, it is possible to start to use it from Python code but in this post, let's send a test message directly from web-admin

Zato channels
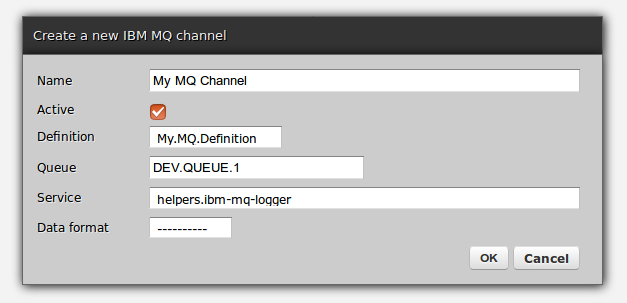
In web-admin, create a new IBM MQ channel through Connections -> Channels -> IBM MQ
A Zato channel acts as a message listener, accepting messages from a particular queue and invoking a user defined [API service]/en/docs/4.1/intro/esb-soa.html) that acts accordingly, e.g. by transforming the message and delivering it to intended recipients
No programming is needed to accept messages from queue - the very fact of creating a channel lets Zato automatically consume messages in background from the channel's queue
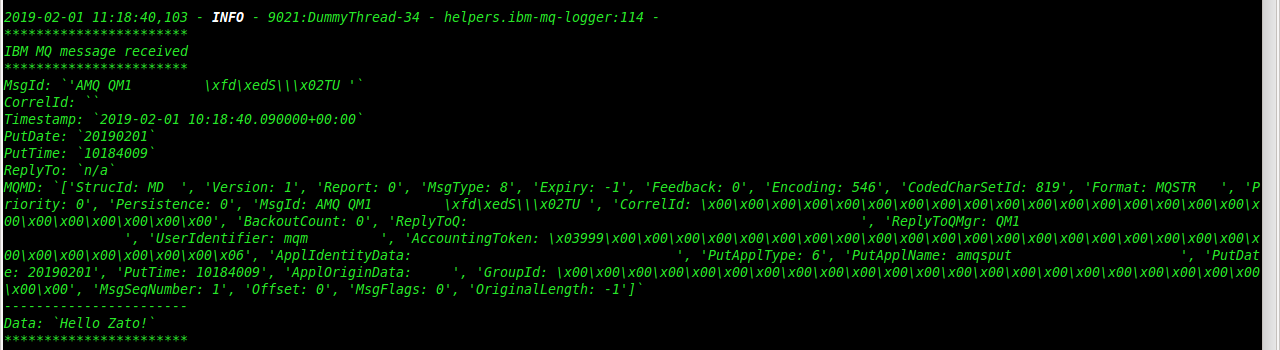
Any user-defined service in the channel can be used, but below, just for illustration purposes, a built-in service called helpers.ibm-mq-logger is employed. This is a convenience service that simply saves to Zato server logs all the information about each message taken off a queue, including the message's data and metadata, such as headers and MQMD.
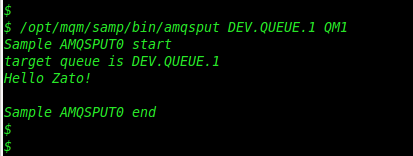
To send a message to Zato, below, MQ's own command line utility is used and the full command that can be executed from the system that MQ runs on is /opt/mqm/samp/bin/amqsput DEV.QUEUE.1 QM1
If you do not have access to MQ command line, you can simply create an outgoing connection in Zato and use the Send message form in web-admin to send a message that will be received by a channel. It is not shown here but it would work just as fine.
Summary
This is it. Your Zato installation is configured to send and accept IBM MQ-originating messages and, in the next part, Python services will be used to actually process the messages in a useful manner, e.g. by enriching their contents and sending them out to other applications.
For more information - visit the [main documentation site]/en/docs/4.1/index.html or [go straight to the tutorial]/en/tutorials/main/01.html) and stay tuned for the next article.