
WebSphere MQ programming in Python with Zato
WebSphere MQ is messaging middleware by IBM - a message queue server - and this post shows how to integrate with MQ from Python and Zato.
The article will go through a short process that will let you:
- Send messages to queues in 1 line of Python code
- Receive messages from queues without coding
- Seamlessly integrate with Java JMS applications - frequently found in WebSphere MQ environments
- Push MQ messages from Django or Flask
Prerequisites
- Zato 3.0+ (e.g. from source code)
- WebSphere MQ 6.0+
Preliminary steps
- Obtain connection details and credentials to the queue manager that you will be connecting to:
- host, e.g. 10.151.13.11
- port, e.g. 1414
- channel name, e.g. DEV.SVRCONN.1
- queue manager name (optional)
- username (optional)
password (optional)
Install Zato
- On the same system that Zato is on, install a WebSphere MQ Client - this is an umbrella term for a set of development headers and libraries that let applications connect to remote queue managers
- Install PyMQI - an additional dependency implementing the low-level proprietary MQ protocol. Note that you need to use the pip command that Zato ships with:
- That is it - everything is installed and the rest is a matter of configuration
Understanding definitions, outgoing connections and channels
Everything in Zato revolves around re-usability and hot-reconfiguration - each individual piece of configuration can be changed on the fly, while servers are running, without restarts.
Note that the concepts below are presented in the context of WebSphere MQ but they apply to other connection types in Zato too.
- Definitions - encapsulate common details that apply to other parts of configuration, e.g. a connection definition may contain remote host and port
- Outgoing connections - objects through which data is sent to remote resources, such as MQ queues
- Channels - objects through which data can be received, for instance, from MQ queues
It is usually most convenient to configure environments during development using the GUI Dashboard but afterwards this can be automated with enmasse, [API]/en/docs/4.1/index.html or command-line interface.
Once configuration is defined, it can be used from Zato services which in turn represent APIs that Zato clients invoke. Then, external applications, such as a Django or Flask, will connect using HTTP to a Zato service which will on their behalf send messages to MQ queues.
Let's use web-admin to define all the Zato objects required for MQ integrations. (Hint: web-admin by default runs on http://localhost:8183)
Definition
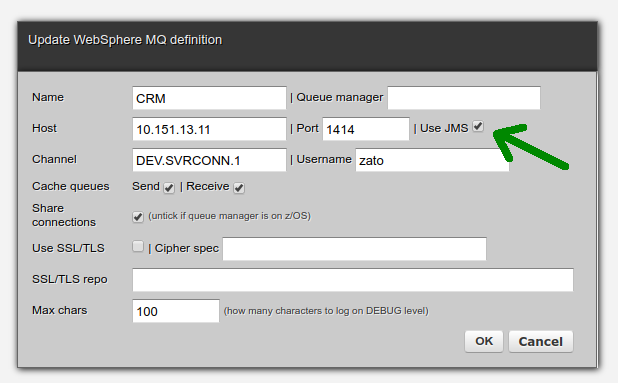
- Go to Connections -> Definitions -> WebSphere MQ
- Fill out the form and click OK
- Observe the 'Use JMS' checkbox - more about it later on
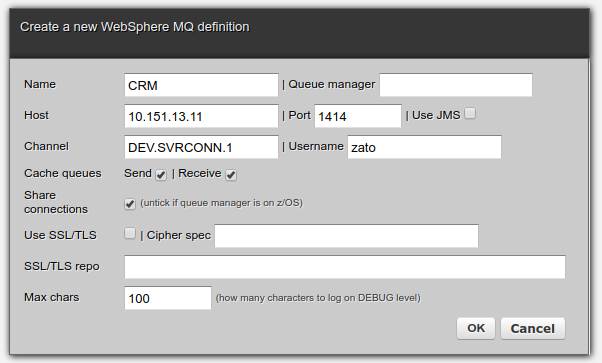
- Note that a password is by default set to an unusable one (a random UUID4) so once a definition is created, click on Change password to set it to a required one
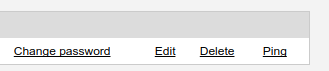
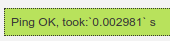
- Click Ping to confirm that connections to the remote queue manager can be established
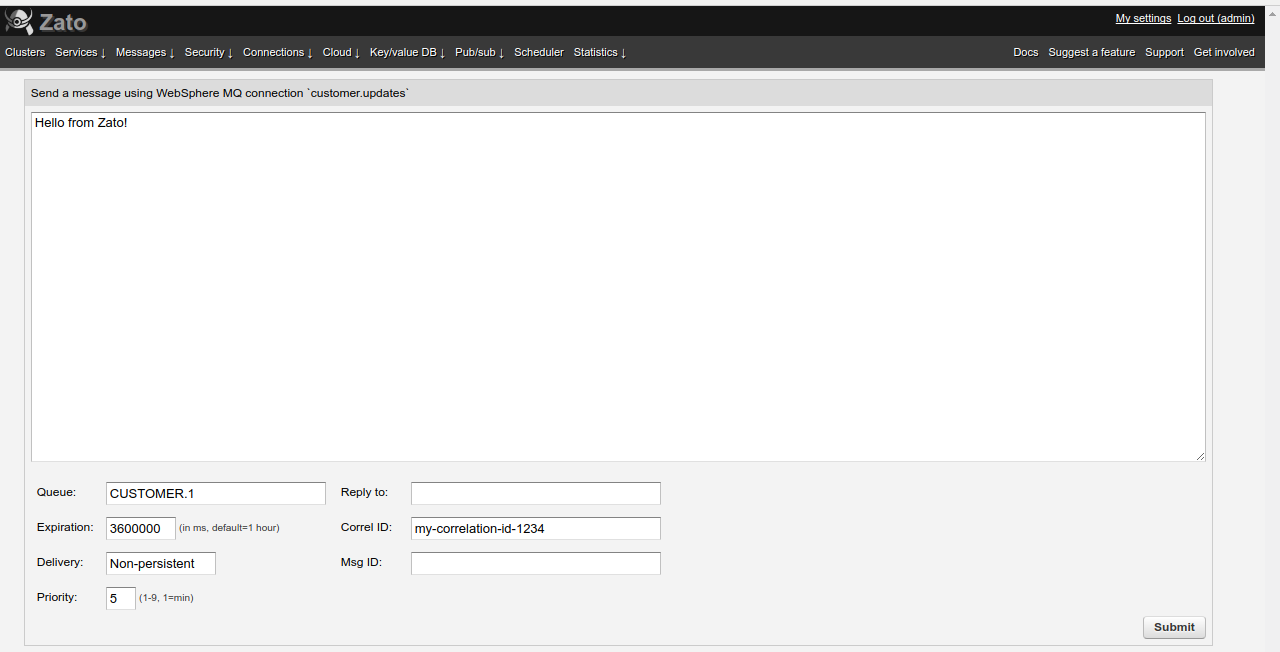
Outgoing connection
- Go to Connections -> Outgoing -> WebSphere MQ
- Fill out the form - the connection's name is just a descriptive label
- Note that you do not specify a queue name here - this is because a single connection can be used with as many queues as needed
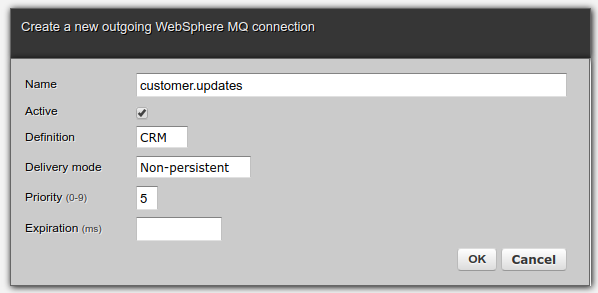
- You can now send a test MQ message directly from web-admin after click Send a message

API services
- Having carried out the steps above, you can now send messages to queue managers from web-admin, which is a great way to confirm MQ-level connectivity but the crucial point of using Zato is to offer API services to client applications so let's create two services now, one for sending messages to MQ and one that will receive them.
# -*- coding: utf-8 -*-

from __future__ import absolute_import, division, print_function, unicode_literals

# Zato
from zato.server.service import Service

class MQSender(Service):
    """ Sends all incoming messages as they are straight to a remote MQ queue.
    """
    def handle(self):

        # This single line suffices
        self.out.wmq.send(self.request.raw_request, 'customer.updates', 'CUSTOMER.1')
In practice, a service such as the one above could perform transformation on incoming messages or read its destination queue names from configuration files but it serves to illustrate the point that literally 1 line of code is needed to send MQ messages
Let's create a channel service now - one that will act as a callback invoked for each message consumed off a queue:
# -*- coding: utf-8 -*-

from __future__ import absolute_import, division, print_function, unicode_literals

# Zato
from zato.server.service import Service

class MQReceiver(Service):
    """ Invoked for each message taken from a remote MQ queue
    """
    def handle(self):
        self.logger.info(self.request.raw_request)
But wait - if this is the service that is a callback one then how does it know which queue to get messages from?
That is the key point of Zato architecture - services do not need to know it and unless you really need it, they won't ever access this information.
Such configuration details are configured externally (for instance, in web-admin) and a service is just a black box that receives some input, operates on it and produces output.
In fact, the very same service could be mounted not only on WebSphere MQ ones but also on REST or AMQP channels.
Without further ado, let's create a channel in that case, but since this is an article about MQ, only this connection type will be shown even if the same principle applies to other channel types.
Channel
- Go to Connections -> Channels -> WebSphere MQ
- Fill out the form and click OK
- Data format may be JSON, XML or blank if no automatic de-serialization is required
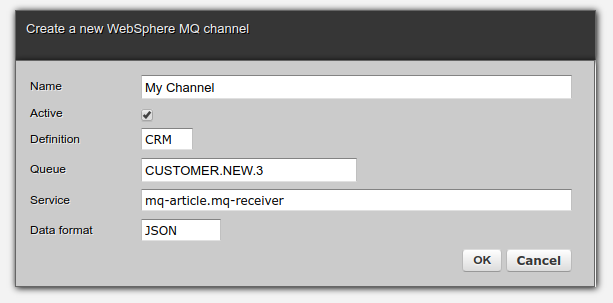
After clicking OK a lightweight background task will start to listen for messages pertaining to a given queue and upon receiving any, the service configured for channel will be invoked.
You can start as many channels as there are queues to consume messages from, that is, each channel = one input queue and each channel may declare a different service.
JMS Java integration
In many MQ environments the majority of applications will be based on Java JMS and Zato implements the underlying wire-level MQ JMS protocol to let services integrate with such systems without any effort from a Python programmer's perspective.
When creating connection definitions, merely check Use JMS and everything will be taken care of under the hood - all the necessary wire headers will be added or removed when it needs to be done.
No restarts required
It's worth to emphasize again that at no point are server restarts required to reconfigure connection details.
No matter how many definitions, outgoing connections, channels there are, and no matter of what kind they are (MQ or not), changing any of them will only update that very one across the whole cluster of Zato servers without interrupting other API services running concurrently.
Configuration wrap-up
- MQ connection definitions are re-used across outgoing connections and channels
- Outgoing connections are used by services to send messages to queues
- Data from queues is read through channels that invoke user-defined services
- Everything is reconfigurable on the fly
Let's now check how to add a REST channel for the MQSender service thus letting Django and Flask push MQ messages.
Django and Flask integration
- Any Zato-based API service can be mounted on a channel
- For Django and Flask, it is most convenient to mount one's services on REST channels and invoke them using the zato-client from PyPI
- zato-client is a set of convenience clients that lets any Python application, including ones based on Django or Flask, to invoke Zato services in just a few steps
- There is a dedicated chapter in documentation about Django and Flask, including a sample integration scenario
- It's recommended to go through the chapter step-by-step - since all Zato configuration objects share the same principles, the whole of its information applies to any sort of technology that Django or Flask may need to integrate with, including WebSphere MQ
- After completing that chapter, to push messages to MQ, you will only need to:
- Create a security definition for a new REST channel for Django or Flask
- Create the REST channel itself
- Assign a service to it (e.g. MQSender)
- Use a Python client from zato-client to invoke that channel from Django or Flask
- And that is it - no MQ programming is needed to send messages to MQ queues from any Python application :-)
Summary
- Zato lets Python programmers integrate with WebSphere MQ with little to no effort
- Built-in support for JMS lets one integrate with existing Java applications in a transparent manner
- Built-in Python clients offer trivial access to Zato-based API services from other Python applications, including Django or Flask
Where to next? Start off with the [tutorial]/en/tutorials/main/01.html), then consult the [documentation]/en/docs/4.1/index.html, there is a lot of information for all types of API and integration projects, and have a look at support options in case you need absolutely any sort of assistance!