
Zato development workflow
Zato is an integration platform and backend application server which means that, during most of their projects, developers using Zato are interested in a few specific matters.
The platform concentrates on answering these key, everyday questions that Python backend developers routinely ask:
- How do I connect to external systems or databases to store or extract data?
- How do I map messages from one format to another?
- How do I automate my work so that it is repeatable across environments?
- How can I focus on my job instead of thinking of trivial low-level details?
- How do I debug my code?
- How can I reuse the skills and knowledge that I obtained elsewhere and how can I better myself?
- How do I manage the complexity of having to integrate at least several systems and dozens or hundreds of APIs?
The typical workflow
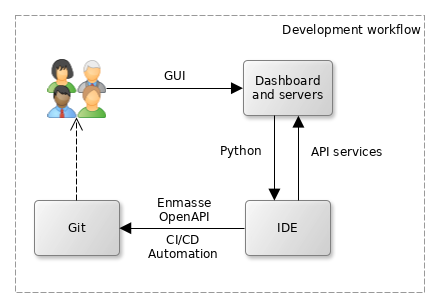
Dashboard
Dashboard is a web-based administration console that lets you define all the various connection pools, security types, scheduler jobs or other integration assets that you later make use of in your Python-based API services
When you install Zato, it is comfortable to use its Dashboard to define resources like REST, MongoDB or SOAP connections pools because it does not require any programming, you just fill out a form and that resource is created
Python
All of your code is in Python - that makes it easy to manipulate any kind of data that you receive or may need to access
In your code, you only deal with the business logic - if your service is invoked, it means that all the security layers, serializers and other low-level parts have already completed their job and you are given a nice Python-based business object that represents your input. Based on this input information, you create output that your business logic dictates, still working purely on a high-level of Python objects, without any low-level details.
Static typing is encouraged through the use of dataclasses for your data models
Your code is hot-deployed from your IDE, no matter where your servers are, e.g. you work on Mac but the server is a remote Linux instance
You can debug your services from your IDE as well and, again, the server can be a remote one
# -*- coding: utf-8 -*-

# stdlib
from dataclasses import dataclass

# Zato
from zato.server.service import Model, Service

@dataclass(init=False)
class GetClientRequest(Model):
    client_id: int

@dataclass(init=False)
class GetClientResponse(Model):
    name:    str
    email:   str
    segment: str

class GetClient(Service):

    class SimpleIO:
        input  = GetClientRequest
        output = GetClientResponse

    def handle(self):

        # Enable type checking and type completion
        request = self.request.input # type: GetClientRequest

        # Log details of our request
        self.logger.info('Processing client `%s`', request.client_id)

        # Produce our response - in a full service this information
        # will be obtained from one or more databases or systems.
        response = GetClientResponse()
        response.name    = 'Jane Doe'
        response.email   = 'hello@example.com'
        response.segment = 'RNZ'

        # Return the response to our caller
        self.response.payload = response
Such a service can be assigned to one or more REST channels and we can invoke it now:
$ curl localhost:17010/api/v1/client -d '{"client_id":123}'
{"name":"Jane Doe","email":"hello@example.com","segment":"RNZ"}
$
Automation
Using Dashboard is very handy, and, once you are satisfied with what you created using it, the resources can be exported from command line using a built-in tool called enmasse - the result is a regular YAML file that describes every resource that you created using Dashboard
In the next step, an emasse file can be imported in a new environment, also from command line. For instance, you can keep adding new connection definitions to the export file each day and they can be imported in a separate testing environment by CI/CD regression testing processes.
Thanks to the enmasse export and import cycle, you do not need to manually recreate any resources that you initially created in your development environment. Moreover, because enmasse files are simple YAML files, you can script their usage in any way required when they are being import, e.g. by filling out credentials or other details that each environment may differ by.
Similarly, with your Python code, you can commit your code to git and configure each environment to hot-deploy it directly from a git checkout. Alternatively, Python code can be deployed statically, which requires a server restart. The latter approach is useful when you, for instance, prepare an AWS AMI with your solution that you create new runtime instance from, because it lets you embed your entire enmasse definition and code directly in your AMIs.
OpenAPI
Definitions of your services can be exported to OpenAPI
Note that, by default, your services can be multi-protocol - it means that you may have a service that only uses WebSockets, or perhaps is a background one that has no REST endpoint at all, and yet, you still will be able to export it to OpenAPI
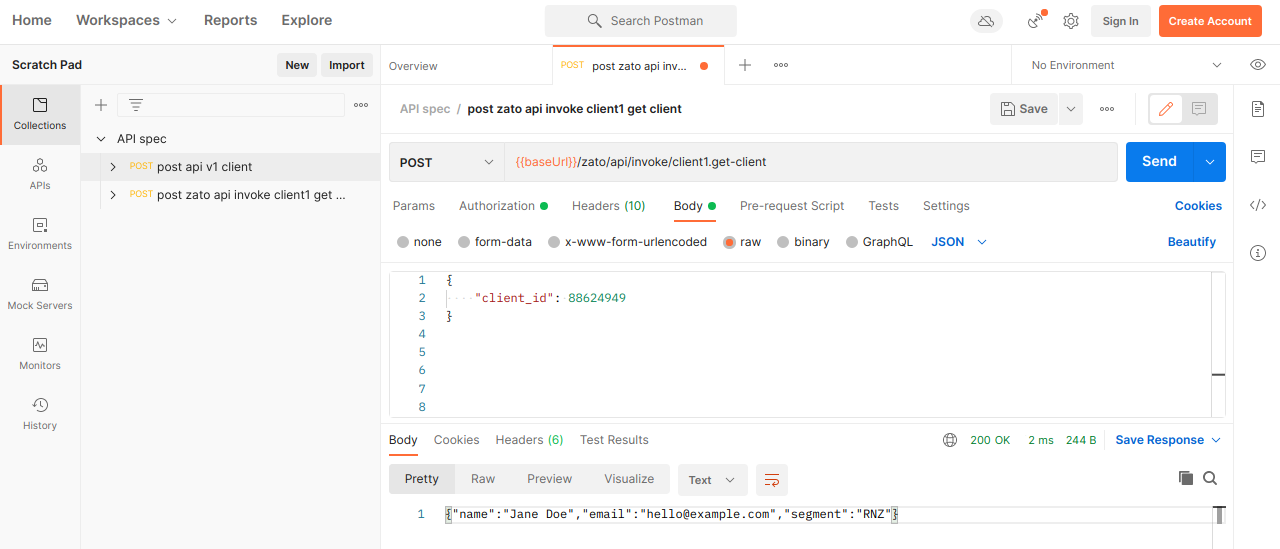
Taken together, it means that you can use any OpenAPI-compatible tool, such as Postman, for accessing and testing your API services, no matter if they use REST or not
You can also generate an entire static HTML site that will include OpenAPI as well as static pages describing your APIs - this is useful, for instance when you need to share with your tech partners not only an OpenAPI definition but a pretty-looking API documentation site as well
Let's generate an OpenAPI definition for the GetClient service above:
Now, we can import the OpenAPI definition to Postman and invoke our services from it:
Python once more
Python is at the core of Zato and the platform allows you to leverage your already existing skills and knowledge of third-party libraries
For instance, the code below is a stand-alone program that connects to Redis to insert a key and read it back:
# -*- coding: utf-8 -*-

# Redis
import redis

# Connect to the database
conn = redis.Redis(host='localhost', port=6379, db=0)

# Set a key ..
conn.set('key', 'value')

# .. read it back ..
result = conn.get('key')

# .. and log what we received.
print('Result', result)
- Now, the same as a Zato-based service:
# -*- coding: utf-8 -*-

# Zato
from zato.server.service import Service

class MyService(Service):
    def handle(self):

        # Set a key ..
        self.kvdb.conn.set('key', 'value')

        # .. read it back ..
        result = self.kvdb.conn.get('key')

        # .. and log what we received.
        self.logger.info('Result %s', result)
In both cases, it is exactly the same amount of code yet a couple of differences are notable.
- First, because the configuration was created earlier using Dashboard or enmasse, your code does not need to be concerned with where Redis is, it just makes use of it.
- Second, already at this point, your Zato code is a scalable API service that can be hot-deployed to clusters for other systems to invoke it.
- Yet, the actual business logic, the usage of Redis, is the same, which means that you can reuse what you already know and build upon it while developing with Zato.
Redis was but one example and the same principle applies to everything else. Be it SQL, MongoDB, ElasticSearch or any other connection type, you can take your existing code and simply embed it in Zato services.
This also means that it is easy to find programming examples specific to a particular system because, in the end, when you connect to such an external system through Zato, you issue requests using a library which already is widely popular among Python programmers, like redis-py in this example above.
Similarly, as a data scientist you may already have some Pandas or Spark code developed earlier - the same principle applies, you can embed it in your services or you can import it from your libraries, just like with regular Python code.
More resources
➤ Python API integration tutorials
➤ What is an integration platform?
➤ Python Integration platform as a Service (iPaaS)
➤ What is an Enterprise Service Bus (ESB)? What is SOA?
➤ Open-source iPaaS in Python