
 Zato installation on Docker
Auto-creates a complete Zato environment, ready for development, testing and production.
- You can create a quickstart Zato container under Docker Desktop or from the command line.
- There is no difference in functionality between the two. In either case, you install the same image.
- The screenshots below show a Mac installation. On Windows and other systems, Docker Desktop works the same.
Download and install Docker Desktop for your operating system
On Mac, if you have Apple silicon, make sure to install all the updates for your system because newest Docker versions may be incompatible with upatched macOS systems
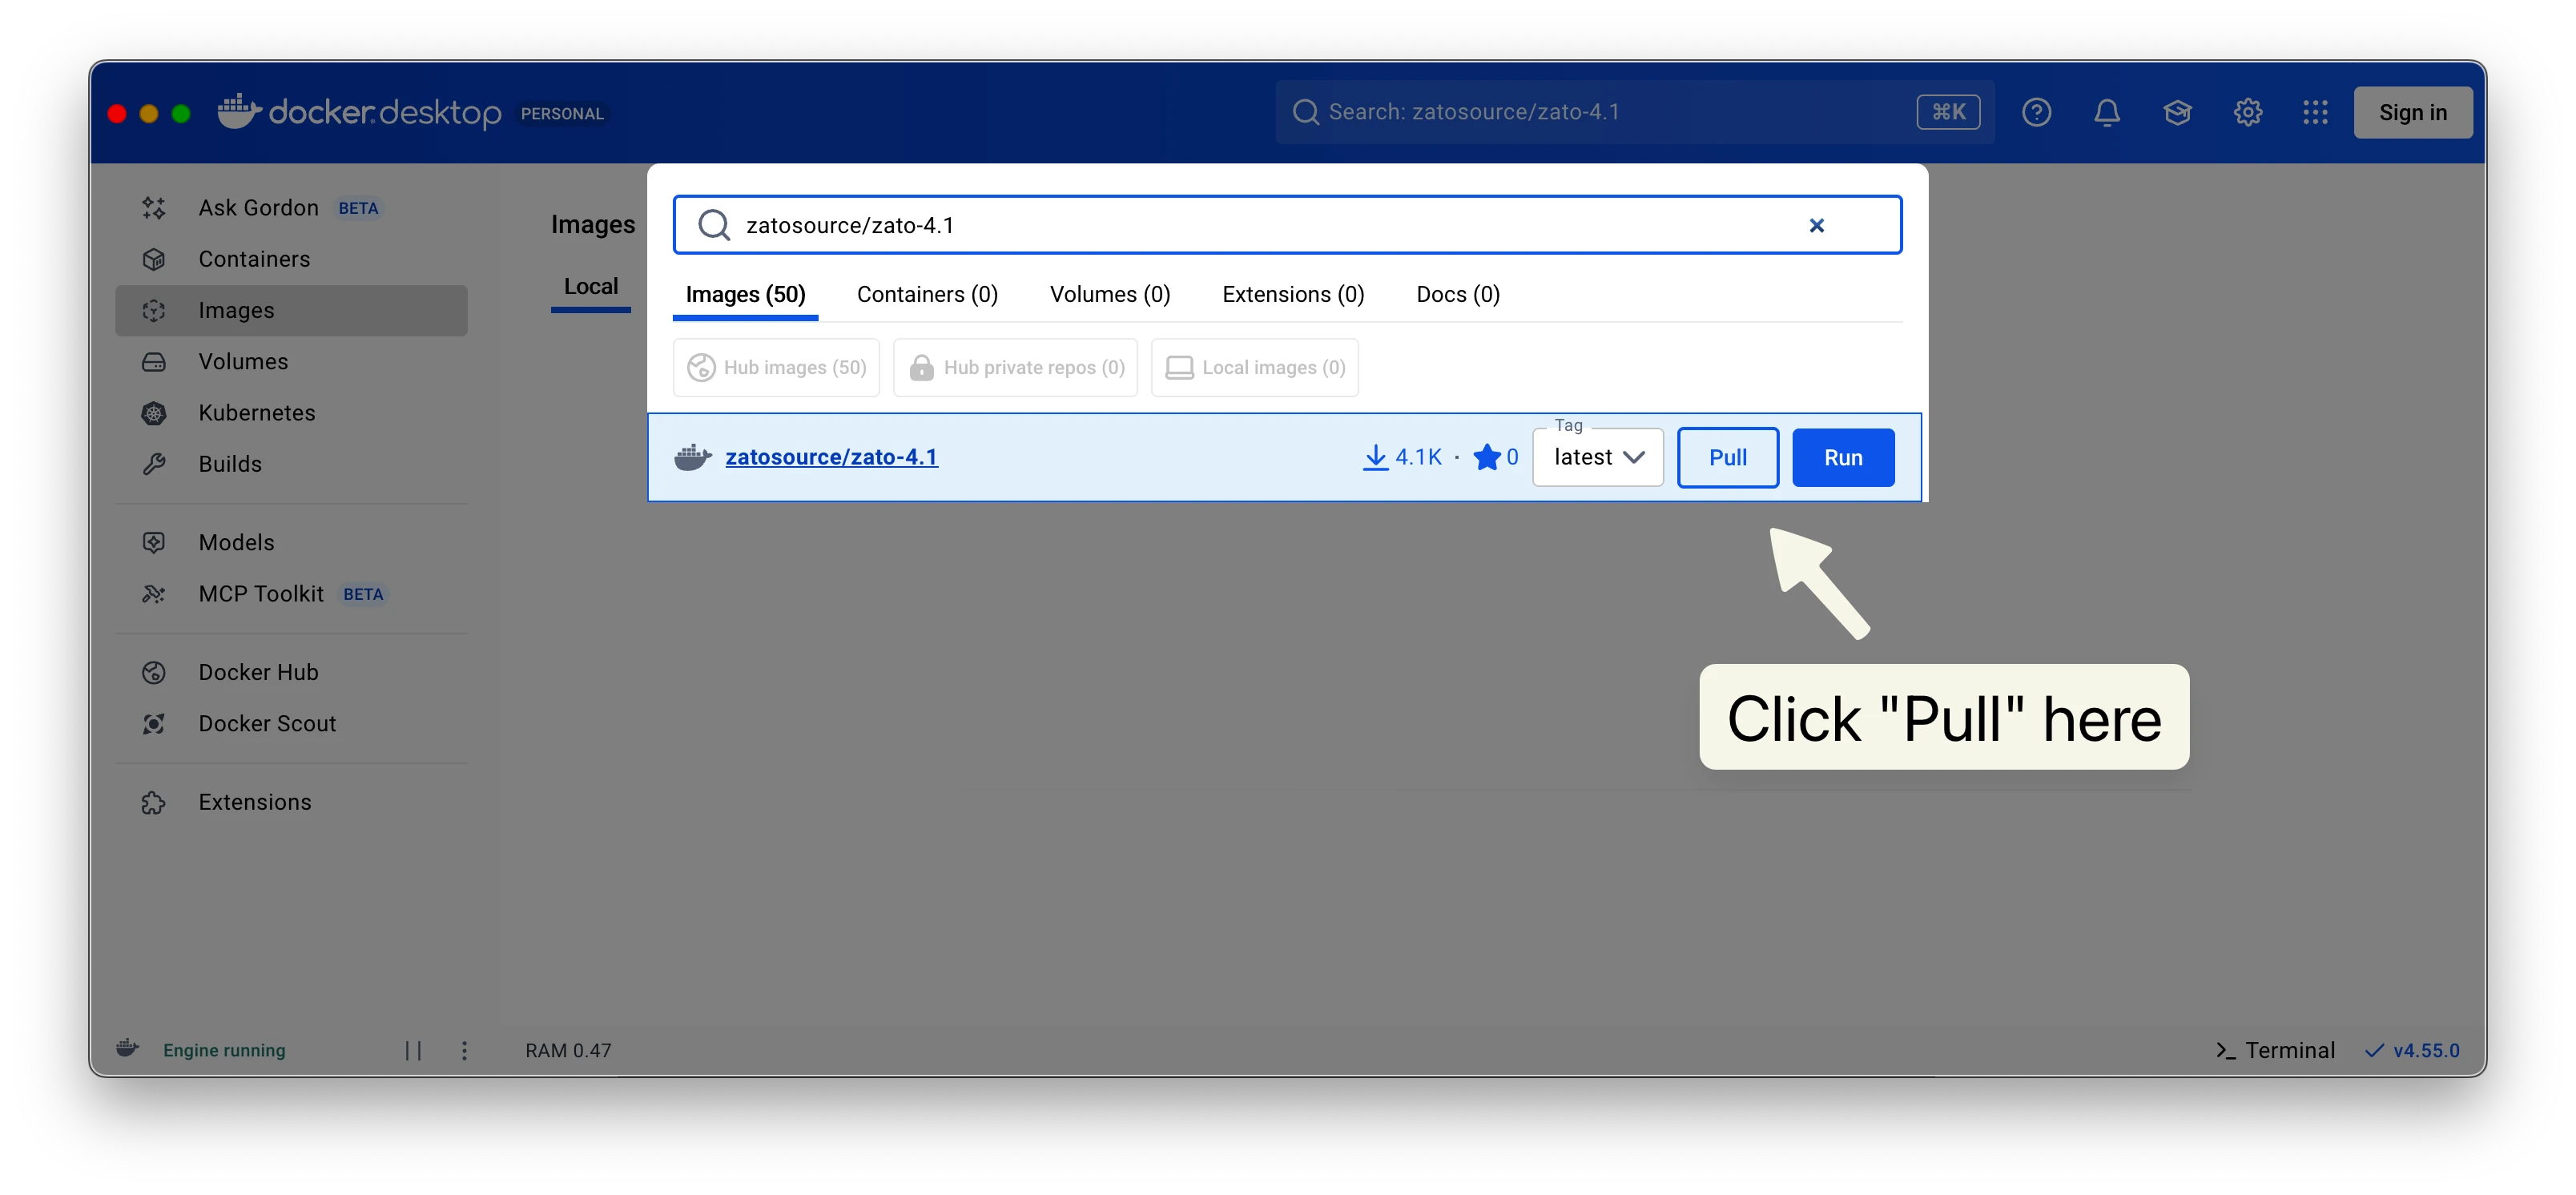
- Start Docker Desktop, look up an image called zatosource/zato-4.1 and pull it to your system

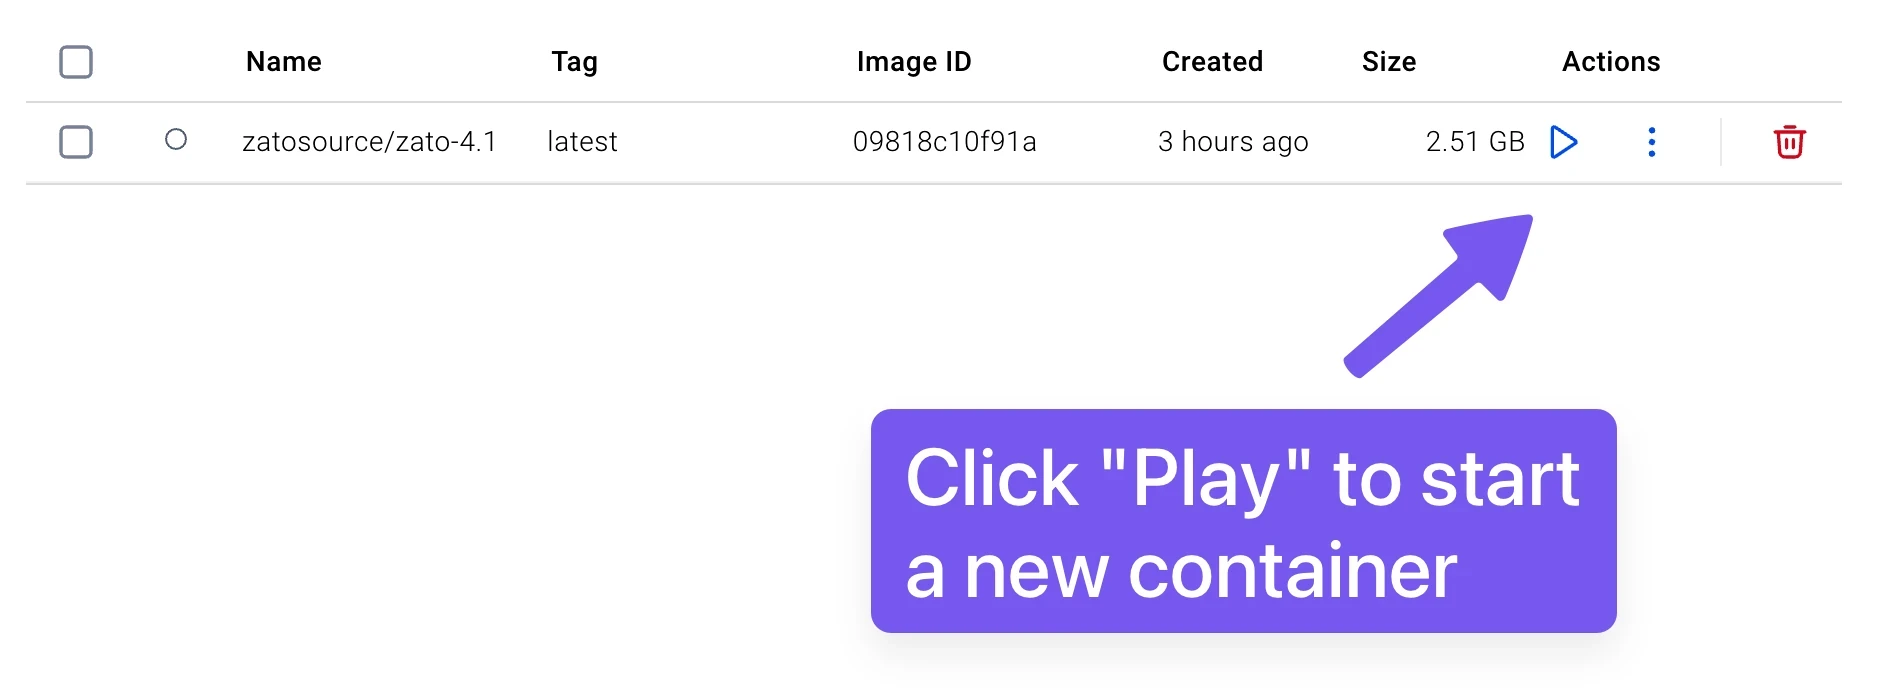
- Once the image is pulled, click Play to start a new container and fill out the settings:
- The container's name can be "Zato"
- Map port 8183 to 8183
- Map port 11223 to 11223 - external REST clients connect to this port
- Map port 11553 to 11553 - for incoming HL7 MLLP connections
- Leave all the other ports unmapped for now
- Add a new environment variable called "Zato_Password". Provide any value and it will become the password to your environment.
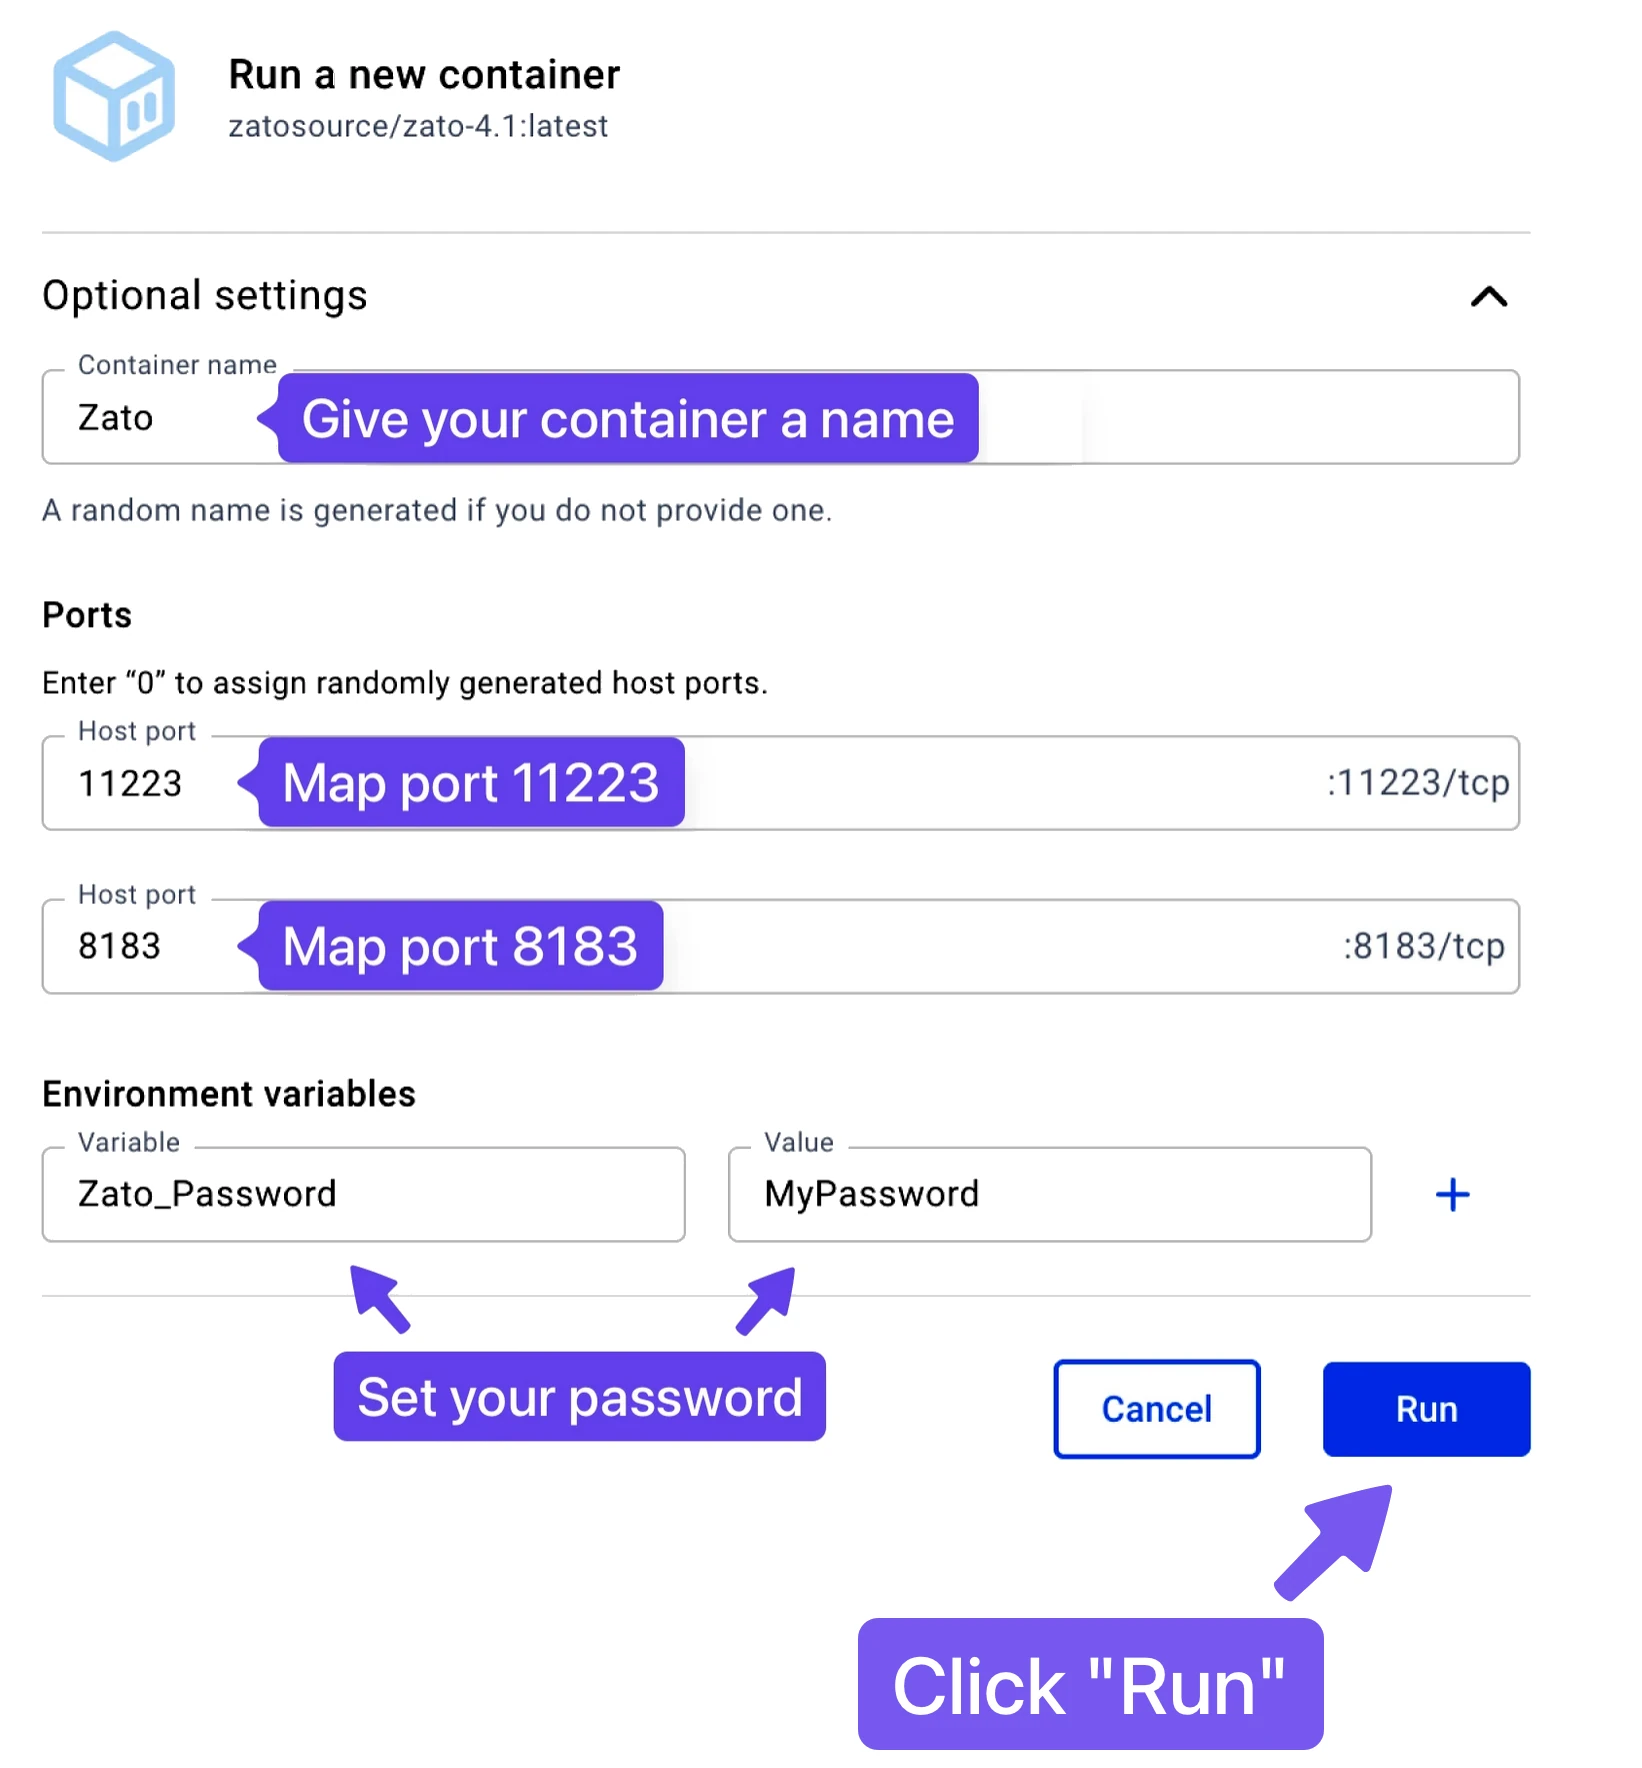
- Click "Run", wait for the container to start and log in to your Dashboard at http://localhost:8183
- Dashboard: http://localhost:8183
- Username: admin
- Password: The one that you set above

Your new environment comes with demo config already installed, including REST APIs and HL7 MLLP with FHIR.
That concludes the process - the best way to continue is to visit the tutorials now.
- Download the Zato Docker Quickstart image and create a new container, choosing your own password through the
Zato_Passwordvariable:
sudo docker run --pull=always -it --rm -p 22022:22 -p 8183:8183 -p 11223:11223 -p 11553:11553 \
  --name zato-4.1 -e Zato_Password=mypassword \
  zatosource/zato-4.1
Log in to your Dashboard once the container is up:
- Dashboard: http://localhost:8183
- Username: admin
- Password: the one that you set above
Your new environment comes with demo config already installed, including REST APIs and HL7 MLLP with FHIR.
Everything you build is stored in a project directory on your host, mounted into the container - you never need to enter the container itself. The deployment tutorial shows the complete workflow, and this is how a project is mounted and pointed at:
sudo docker run --pull=always -it --rm -p 22022:22 -p 8183:8183 -p 11223:11223 -p 11553:11553 \
  --name zato-4.1 -e Zato_Password=mypassword \
  -e Zato_Project_Root=/opt/hot-deploy/myproject \
  -v /path/to/myproject:/opt/hot-deploy/myproject:ro \
  zatosource/zato-4.1
- That concludes the process - the best way to continue is to visit the tutorials now.
Docker Compose provides a declarative way to define and run your Zato environment with persistent configuration and services.
Prerequisites
- Docker and Docker Compose installed on your system
- Clone the blueprint git repository with a sample Zato project structure
Basic setup
Create a docker-compose.yml file in your project directory:
version: '3.8'

services:
  zato:
    image: zatosource/zato-4.1:latest
    container_name: zato-quickstart
    ports:
      - "8183:8183"
      - "11223:11223"
      - "11553:11553"
      - "22022:22"
    environment:
      - Zato_Password=mypassword
      - Zato_Log_Env_Details=True
    restart: unless-stopped
Start the container:
Access your Dashboard at http://localhost:8183: * Username: admin * Password: mypassword
Production setup with persistent configuration
For production environments, mount your project directories to persist configuration and services:
version: '3.8'

services:
  zato:
    image: zatosource/zato-4.1:latest
    container_name: zato-production
    ports:
      - "8183:8183"
      - "11223:11223"
      - "11553:11553"
      - "22022:22"
    environment:
      - Zato_Dashboard_Password=${ZATO_DASHBOARD_PASSWORD}
      - Zato_IDE_Password=${ZATO_IDE_PASSWORD}
      - Zato_SSH_Password=${ZATO_SSH_PASSWORD}
      - Zato_Log_Env_Details=True
      - Zato_Env_Name=Production
    volumes:
      - ./myproject:/opt/hot-deploy/myproject:ro
      - ./myproject/config/enmasse/enmasse.yaml:/opt/hot-deploy/enmasse/enmasse.yaml:ro
      - ./myproject/config/auto-generated/env.ini:/opt/hot-deploy/enmasse/env.ini:ro
      - ./myproject/config/python-reqs/requirements.txt:/opt/hot-deploy/python-reqs/requirements.txt:ro
    restart: unless-stopped
The env.ini file written by the blueprint's provisioning script contains Zato_Project_Root, which is what makes the mounted project deployed and watched for changes - see hot deployment. When the file is not used, set the variable directly instead:
Create a .env file in the same directory to store passwords:
ZATO_DASHBOARD_PASSWORD=your_secure_password
ZATO_IDE_PASSWORD=your_ide_password
ZATO_SSH_PASSWORD=your_ssh_password
Start the environment:
Custom port configuration
Override default ports to avoid conflicts:
version: '3.8'

services:
  zato:
    image: zatosource/zato-4.1:latest
    container_name: zato-custom-ports
    ports:
      - "9000:9000"
      - "12000:12000"
      - "23000:22"
    environment:
      - Zato_Port_Dashboard=9000
      - Zato_Port_Load_Balancer=12000
      - Zato_Password=mypassword
      - Zato_Log_Env_Details=True
    restart: unless-stopped
Monitoring
The /metrics Prometheus endpoint is served on the ports already published above, with a password of your choosing:
version: '3.8'

services:
  zato:
    image: zatosource/zato-4.1:latest
    container_name: zato-monitored
    ports:
      - "8183:8183"
      - "11223:11223"
    environment:
      - Zato_Password=mypassword
      - Zato_Metrics_Password=metrics-password
    restart: unless-stopped
The monitoring guide shows how to connect Prometheus, Grafana and Datadog to it.
Common commands
View logs:
Stop the environment:
Restart the environment:
Pull latest image and recreate:
Environment variables reference
For a complete list of available environment variables, see the Environment Variables Reference.
Next steps
- Deploying Zato Projects - Learn about project structure and deployment
- Tutorials - Start building integration services
The same quickstart image runs on Kubernetes, installed with Helm, with the chart taking care of health probes and configuration delivery.
The installation command, ConfigMap-driven configuration, hot deployment of services, replica constraints and Ingress examples are all in the Zato on Kubernetes guide.
Once the container is up and you move past trying it out, the production checklist lists the steps that prepare it for production traffic.