The Akenza IoT platform, on its own, excels in collecting and managing data from a myriad of IoT devices. However, it is integrations with other systems, such as enterprise resource planning (ERP), customer relationship management (CRM) platforms, workflow management or environmental monitoring tools that enable a complete view of the entire organizational landscape.
Complementing Akenza's capabilities, and enabling the smooth integrations, is the versatility of Python programming. Given how flexible Python is, the language is a natural choice when looking for a bridge between Akenza and the unique requirements of an organization looking to connect its intelligent infrastructure.
This article is about combining the two, Akenza and Python. At the end of it, you will have:
Since WebSocket connections are persistent, their usage enhances the responsiveness of IoT applications which in turn helps to exchange occurs in real-time, thus fostering a dynamic and agile integrated ecosystem.
First, let's have a look at full Python code - to be discussed later.
 # -*- coding: utf-8 -*-

# Zato
from zato.server.service import WSXAdapter

# ###############################################################################################
# ###############################################################################################

if 0:
    from zato.server.generic.api.outconn.wsx.common import OnClosed, \
        OnConnected, OnMessageReceived

# ###############################################################################################
# ###############################################################################################

class DemoAkenza(WSXAdapter):

    # Our name
    name = 'demo.akenza'

    def on_connected(self, ctx:'OnConnected') -> 'None':
        self.logger.info('Akenza OnConnected -> %s', ctx)

# ###############################################################################################

    def on_message_received(self, ctx:'OnMessageReceived') -> 'None':

        # Confirm what we received
        self.logger.info('Akenza OnMessageReceived -> %s', ctx.data)

        # This is an indication that we are connected ..
        if ctx.data['type'] == 'connected':

            # .. for testing purposes, use a fixed asset ID ..
            asset_id:'str' = 'abc123'

            # .. build our subscription message ..
            data = {'type': 'subscribe', 'subscriptions': [{'assetId': asset_id, 'topic': '*'}]}

            ctx.conn.send(data)

        else:
            # .. if we are here, it means that we received a message other than type "connected".
            self.logger.info('Akenza message (other than "connected") -> %s', ctx.data)

# ##############################################################################################

    def on_closed(self, ctx:'OnClosed') -> 'None':
        self.logger.info('Akenza OnClosed -> %s', ctx)

# ##############################################################################################
# ##############################################################################################
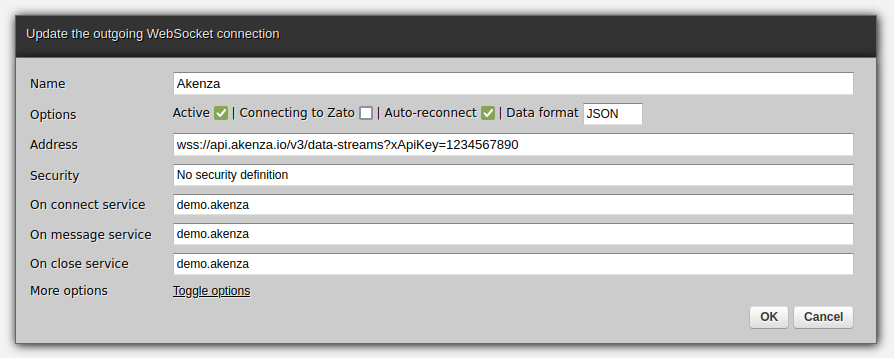
Now, deploy the code to Zato and create a new outgoing WebSocket connection. Replace the API key with your own and make sure to set the data format to JSON.

The WebSocket Python services that you author have three methods of interest, each reacting to specific events:
on_connected - Invoked as soon as a WebSocket connection has been opened. Note that this is a low-level event and, in the case of Akenza, it does not mean yet that you are able to send or receive messages from it.
on_message_received - The main method that you will be spending most time with. Invoked each time a remote WebSocket sends, or pushes, an event to your service. With Akenza, this method will be invoked each time Akenza has something to inform you about, e.g. that you subscribed to messages, that
on_closed - Invoked when a WebSocket has been closed. It is no longer possible to use a WebSocket once it has been closed.
Let's focus on on_message_received, which is where the majority of action takes place. It receives a single parameter of type OnMessageReceived which describes the context of the received message. That is, it is in the "ctx" that you will both the current request as well as a handle to the WebSocket connection through which you can reply to the message.
The two important attributes of the context object are:
ctx.data - A dictionary of data that Akenza sent to you
ctx.conn - The underlying WebSocket connection through which the data was sent and through you can send a response
Now, the logic from lines 30-40 is clear:
First, we check if Akenza confirmed that we are connected (type=='connected'). You need to check the type of a message each time Akenza sends something to you and react to it accordingly.
Next, because we know that we are already connected (e.g. our API key was valid) we can subscribe to events from a given IoT asset. For testing purposes, the asset ID is given directly in the source code but, in practice, this information would be read from a configuration file or database.
Finally, for messages of any other type we simply log their details. Naturally, a full integration would handle them per what is required in given circumstances, e.g. by transforming and pushing them to other applications or management systems.
A sample message from Akenza will look like this:
INFO - WebSocketClient -  Akenza message (other than "connected") -> {'type': 'subscribed',
'replyTo': None, 'timeStamp': '2023-11-20T13:32:50.028Z',
'subscriptions': [{'assetId': 'abc123', 'topic': '*', 'tagId': None, 'valid': True}],
'message': None}
An aspect not to be overlooked is communication in the other direction, that is, sending of messages to WebSockets. For instance, you may have services invoked through REST APIs, or perhaps from a scheduler, and their job will be to transform such calls into configuration commands for IoT devices.
Here is the core part of such a service, reusing the same Akenza WebSocket connection:
 # -*- coding: utf-8 -*-

# Zato
from zato.server.service import Service

# ##############################################################################################
# ##############################################################################################

class DemoAkenzaSend(Service):

    # Our name
    name = 'demo.akenza.send'

    def handle(self) -> 'None':

        # The connection to use
        conn_name = 'Akenza'

        # Get a connection ..
        with self.out.wsx[conn_name].conn.client() as client:

            # .. and send data through it.
            client.send('Hello')

# ##############################################################################################
# ##############################################################################################
Note that responses to the messages sent to Akenza will be received using your first service's on_message_received method - WebSockets-based messaging is inherently asynchronous and the channels are independent.
Now, we have a complete picture of real-time, IoT connectivity with Akenza and WebSockets. We are able to establish persistent, responsive connections to assets, we can subscribe to and send messages to devices, and that lets us build intelligent automation and integration architectures that make use of powerful, emerging technologies.
➤ Python API integration tutorials
➤ What is an integration platform?
➤ Python Integration platform as a Service (iPaaS)
➤ What is an Enterprise Service Bus (ESB)? What is SOA?
➤ Open-source iPaaS in Python