
Integrating with IBM MQ in Python
Using Zato, it is easy to make IBM MQ queues available to Python applications - this article will lead you step-by-step through the process of setting up the Python integration platform to listen for MQ messages and to send them to MQ queue managers.
Prerequisites
- First, install Zato - pick the system of your choice and follow the installation instructions
- In the same operating system where Zato runs, install an IBM MQ Client matching the version of the remote queue managers that you will be connecting to - an MQ Client is a redistributable package that lets applications, such as Zato, connect to IBM MQ and if your queue manager is at version 9, you also need an MQ Client v9.
Further steps will assume that Zato and MQ Client are installed.
Configuring Zato
- Install PyMQI - this is a low-level package that Zato uses for connections to IBM MQ. You can install it using pip - for instance, assuming that the 'zato' command is in /opt/zato/current/bin/zato, pip can be used as below. Note that we are using the same pip version that Zato ships with, no the system one.
Now, we need to enable IBM MQ connections in your Zato server - this needs to be done in a file called server.conf, e.g. assuming that your server is in the /opt/zato/env/dev/server1 directory, the file will be in /opt/zato/env/dev/server1/config/repo/server.conf
Open the file and locate the [component_enabled] stanza
Make sure that there is an entry reading "ibm_mq=True" in the stanza (by default it is False)
Save and close the file
If the server was running while you were editing the file, use 'zato stop' to stop it
Start the server with 'zato start'
If you have more than one Zato server, all the steps need to be repeated for each one
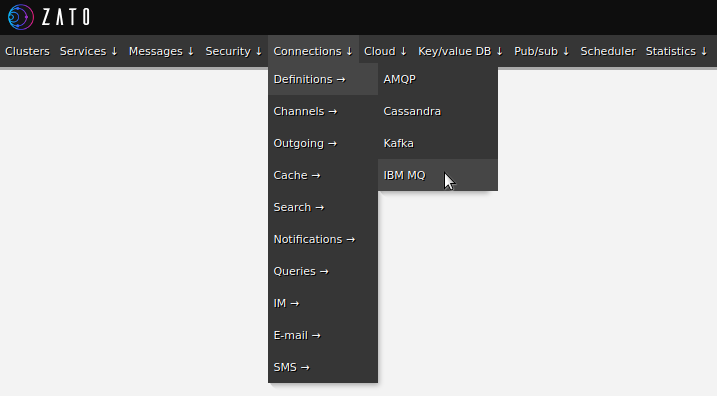
Understanding definitions, channels and outgoing connections
Most Zato connection types, including IBM MQ ones, are divided into two broad classes:
- Channels - for messages sent to Zato from external applications and data sources
- Outgoing connections - for messages sent from Zato to external connections and data sources
Moreover, certain connection types - including IBM MQ - make use of connection definitions which are reusable pieces of configuration that can be applied to other parts of the configuration.
For instance, IBM MQ credentials are used by both channels and outgoing connections so they can be defined once, in a definition, and reused in many other places.
Note that, if you are familiar with IBM MQ, you may already know what an MQ channel is - the term is the same but the concept does not map 1:1, because in Zato a channel always relates to incoming messages, never to outgoing.
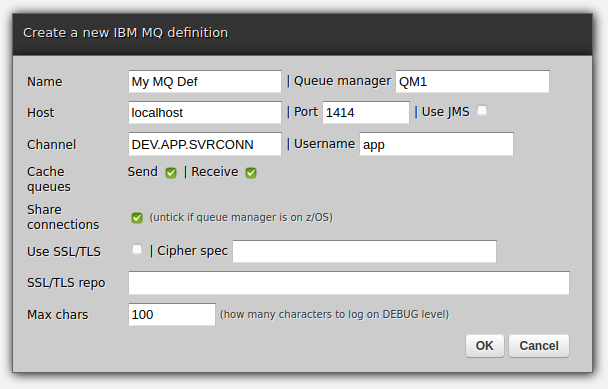
Let's configure Zato using its web-admin dashboard. We shall assume that your queue manager's configuration is the following:
- Queue manager: QM1
- Host: localhost
- Port: 1414
- Channel: DEV.APP.SVRCONN
- Username: app
- Queue 1: DEV.QUEUE.1 (for messages to Zato)
- Queue 2: DEV.QUEUE.2 (for messages from Zato)
But first, we will need some Python code.
Python API services
Let's deploy this module with two sample Zato services that will handle messages from and to IBM MQ.
You will note two aspects:
A Zato channel service is invoked each time a new message arrives in the queue the channel listens for - there is no MQ programming involved. Note that you can mount the same service on multiple Zato channels - it means that the service is reusable and a single one can wait for messages from multiple queues simultaneously.
The other service is a producer - it uses an outgoing connection to put messages on MQ queues. Again, you just invoke a method and Zato sends your message, there is no low-level MQ programming here. Just like with channels, it can be used for communication with multiple queues at a time.
# -*- coding: utf-8 -*-

# Zato
from zato.server.service import Service

class APIMQChannel(Service):
    """ Receives messages from IBM MQ queues.
    """
    name = 'api.mq.channel'

    def handle(self):

        # Our handle method is invoked for each message taken off a queue
        # and we can access the message as below.

        # Here is the business data received
        data = self.request.ibm_mq.data

        # Here is how you can access lower-level details,
        # such as MQMD or CorrelId.
        mqmd = self.request.ibm_mq.mqmd
        correl_id = self.request.ibm_mq.correlation_id

        # Let's log the message and some of its details
        self.logger.info('Data: %s', data)
        self.logger.info('Sent by: %s', mqmd.PutApplName)
        self.logger.info('CorrelId: %s', correl_id)

class APIMQProducer(Service):
    """ Sends messages to IBM MQ queues.
    """
    name = 'api.mq.producer'

    def handle(self):

        # Message to send as received on input,
        # without any transformations or deserialization,
        # hence it is considered 'raw'.
        msg = self.request.raw_request

        # Outgoing connection to use
        conn = 'My MQ Connection'

        # Queue to send the message to
        queue = 'DEV.QUEUE.2'

        # Send the message
        self.outgoing.ibm_mq.send(msg, conn, queue)

        # And that's it, the message is already sent!
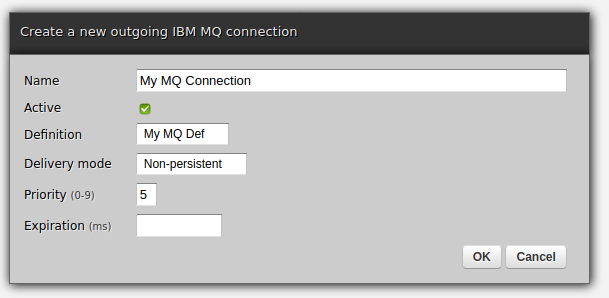
Connection definition
In web-admin, go to Connections -> Definitions -> IBM MQ and fill out the form as below. Afterwards, make sure to change your user's password by clicking Change password for the connection definition you have just created.
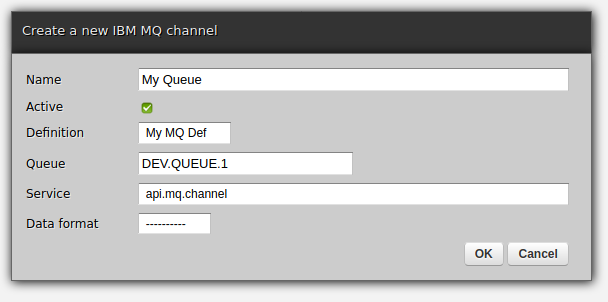
Channel
Let's create a new Zato channel to receive message sent from IBM MQ. In web-admin, create it via Connections -> Channels -> IBM MQ. In the Service field, use the channel service deployed earlier.
Outgoing connections
Testing the channel
We have configured everything as far as Zato goes and we can try it out now - let's start with channels. We can use IBM's MQ Explorer to put a message on a queue:
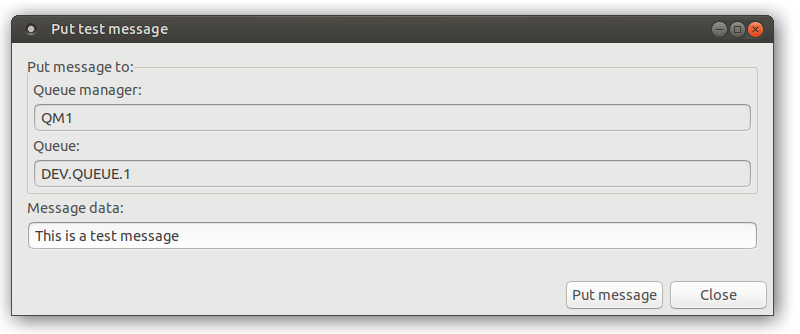
As expected, here is an entry from the Zato server log confirming that it received the message:
INFO - Data: This is a test message
INFO - Sent by: b'MQ Explorer 9.1.5           '
INFO - CorrelId: b'\x00\x00\x00\x00\x00\x00\x00\x00\x00...'
Testing the outgoing connection
The next step is to send a message from Zato to IBM MQ. We already have our producer deployed and we need a way to invoke it.
This means that the producer service itself needs a channel - for instance, if you want to make it available to REST clients, head over to these articles for more information about using REST channels in Zato.
For the purposes of this guide, though, it will suffice if we invoke our service from web-admin. To that end, navigate to Services -> Find "api.mq.producer" -> Click its name -> Invoker, and a form will show.
Enter any test data and click Submit - data format and transport can be left empty.
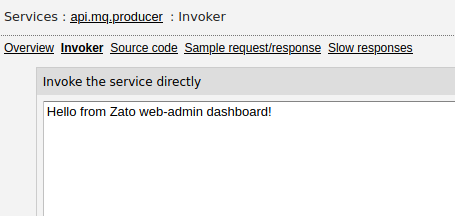
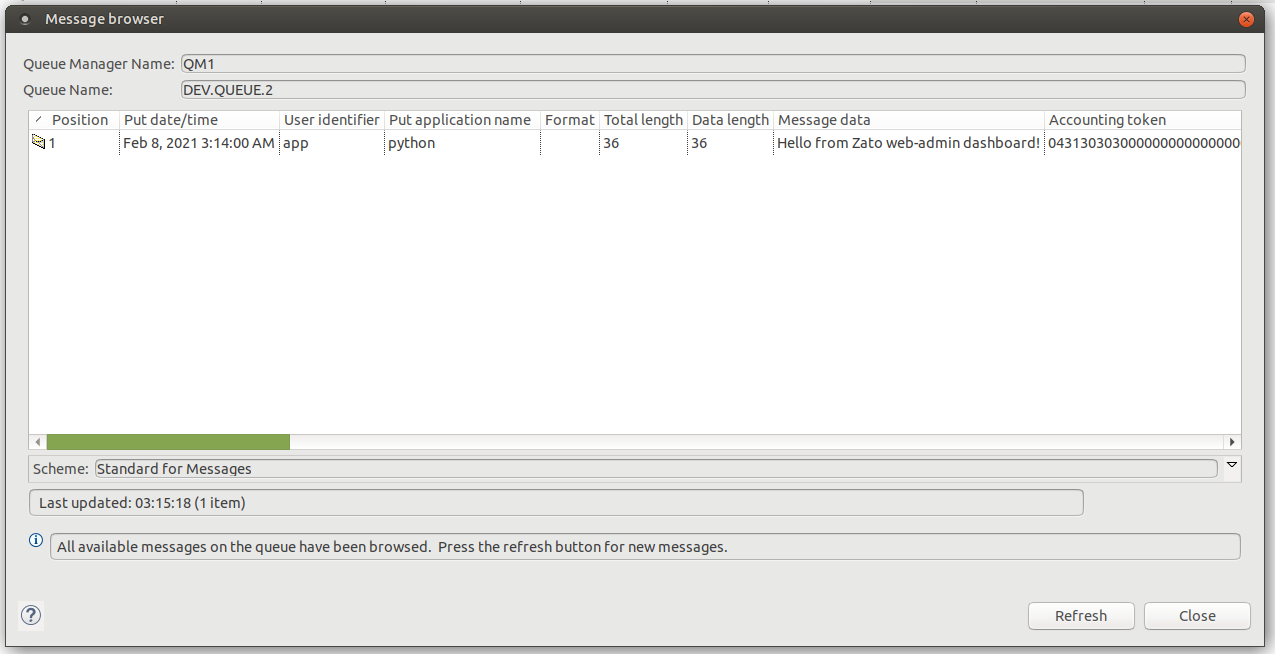
The message will go to your service and Zato will deliver it to the queue manager that "My MQ Connection" uses. We confirm it using MQ Explorer again:
Sending connections from the dashboard
At this point, everything is already configured but we can still go one better. It is often useful to be able to send test messages to queue managers directly from servers, without any service, which is exactly what can be done from an outgoing connection's definition page, as in these screenshots:
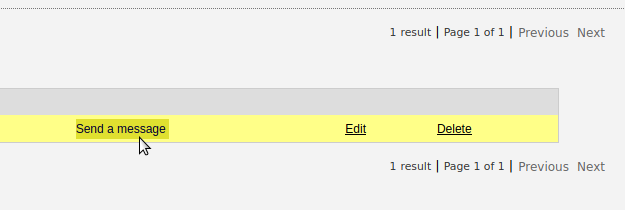
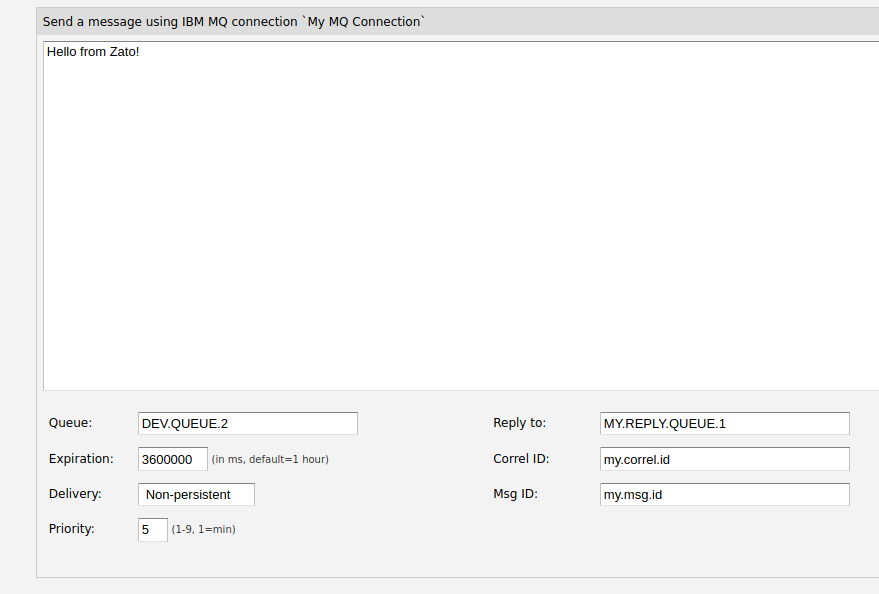
Note that the message is sent from a Zato server, not from the dashboard - the latter is just a GUI that delivers your message to the server. This means that it is a genuine test of connectivity from your servers to remote queue managers.
Log files
Finally, it is worth to keep in mind that there are two server log files with details pertaining to communication with IBM MQ:
- server.log - general messages, including entries related to IBM MQ
- ibm-mq.log - low-level details about communication with queue managers
With that, we conclude this blog post - everything is set up, tested and you are ready to integrate with IBM MQ in your Python projects now!