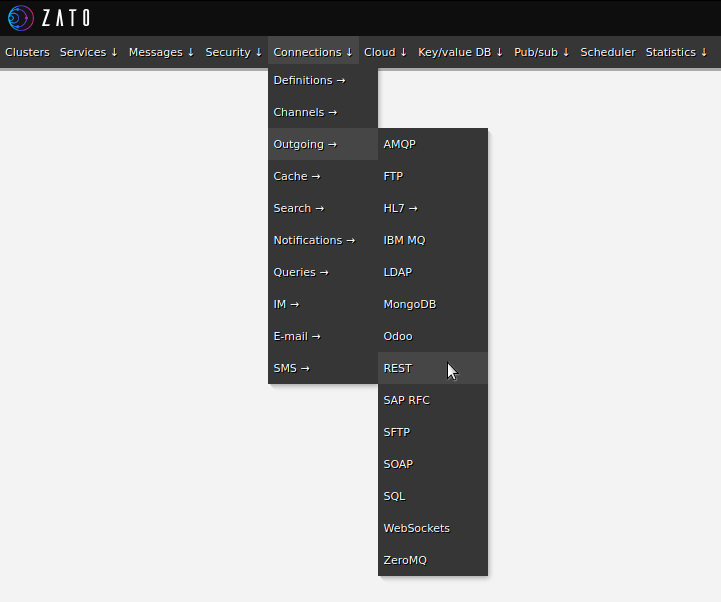
This Zato article is a companion to an earlier post - previously, we covered accepting REST API calls and now we will look at how Zato services can invoke external REST endpoints.
Similar to how channels are responsible for granting access to your services via REST or other communication means, it is outgoing connections (outconns, as an abbreviation) that let the services access resources external to Zato, including REST APIs.
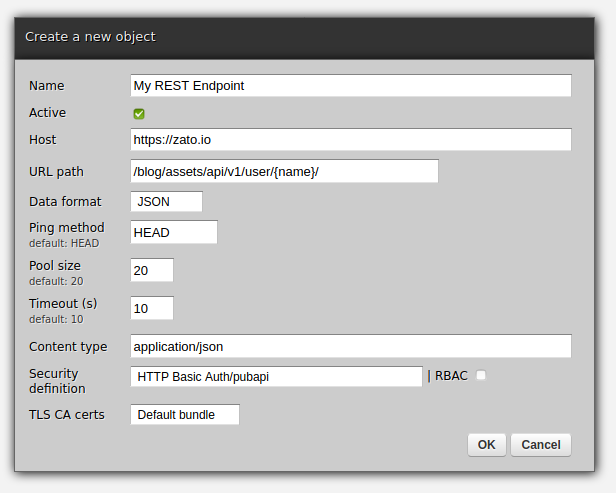
Here is a sample definition of a REST outgoing connection:


The Python implementation will follow soon but, for now, let's observe that keeping the two separate has a couple of prominent advantages:
The same outgoing connection can be used by multiple services
The configuration is maintained in one place only - any change is immediately reflected on all servers and services can make use of the new configuration without any interruptions
Most of the options of REST outconns have the same meaning as with channels but TLS CA certs may require particular attention. This option dictates what happens if a REST endpoint is invoked using HTTPS rather than HTTP, how the remote end's TLS certificate is checked.
The option can be one of:
A sample service making use of the outgoing connection is below.
# -*- coding: utf-8 -*-

# Zato
from zato.server.service import Service

class GetUserDetails(Service):
    """ Returns details of a user by the person's name.
    """
    name = 'api.user.get-details'

    def handle(self):

        # In practice, this would be an input parameter
        user_name = 'john.doe'

        # Name of the connection to use
        conn_name = 'My REST Endpoint'

        # Get a connection object
        conn = self.out.rest[conn_name].conn

        # A single dictionary with all the parameters,
        # Zato will know where each one goes to.
        params = {
            'name': user_name,
            'app_id': 'Zato',
            'app_version': '4.1'
        }

        # We are responsible for catching exceptions
        try:

            # Invoke the endpoint
            response = conn.get(self.cid, params)

            # Log the response
            self.logger.info('Response `%s`', response.data)

        # We caught an exception - log its details
        except Exception as e:
            self.logger.warn('Endpoint could not be invoked due to `%s`', e.args[0])
First, we obtain a connection handle, then the endpoint is invoked and a response is processed, which in this case means merely outputting its contents to server logs.
In the example, we use a constant user name and query string but in practice, they would be likely produced basing on user input.
Note the 'params' dictionary - when you invoke this service, Zato will know that 'name' should go to the URL path but all the remaining parameters will go to the request's query string. Again, this gives you additional flexibility, e.g. if the endpoint's URL changes from path parameters to query string, the service will continue to work without any changes.
Observe, too, that we are responsible for catching and handling potential exceptions arising from invoking REST endpoints.
Finally - because the outgoing connection's data format is JSON, you are not required to de-/serialize it yourself, the contents of 'response.data' is already a Python dict read from a JSON response.
At this point, the service is ready to be invoked - let's say, through REST, AMQP or from the scheduler - and when you do it, here is the output that will be seen in server logs:
Now, you can extend it to invoke other systems, get data from an SQL database or integrate with other APIs.