Remember: you can connect your AI copilot to Zato documentation for real-time, accurate answers throughout this tutorial.
pip install zato-apitest to install Zato API Test from PyPIYou can run it in the verbose mode too if you'd like to see all the headers and messages.
API tests are written in a directory that contains test files and related resources, such as test requests or responses.
To create the directory for a new project, run apitest init with a path that doesn't exist yet. This will create the directory with an initial structure for the project.
Remember, this directory must not exist, otherwise apitest will return an error.
You will get output as this:
Creating directory `/tmp/tutorial`.
OK, initialized.
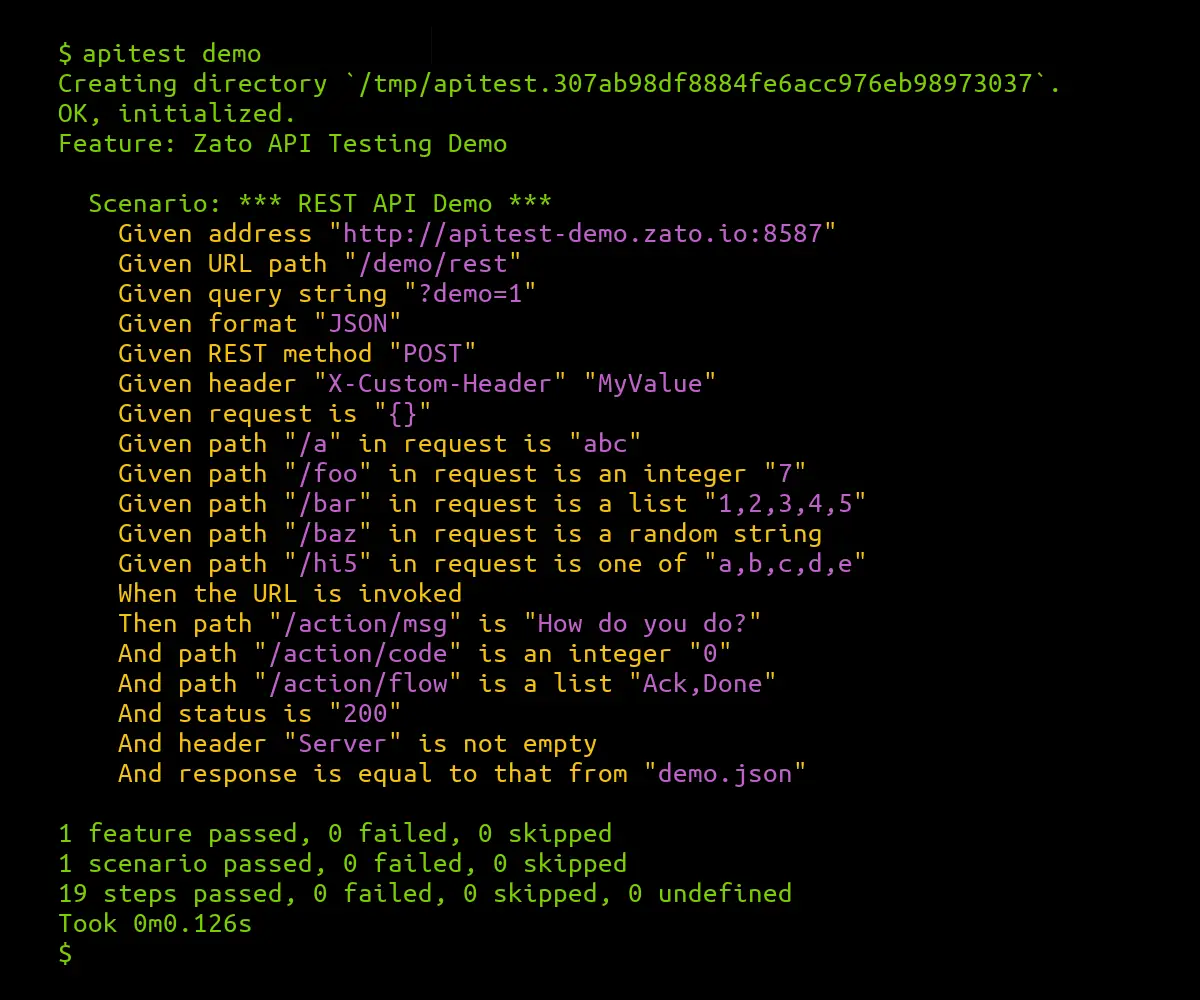
Run `apitest run /tmp/tutorial` for a live demo.
If you want, apitest run will let you run a live demo from the directory that you've just created.
Now that we have a directory for the tutorial, let's analyze the contents of what is inside.
Each collection of tests, each suite of tests, is called a feature. This makes sense, because you test features of a given business functionality.
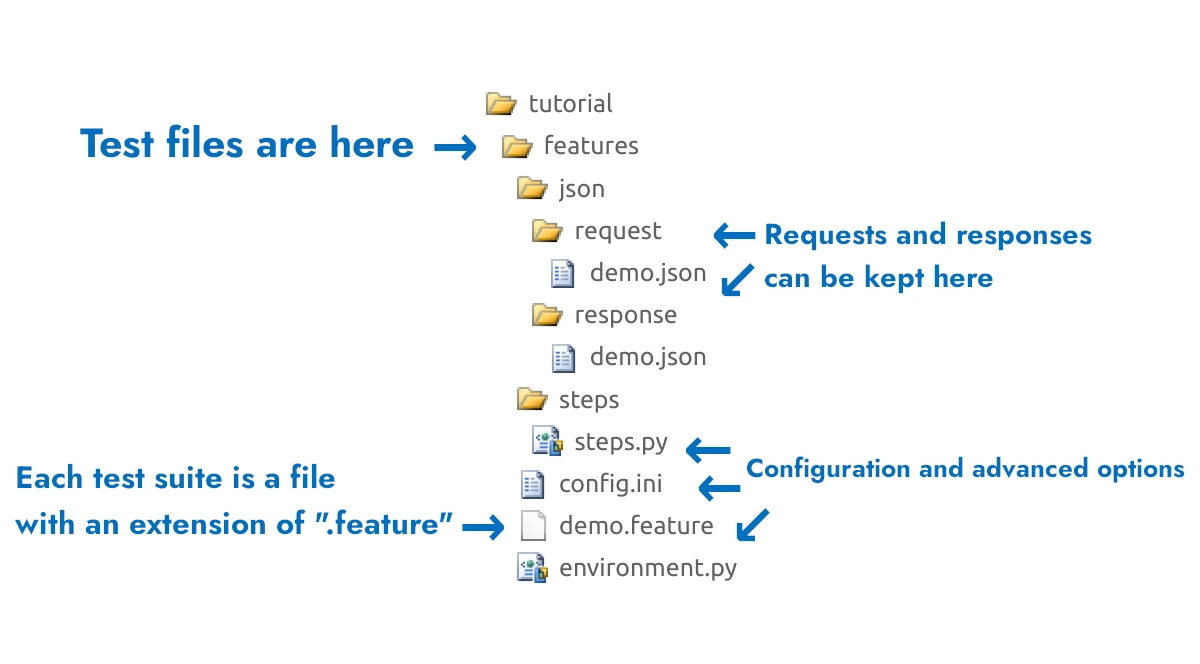
Each test suite is in its own file. Its name must end in ".feature", otherwise apitest will not recognize it as a file with tests.
It's sometimes convenient to keep requests and responses in their own files
Extra configuration and advanced options have their own dedicated files
The directories with all these files are relocatable. It means that you can create such a directory in one place, move it to any other place, another system or a different parent directory, and everything inside will still work.
Feature: API Testing Tutorial

Scenario: *** Resolve ZIP code ***

    Given address "https://api.zippopotam.us"
    Given URL path "/us/11223"
    Given REST method "GET"

    When the URL is invoked

    Then path "/country" is "United States"
    And path "/places/0/state" is "New York"
    And path "/places/0/place name" is any string
Now, run the test suite:
Or use the --verbose flag if you'd like to see all the headers, requests and responses that tests send and receive.
We can observe a few key points:
Each file with tests is composed of one or more scenarios. A scenario can test a specific business use case, like resolving a zip code to its location. More complex tests will have separate scenarios to prepare data, other scenarios to actually run your functional tests, and additional scenarios to clean up afterwards.
Each scenario is composed of steps. Any step beginning with "Given" prepares a request. A "When" may invoke an endpoint. Any step beginning with "Then" or "And" tests a response.
Both "Then" and "And" work the same but there must be one "Then" in a scenario before "And" steps can be used.
In each step, the value that goes between the quotation marks "" is what you put in yourself. For instance, in Given REST method "GET", you can put any method between the quotes, e.g. "POST" or "DELETE", depending on what's needed in a given test.
Steps in each scenario follow the same pattern:
You can choose from dozens of different steps. Some prepare requests before an endpoint is invoked, some are used to check responses.
Some steps will populate initial headers or JSON messages, whereas others will check if values in responses are strings, integers, lists or UUIDs, and yet different steps will create variables based on responses, to be used in subsequent scenarios.
All the steps that are available by default are listed in the reference.
You can create your API testing own steps in Python too.
So far, the tests ran in isolation but it's common for more advanced scenarios to first prepare test data, which is then used in an actual test, and to clean up everything after a test is done.
Let's do that now. Copy-paste the following to "tutorial.feature".
Feature: API Testing Tutorial Complex

Scenario: *** Get test data ***

    Given address "https://api.zippopotam.us"
    Given URL path "/us/11223"
    Given REST method "GET"
    Given I store "Earth" under "planet"

    When the URL is invoked

    Then path "/country" is "United States"
    And path "/places/0/state" is "New York"
    And path "/places/0/place name" is any string
    And I store "/country abbreviation" from response under "country_abbreviation"
    And I store "/places/0/state abbreviation" from response under "state_abbreviation"

Scenario: *** Push state data ***

    Given address "http://apitest-demo.zato.io:8587"
    Given URL path "/demo/rest"
    Given REST method "POST"
    Given request is "{}"
    Given path "/request_type" in request is "zip_data"
    Given path "/planet" in request is "#planet"
    Given path "/country_abbr" in request is "#country_abbreviation"
    Given path "/state_abbr" in request is "#state_abbreviation"

    When the URL is invoked
    Then status is "200"

Scenario: *** Clean up ***
    When this scenario is invoked
    Then context is cleaned up
Observe the highlighted lines.
The first three lines dynamically create so called local variables. The first one is hard-coded but the following two are extracted from the response that the first endpoint returns.
The other three lines make use of the local variables. You can access any previously created variable by prefixing it with the pound sign "#". In this way, you can have initial scenarios that create variables that other scenarios use. As an example, you can create customers and orders, store their IDs in local variables, and then invoke other APIs with these dynamically created variables on input.
Note that local variables need to be cleaned up as otherwise they would be still available in other scenarios and tests. Since the variables are kept in a so called context object, we clean it up in the last scenario in line 34.
As you keep adding more .feature files, it will become more and more useful to run only selected ones, rather than the entire test suite
In such a case, you can always point apitest to a specific file, rather than to the test project's top-level directory
For instance, this will only run tests from the "create-order.feature" file, which may be one among many others related to your CRM orders.
The topic of configuration is worth a side discussion as you'll often need to access reusable variables and it's certainly not a good idea to always hard-code them.
The are two places that you can read your variables from are the "config.ini" file and the environment.
First, config.ini.
You'll find config.ini in your project's directory. Inside, you'll note a section called [user]. Any key/value pair that you add to this section will become available to any of your steps using the "@" prefix.
For instance, let's say you have this in config.ini:
You can now refer to these keys in any step that requires them.
Given URL path "@default_url_path"
Given path "/planet" in request is "@default_planet"
And path "/places/0/state" is "@default_state"
Variables in config.ini are great for reusability. If you need to make use of the same information in multiple test suites, and it's not any kind of secret, then it should be kept in the file so that when there's a need to update a value, you'll be doing it in one place only.
Note, however, that secrets should not be kept in config.ini. Passwords, API keys or anything that is confidential or otherwise legally protected shouldn't go there because this file is stored in git, along with all the actual tests.
Now, on to the environment variables.
You can access environment variables by using the standard dollar sign "$" prefix.
For instance, assume that you have environment variables called DEFAULT_URL, DEFAULT_CALLBACK and DEFAULT_TIMEOUT, here's how you'd use them in your steps.
Given URL path "$DEFAULT_URL"
Given path "/request/callback" in request is "$DEFAULT_CALLBACK"
And path "/response/timeout" is "$DEFAULT_TIMEOUT"
Environment variables are akin to the ones from config.ini but they tend to be more variable.
For instance, in config.ini, you'd keep variables that are reusable but not necessarily changing across environments. If the same reusable variable can be re-used in your development and all the testing environments that you have, this should be a config.ini-based one.
On the other hand, if there's a variable whose value will be different in various environment, that should be an environment variable then.
Typically, config.ini variables will be more related to the actual business functionality, e.g. default account or order types or other pieces of information that is reusable, whereas environment variables are more related to the actual protocol-level API functionality and they may include credentials or other low-level details.
Note that you can combine the two in one step, e.g.:
Export your API key to an environment variable and use it as in the highlighted line.
Feature: API Testing Tutorial

Scenario: *** Use API key ***

    Given address "http://apitest-demo.zato.io:8587"
    Given header "X-My-API-Key" "$MY_API_KEY"
    Given URL path "/demo/rest"

    When the URL is invoked
    Then status is "200"
Store the Basic Auth username in config.ini, the password in an environment variable, and make use of them as below.
In this way, the username will be the same in each test that needs it but without hardcoding it.
At the same time, the password will not be a part of what is stored in git and you'll be able to change it in each of your environments.
Feature: API Testing Tutorial

Scenario: *** Use API key ***

    Given address "http://apitest-demo.zato.io:8587"
    Given Basic Auth "@username" "$MY_PASSWORD"
    Given URL path "/demo/rest"

    When the URL is invoked
    Then status is "200"
Store the OAuth2 address and username in config.ini, the password in an environment variable, and make use of them as below.
Observe how the token is obtained in a separate scenario. Thanks to this, you'll be able to reuse it in multiple, subsquent scenarios that test the actual functionality.
Also note that the OAuth2 context, meaning the configuration required to get a token but not the token itself, is cleaned up at the end because they are no longer required.
Feature: Zato API Testing OAuth2

Scenario: *** Get bearer token ***

    Given OAuth2 endpoint "@my_ouath2_endpoint"
    Given OAuth2 credentials "@my_ouath2_username" "$My_OAuth2_Password"
    Given I store an OAuth2 bearer token under "my_token"

Scenario: *** Get data ***
    Given address "https://example.com"
    Given URL path "/api"
    Given REST method "GET"
    Given OAuth2 bearer token "#my_token"

    When the URL is invoked
    Then status is "200"
    And  OAuth2 context is cleaned up
Many a time, JSON responses will contain lists. Use integer indexes to access each of them. Indexes start from 0, as in Python.
Let's go through a couple of examples.
In the first one, response is a dictionary and of its fields has a list value.
When the URL is invoked
Then status is "200"
And path "/users/0/user_id" is an integer "1"
And path "/users/1/user_id" is an integer "2"
In this example, the response is a list of dictionaries:
When the URL is invoked
Then status is "200"
And path "/0/user_id" is an integer "1"
And path "/1/user_id" is an integer "2"
Finally, the response in this example is a list of simple integers and strings.
When the URL is invoked
Then status is "200"
And path "/0" is an integer "123"
And path "/1" is an integer "456"
And path "/2" is "abc"
And path "/3" is "def"
--verbose flag, apitest will show all the data that the tests send and receive--verbose flag works with the demo tooExamples:
That's everything you need to know to start writing your own API tests in English.
Now you can: