Multi-server environments (HA)
Introduction
A multi-server environment will have more than one Docker Quickstart container running, with a total of more than one server. An external load-balancer will distribute the incoming traffic to one or more servers.
This is in contrast with single-server environments that have only one Zato container with one server.
About Docker Quickstart
Docker Quickstart is always the recommended way to run any Zato environment, from development, through testing, to production.
In very specific, niche cases, Zato support may advise that you use a different installation method. Otherwise, if you build your environments without support from Zato Source, always create them using Docker Quickstart.
When to use multi-server environments
Use multi-server environments if you would like to:
- Scale your environment horizontally, by adding more servers
- Implement HA (High Availability), by adding standby or active servers
Architectural considerations
If you have more than one server in your environment, consider that all of them run independently of each other, which means that:
If you use publish/subscribe, note that message queues are not shared across servers and each server will effectively act as a separate message broker. It means that you should use pub/sub on only one server in the whole environment, unless you specifically want for each server to be an independent message broker.
If you use the scheduler, it must be started in only one container in the whole environment. All jobs will always run in this container's server. It also means that one-time tasks scheduled dynamically should only be created by that one server.
If you don't use either pub/sub or the scheduler, you can add multiple servers with an external load-balancer in front of them without any further considerations.
What load-balancer to use
Most of the mainstream load-balancers will work well with Zato. The most commonly used ones are HAProxy, Envoy, NetScaler and AWS ELB.
Active/standby environments
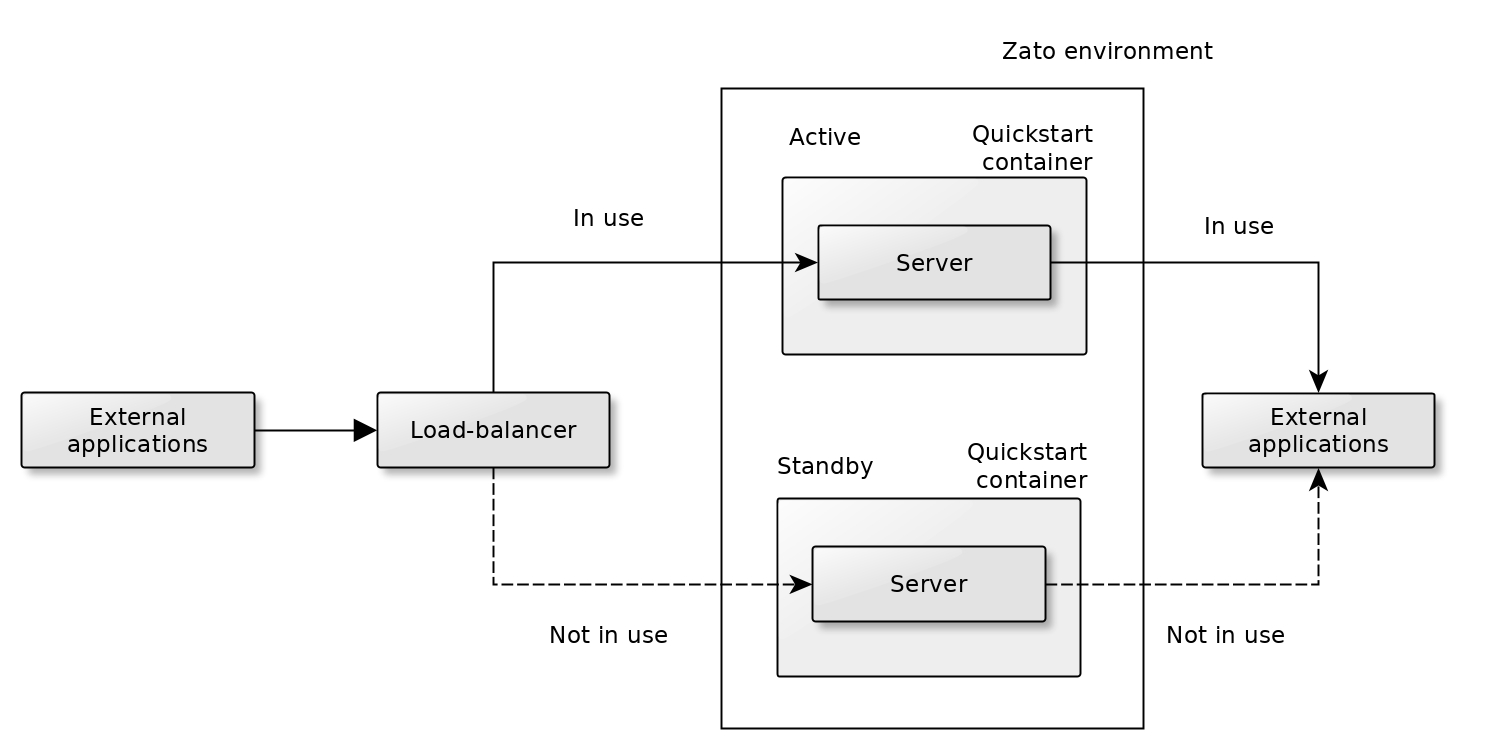
- In an environment of this type, there's one server that actively processes incoming requests. If you use pub/sub, all messages will be processed on this server. If you use the scheduler, all tasks run on this one server as well.
- Another server acts as a mirror copy but its container is not started and it doesn't accept any requests yet.
There are two ways to implement the standby server:
- Don't keep the host running - rather, start it only when it's required for the standby to take over the traffic, and then start a container on the host.
- Keep running the host on which a container with the standby server will run, but don't start the container until it's required.
Which way to choose will depend on your preferences and requirements. Consider that:
- If the standby host is not started, it will take a bit more time to first start the host, and then run the container on it. Yet, the startup time of the host is often much shorter than the startup time of the container itself, so it may be that this won't be a concern.
- If the standby host is started, it will always consume processing resources, which incurs costs. At the same time, the time to switch to the standby server will be slightly lower because the host will be already running, so only a container will have to be started.
In either case, the container with the standby server is not started until it's needed. It's only a question whether the host should be always running in the background or not.
It's recommended to choose the first method initially - not keeping the standby host running - and switch to the other one if you decide that it will be beneficial in your case.
The very act of switching the traffic from the active server to the standby one will be implemented using your own provisioning scripts and CI/CD pipelines.
Each Zato container will give you monitoring endpoints that let you decide whether the components inside the container are running or whether the standby server should be started.
For instance - your monitoring tool will be pinging the active server's monitoring endpoint once in 30 seconds. If 3 pings are missed, it will trigger a CI/CD script. The script will stop a container with the first server, and then the same script will start a new container on the mirror host, turning it into a new active server, then the script will notify your monitoring product, and the load-balancer in front of the servers, with information about which server is the active one and which is the standby now.
Active/active environments
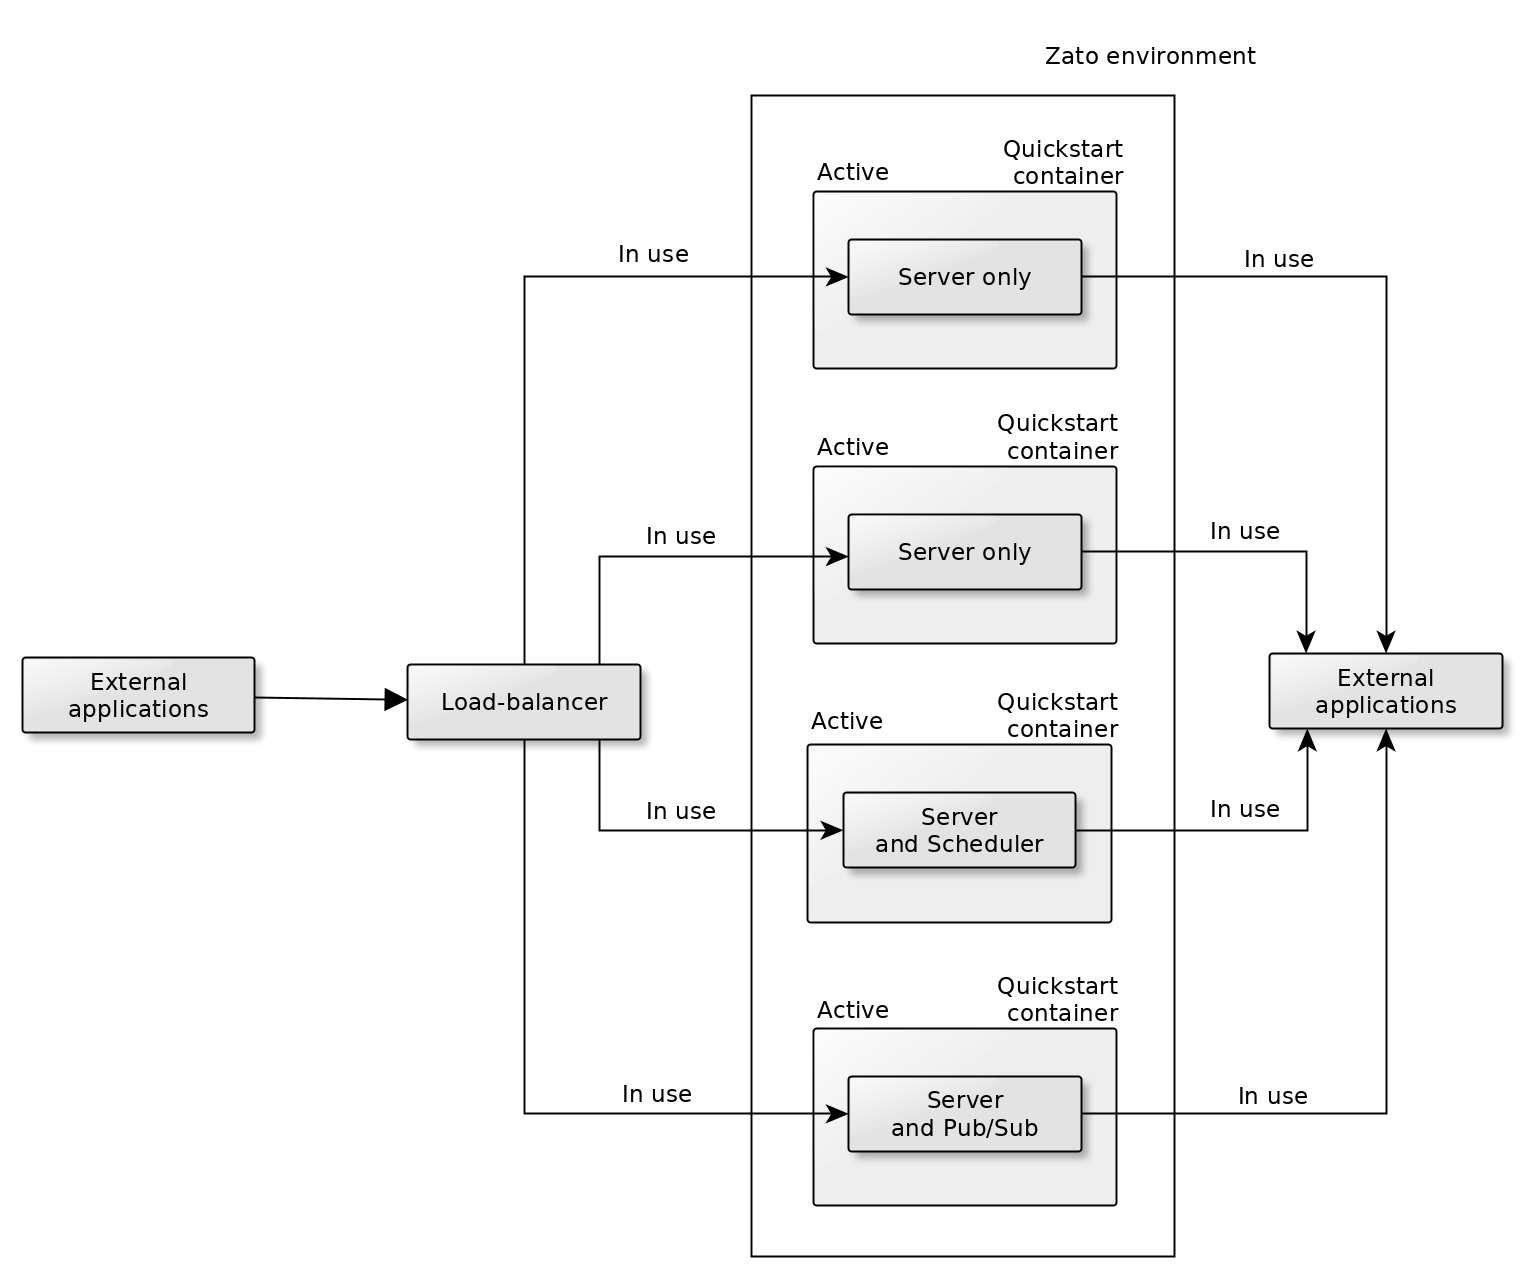
In an environment of this type, there's more than one server that actively processes incoming requests. If you use pub/sub, you need to configure the containers to start pub/sub in only one of them. Similarly, if you use the scheduler, you need to configure the containers to start the scheduler on only one of them.
With this configuration, multiple servers manage incoming requests, ensuring High Availability. Moreover, the use of multiple servers enhances the environment's performance.
By default, a starting container will start pub/sub. To prevent it, pass the
Zato_Start_PubSub=Falseenvironment variable when the container is starting. If you don't set this flag, or if you set it to True, the container's server will start pub/sub.Likewise, a starting container will by default start the scheduler. To prevent it, pass the
Zato_Start_Scheduler=Falseenvironment variable when the container is starting. If you don't set this flag, or if you set it to True, the container's server will start the scheduler.For instance - if you have 5 servers, and you set the scheduler's flag to False on 4 of them, only the fifth one will start the scheduler.
There are no limits as to how many active servers you can have in an environment.
Servers don't need to have direct TCP connectivity enabled between them. It means that each can run behind a firewall, with a load-balancer in front of them all, and each server can potentially be installed in a different geographic region.
Note that the servers with pub/sub and the scheduler don't need to accept API requests from the load-balancer. If it suits your requirements better, you can just treat them as servers dedicated to these tasks, without the overhead of handling incoming requests.
DevOps tools and CI/CD pipelines
- If you have a support contract with Zato Source, you'll get access to DevOps provisioning tools that will help you automate the process of setting up your environments. Other people use them extensively to conveniently provision their development, test and production environments, and they're a great time saver that let you focus on more interesting tasks. Contact Zato support to discuss the details.
Learn more
Schedule a meaningful demo
Book a demo with an expert who will help you build meaningful systems that match your ambitions
"For me, Zato Source is the only technology partner to help with operational improvements."
 — John Adams
Program Manager of Channel Enablement at Keysight ![]()