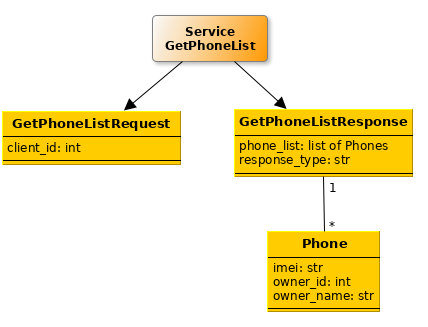
In the code example below, we assume that we need to represent the following business needs:
Graphically, it can be expressed as such:

In code, this will be the result as below, where each request, response and model object is a dataclass subclassing a class called Model.
# -*- coding: utf-8 -*-

# stdlib
from dataclasses import dataclass

# Zato
from zato.common.typing_ import list_
from zato.server.service import Model, Service

# ###########################################################################

@dataclass(init=False)
class Phone(Model):
    imei:       str
    owner_id:   int
    owner_name: str

# ###########################################################################

@dataclass(init=False)
class GetPhoneListRequest(Model):
    client_id: int

@dataclass(init=False)
class GetPhoneListResponse(Model):
    phone_list:    list_[Phone]
    response_type: str

# ###########################################################################

class GetPhoneDetails(Service):

    # Use API models
    input  = GetPhoneListRequest
    output = GetPhoneListResponse

    def handle(self):

        # Enable type checking and type completion
        request = self.request.input # type: GetPhoneListRequest

        # Log details of our request
        self.logger.info('Processing client `%s`', request.client_id)

        # Build our response now - in a full service this information
        # would be read from an external system or database.

        # Our list of phones to return
        phone_list = []

        # Build the fist phone ..
        phone1 = Phone()
        phone1.imei = '123'
        phone1.owner_id = 456
        phone1.owner_name = 'John Doe'

        # .. the second one ..
        phone2 = Phone()
        phone2.imei = '789'
        phone2.owner_id = 999
        phone2.owner_name = 'Jane Doe'

        # .. populate the container for phones that we return ..
        phone_list.append(phone1)
        phone_list.append(phone2)

        # .. build the top-level response element ..
        response = GetPhoneListResponse()
        response.response_type = 'RZH'
        response.phone_list = phone_list

        # .. and return the response to our caller
        self.response.payload = response

# ###########################################################################
This service is ready to be invoked with:
$ curl http://pubapi:<password>@localhost:17010/zato/api/invoke/phone.get-phone-list \
    -d '{"client_id":789}'
{"response_type":"RZH",
 "phone_list": [
    {"imei":"123","owner_id":456,"owner_name":"John Doe"},
    {"imei":"789","owner_id":999,"owner_name":"Jane Doe"}]}
$
To indicate that a particular field in a model is optional, use the code as below:
# stdlib
from dataclasses import dataclass

# Zato
from zato.common.typing_ import optional # Note the underscore in typing_
from zato.server.service import Model

@dataclass(init=False)
class Customer(Model):

    # This string field is optional, its default value is None
    email: optional[str] = None
Marking a response field as optional means that you are not required to populate it in your responses with any value, in which case the default one will be used.
The field as such will be always returned. Its value will be that which you assign to it or the default one if you do not give it any value.
For instance, note that the dict representation of the Customer object below uses the default value of None.
If the optional field is part of a request, the default value will be used only if the field is missing on input.
For instance, assume that your service expects a Customer object on input and the data sent is {} (an empty dict). In this case, your service will receive {'email': None} on input because the default value of None will be used for the "email" field.
Again, if the "email" field had existed on input, no matter what its value was, the default value would not have been used.
Your model can post-process the data it receives after Zato already de-serialized a request or input to a dataclass - this can be used for validation of data received or for additional post-processing, e.g. you can have an email field declared as a string and your model can further confirm that not only is it a string but it matches the expected email format or domain as well
The post-processing is done in a method called after_created, declared as below:
The ctx object has three attributes of interest:
Note that the method is invoked for each JSON or dict received, not for each individual field. It means that, if the method is invoked, it can assume that the common validation and processing tasks run by Zato have completed successfully, e.g. that all the non-optional fields are sure to exist at this point.
For instance, if you send this information in a request ..
.. the ctx.data dict will be {'client_id': 123, 'client_name':'John Done'} rather than 'client_id' and 'client_name' individually.
The ctx.service is the same service whose handle method is being invoked. Because it is a service, it means that it has access to everything that a service can do. For instance, for each dataclass received you can perform input validation using an external REST call. Or you can apply your own data masking, e.g. replacing credit card numbers with *** signs. There are no limits to what a service can do.
The after_created method should modify ctx.data in place, without returning anything when it is called.
from model import Clientserver.log file Each model has two convenience methods: .to_dict() and .to_json() that will serialize that model to a dict or JSON, respectively.
Thanks to these methods, models can be used to express complex dictionaries using statically typed dataclasses that may be easier to author and maintain.
For instance, when invoking ElasticSearch, you may be required to build a complex dict to express various query filters. Instead of that, create your own models that represent ElasticSearch filters and serialize them using .to_dict().
There are also many situations where a JSON string is needed - build your data using models and call .to_json() when the time comes for serialization.
Models can be used when you invoke one Zato service from another, e.g.:
# -*- coding: utf-8 -*-

# stdlib
from dataclasses import dataclass

# Zato
from zato.server.service import Model, Service

# ###########################################################################

@dataclass(init=False)
class GetClientRequest(Model):
    client_id: int

@dataclass(init=False)
class GetClientResponse(Model):
    client_name: str

# ###########################################################################

class APIService(Service):
  def handle(self):

      # The service that will be invoking
      name = 'my.api.get-client'

      # Build our request ..
      request = GetClientRequest()
      request.client_id = 123

      # .. and get client details - note that we indicate in a type hint
      # .. what the actual model we have in the response.
      response = self.invoke(name, request) # type: GetClientResponse

# ###########################################################################

class GetClient(Service)

    # Use API models
    input  = GetClientRequest
    output = GetClientResponse

    def handle(self):

        # Enable type checking and type completion
        request = self.request.input # type: GetClientRequest

        # Log what we are doing ..
        self.logger.info('Returning data for %s', request.client_id)

        # .. build our response ..
        response = GetClientResponse()
        response.client_name = 'Jane Doe'

        # .. and return it to our caller.
        self.response.payload = response

# ###########################################################################
Models can be used to invoke REST APIs directly, without a need for serialization to dicts or JSON.
# -*- coding: utf-8 -*-

# stdlib
from dataclasses import dataclass

# Zato
from zato.server.service import Model, Service

# ###########################################################################

@dataclass(init=False)
class GetClientRequest(Model):
    client_id: int

@dataclass(init=False)
class GetClientResponse(Model):
    client_name: str

# ###########################################################################

class APIService(Service):
  def handle(self):

      # The REST endpoint
      name = 'My Client API'

      # Build our request ..
      request = GetClientRequest()
      request.client_id = 123

      # .. invoke the endpoint ..
      response = self.out.rest.post(self.cid, request)

      # .. read the response data + enable type checking and type completion ..
      response = response.data # type: GetClientResponse

      # .. and log what we have received.
      self.loger.info('Data received %s', response.client_name)

# ###########################################################################
Definitions of services that use models can be exported to OpenAPI
Note that integration with OpenAPI is on the level of services, no matter if there are direct REST channels for them or not. This means that you can have, for instance, a service that is accessible primarily through WebSockets, but you can be still able to access it through OpenAPI clients, which can be useful because now you can invoke your services from any OpenAPI-compatible tool, such as Postman below, even if the service normally does not use REST.
Export services to OpenAPI:
Invoke one of them in Postman:

In addition to OpenAPI, it is also possible to generate full API specifications which include HTML documentation as well
This is useful if you need to offer static documentation for your API, particularly if your servers are internal ones and your tech partners cannot access them directly - simply generate an API specification and make it available as a static site without a need for opening access to your internal servers
Create a full API specification:
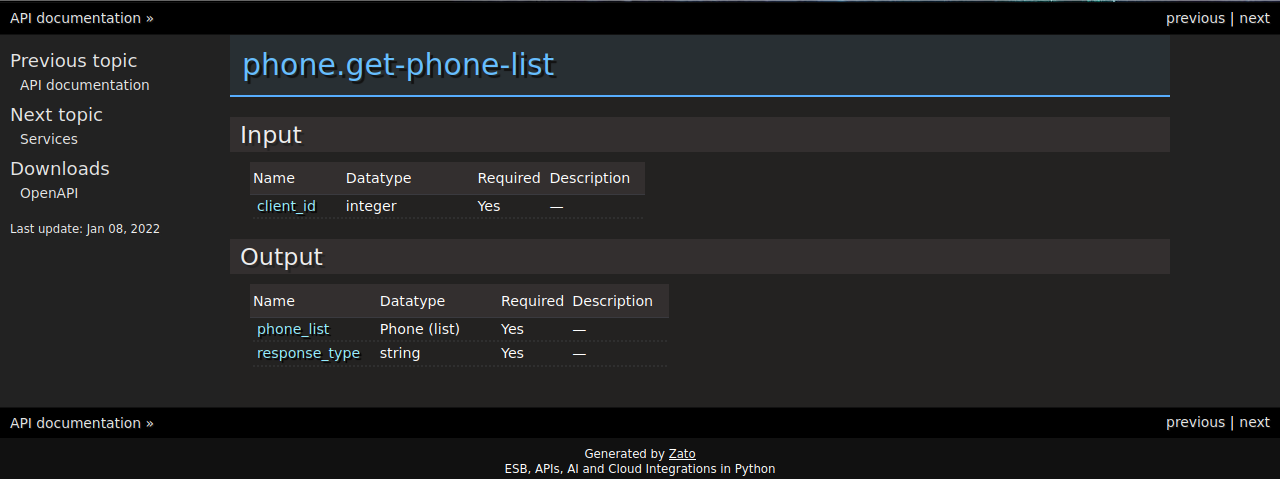
We can open it in a browser now - note that the OpenAPI definition is still there and can be downloaded as well.
Main page:

Details of a particular service:

Book a demo with an expert who will help you build meaningful systems that match your ambitions
"For me, Zato Source is the only technology partner to help with operational improvements."