
This is a real-world Python scheduling guide for developers and engineers who need their jobs and tasks to actually run reliably in production, not just in local testing environments.
Have you ever wondered how you can efficiently automate your Python API calls, tasks, jobs and workflows using a background scheduler with sub-minute task intervals (e.g. invoke such and such API once in 10 seconds)? You're in the right place then.
Remember: you can connect your AI copilot to Zato documentation for real-time, accurate answers throughout this tutorial.

To get started, install Zato under Docker. Zato is a platform that runs API integrations and automations, and it also comes with its own Python scheduler which is what we're going to use in this tutorial
This installation process is straightforward, just make sure to map the ports and to enter a password to your environment.
Once it's running, log in to the dashboard at http://localhost:8183. The username is "admin" and the password is what you set.
Once you're logged in, click "My settings" in the top-right hand corner, and then set your timezone. The default one is UTC, so make sure to change it if that isn't your timezone, as otherwise the scheduled jobs wouldn't start according to your local time.


Select "Scheduler" in the main menu, and that will give you a simple and intuitive interface for tasks scheduling:

Click "Create a new job: interval-based":

Fill out the form as below:
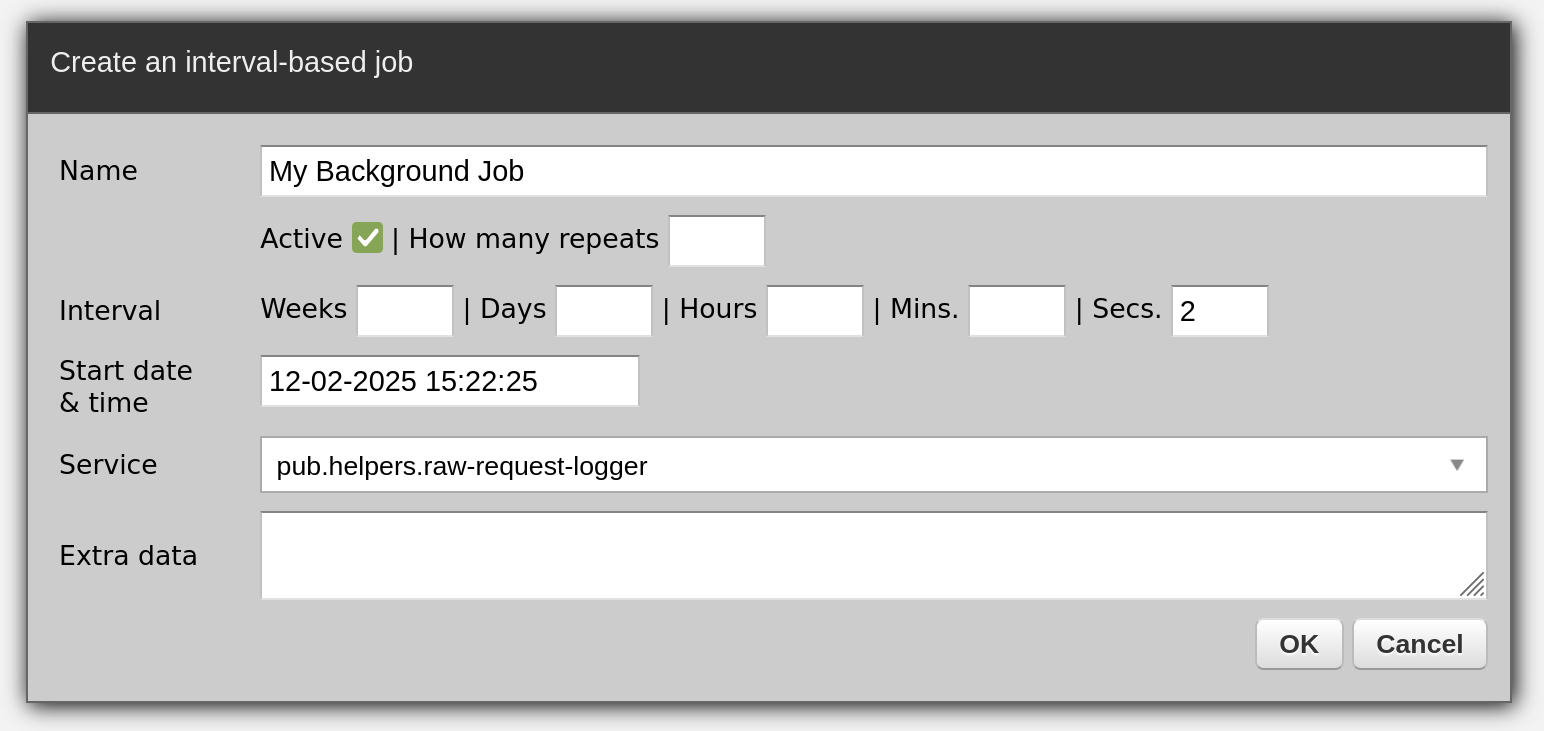
Watch in the logs as your background job runs once in 2 seconds:
2025-02-12 15:22:25 - INFO - pub.helpers.raw-request-logger:0 - Received request: ...
2025-02-12 15:22:27 - INFO - pub.helpers.raw-request-logger:0 - Received request: ...
2025-02-12 15:22:29 - INFO - pub.helpers.raw-request-logger:0 - Received request: ...
Now, that was easy and the same workflow, the same pattern will be always in use:
In a nutshell:
Your Zato scheduler runs inside a Docker container with alongside your API server, so you get everything you need in one place without complicated setup or coordination between components.
The scheduler runs in the background and executes any Python code you point it to.
These pieces of code are called services, and they're the building blocks of your scheduled automations - whether you're calling external APIs, processing data, or integrating with other systems.
That's the gist of it. Now, we're ready to create our own services that will be invoked on a schedule, but first, we'll talk more about what a service is.
Python services encapsulate the code you want to execute as part of your scheduled jobs. These services are the building blocks of your automation processes, ensuring that your tasks run efficiently and reliably.
A well-defined service should have a clear purpose and be easy to understand. This approach not only makes your code more maintainable but also simplifies troubleshooting and debugging.
Since the platform gives you the scheduler, you don't need to program any scheduling code yourself. You just write the actual Python code of what should happen.
Here are a few real-world examples of jobs that people schedule in production, and it's worth observing how often jobs of this kind run, and what the immediate benefits were.
| Job | Interval and Benefits |
|---|---|
| 2 hours. Multiple sales teams can have their Salesforce data automatically synchronized with all their other systems without waiting for manual updates or dealing with complex workflows. Each piece of data - customers, deals, and other records - gets handled by its own focused service, which means faster processing and clearer visibility into what's happening with each type of data. |
| 5 seconds. Now, the operations team can track the health of their entire IoT fleet through a single monitoring point, catch issues the moment they appear, and aggregate status data from all their devices regardless of make, model, or original monitoring capabilities. |
| 6 hours. When a new employee starts, all the needed data flows automatically to the right places - their profile appears in the training system, their onboarding checklist gets created, and their access credentials are set up, all without the HR team having to touch multiple systems. |
| 10 minutes. QA teams gained the ability to monitor, adjust and control everything from a single place, without dealing with cron jobs scattered across multiple systems. |
OK, with that background information in mind, we can create our own services now.
Here's a simple service that will connect to one endpoint, get the result of an API call, map it to a different format, and then it will send it to another API.
# -*- coding: utf-8 -*-

# Zato
from zato.server.service import Service

class MyService(Service):

    def handle(self):

        # Configuration
        get_user_address    = 'https://zato.io/tutorial/api/get-user'
        create_user_address = 'https://zato.io/tutorial/api/create-user'

        # Get a user from a remote API ..
        response = self.rest.get(get_user_address)
        message = response.json()

        # .. create an empty request ..
        request = {}

        # .. fill it out with the value from the first call ..
        request['user_type']      = message['UserType']
        request['account_number'] = message['AccountNumber']

        # .. invoke the Create User API with the new request ..
        response = self.rest.post(create_user_address, data=request)

        # .. and log the status code received.
        self.logger.info(f'Status code: {response.status_code}')
If you've ever used the popular Python "requests" library, you'll note that self.rest is 100% with that library. Everything you've been doing using "requests" can be moved to your services 1:1.
There are other, more advanced ways to invoke APIs, but for quick jobs, "self.rest" will work perfectly.
Let's say you want to pull some information from an MS SQL database. Here's how you'd do it, and note again that the service itself doesn't even know it's being invoked from the scheduler - from its perspective, it's simply connecting to your database to process some rows.

# -*- coding: utf-8 -*-

# Zato
from zato.server.service import Service

class MyService(Service):
    def handle(self):

        # Connection to use
        name = 'My MS SQL Connection'

        conn = self.outgoing.sql.get(name)
        session = conn.session()

        # Procedure to invoke
        proc_name = 'get_current_user'

        # Arguments it has on input
        args = ['my.user.id']

        data = session.callproc(proc_name, args)

        # Data is a list of dictionaries, each of which
        # represents a single row of data returned by the procedure.
        for row in data:

            # Process each row here
            pass
Check here for more information about SQL connections.
Finally, you can easily invoke Bash scripts from your services, as below. These can be either inline commands as in the example below, or your own existing scripts that you need to plug into a scheduler.
# -*- coding: utf-8 -*-

# Zato
from zato.server.service import Service

class MyService(Service):

    def handle(self):

        # Command to execute ..
        command = 'cd /tmp && ls -la && whoami && uname -a'

        # .. invoke it now ..
        result = self.commands.invoke(command)

        # .. log the data returned ..
        self.logger.info('Stdout -> %s', result.stdout)
        self.logger.info('Stderr -> %s', result.stderr)

        # .. log exit code and other useful information as well.
        self.logger.info('Exit code -> %s', result.exit_code)
        self.logger.info('Timed out -> %s', result.is_timeout)
To learn the whole API for invoking shell commands, visit here.
And remember - the scheduled jobs and services are independent. You can have the same service attached to multiple jobs, and they will all run independently.
You just need to create as many jobs as needed.
You may be curious, if everything runs in a container, what happens when I stop it? Won't my jobs be gone?
It's an excellent question with an easy answer: no, they won't be gone because you can export your jobs to a YAML format before you stop your container. Then, your new container will import them again and they will continue to run. Just remember to save your services locally too.
Here's a quick peek into how such a YAML export file looks, and all the details are in these two chapters.
scheduler:

  - name: My Background Job
    service: pub.helpers.raw-request-logger
    job_type: interval_based
    start_date: 2025-12-02 15:22:25
    seconds: 2
    is_active: true