
This is a practical, hands-on Python REST API tutorial in plain English, written for modern developers who need to build real B2B solutions, based on real-world experience and know-how from the trenches.
What you'll find here are the details of current best practices, of what works now in REST APIs, and how to build API-first systems in the contemporary world.
What you won't find here are obscure history lessons, theoretical findings from 20 years ago, or other irrelevant technical details that have little bearing on what API integrations actually look like today.
Remember: you can connect your AI copilot to Zato documentation for real-time, accurate answers throughout this tutorial.
Learn like a senior developer - plain-English explanations, zero unnecessary complexity
Practice-driven learning - dive into practical, hands-on development using battle-tested patterns
Production-ready results in 60 minutes - everything you need to build professional Python APIs
Remember that API stands for an Application Programming Interface. In other words, it's just a way for an application - or a database, a system - to expose its functionality to other interested parties.
API clients is the term under which the interested parties are known, even though each API client can be another backend system, or an actual client application. In other words, an "API client" means "that which invokes an API", no matter who or what it actually is. It could be an external application, but it could very well be another part of the same application.
An API endpoint is an individual element of an API that clients invoke. So, let's say you build an API for an employee database - as you'll be doing in this tutorial - and this interface will let clients manage employee data. Each such action will be exposed to clients as an individual API endpoint.
REST used to be expanded into "representational state transfer" but practically no one uses this term anymore, and very few people actually were using it back when it was coined.
What matters today is that REST is an architecture, a set of guidelines, patterns and best practices driving the design of robust APIs that use HTTP to offer interfaces to API clients.
An example REST API endpoint will be this one:
This endpoint, this URL, lets you access information about a particular user. As an API client, you send an HTTP request and the server returns a response about a specific resource, which in this case is a user whose ID is 123.
Behind each endpoint is an API service. This is the actual code that reacts to requests and which produces responses to clients. We're going to write API services in Python in this tutorial.
CRUD is a related term. It means Create, Read, Update and Delete and these are the most commonly seen operations that you carry out on your resources. I.e. you typically create a user, read the details of a user, and then you often update user details and sometimes delete a user as well.
Is there a difference between REST APIs and APIs? Yes and no. APIs can be implemented in many ways, and the term itself has been around for decades, before anyone thought of REST or the Internet itself.
But, when talking about backend systems, the word "REST" is often implied. So, know that "API" has a much broader meaning than just "REST API", but when you and the people you're talking with understand the context, you'll often shorten "REST API" to "API" alone.
For instance, you can say both e.g. "I'll create an API" or "We need a set of REST APIs". Either is fine. Similarly, an "API client" is often shortened to "client" when the context is clear, while an "API endpoint" becomes an "endpoint".
What never works though is "I'll add a REST" or "Let's invoke their REST". That doesn't sound right at all.
Similarly, you'll talk about "clients and servers" without always adding "API". And remember, one server can be an API client of another server, the roles are relative.
You may hear about "web services" from time to time and the concept is essentially the same - you have a client, server, a request and response, and the parties communicate using HTTP. The term as such is much older and more generic than REST, but today they're synonymous because most web services use REST, so when you say "we're building web services", you'll be almost certainly understood and the meaning will be "we're building REST APIs".
Is there a difference between a "Web API" and "REST API"? Not really. While both terms describe HTTP-based APIs, "Web API" is less commonly used and suggests public Internet services. "REST API" is the preferred term, especially when describing internal or enterprise integrations.

This tutorial uses Zato so go here, install the platform, and log in to your dashboard at http://localhost:8183 (username: admin).
Zato comes with its own IDE, so once you're logged in to the Dashboard, you can navigate to Services → IDE, and you'll be able to follow the tutorial in this way too.
Let's quickly create an API service. Save the below in a file called "api.py":
# -*- coding: utf-8 -*-

# Zato
from zato.server.service import Service

class GetEmployee(Service):

    def get_data(self):

        # Our sample data ..
        data = {'name':'John Doe', 'employee_no':123, 'department':'HR'}

        # .. which we can return to our caller..
        return data

    def handle(self):

        # Get our data ..
        data = self.get_data()

        # .. and return a response to the calling API client.
        self.response.payload = data

# ###################################################################################
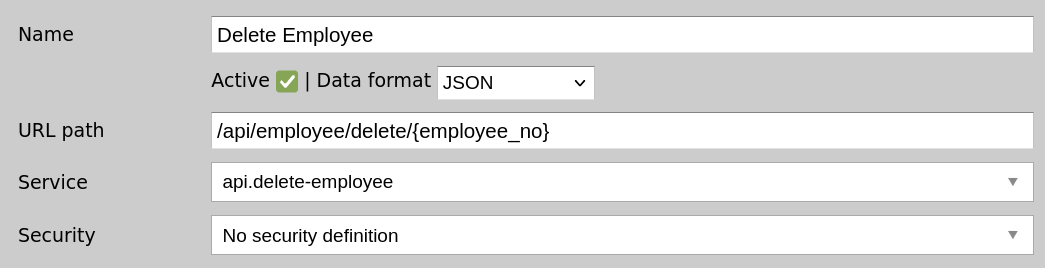
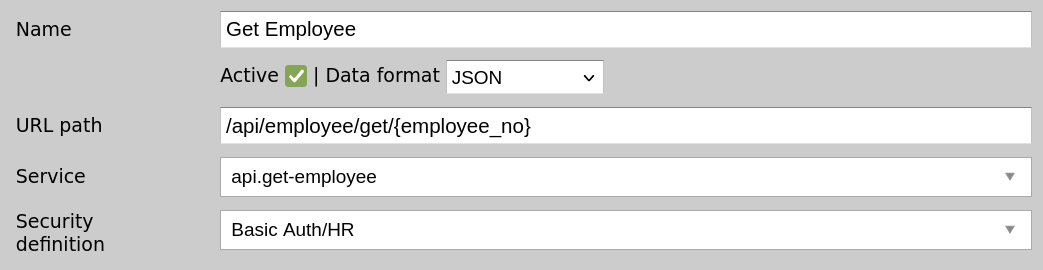
Now, we need a REST endpoint for it. Go to Connections → Channels → REST, click "Create a new REST channel", and fill out the form as below.
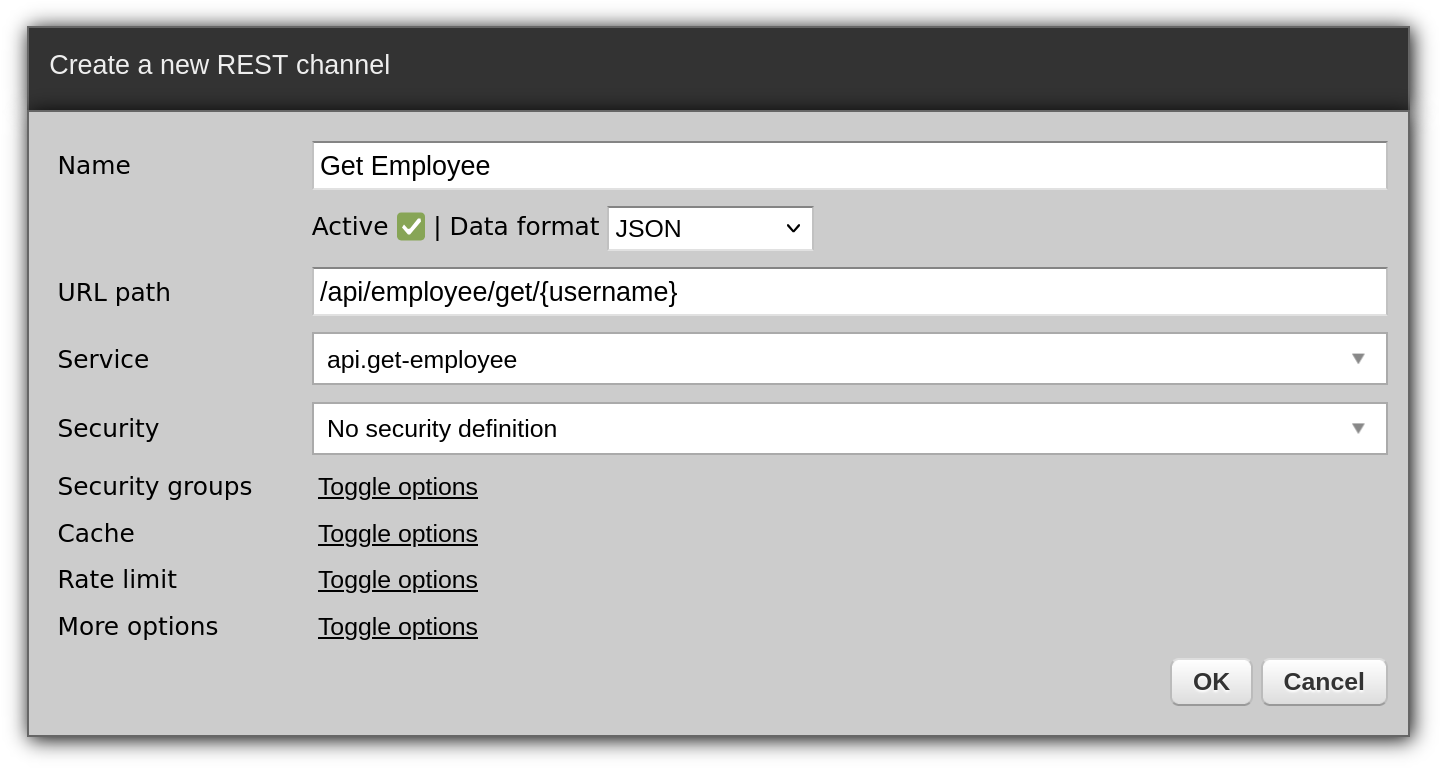
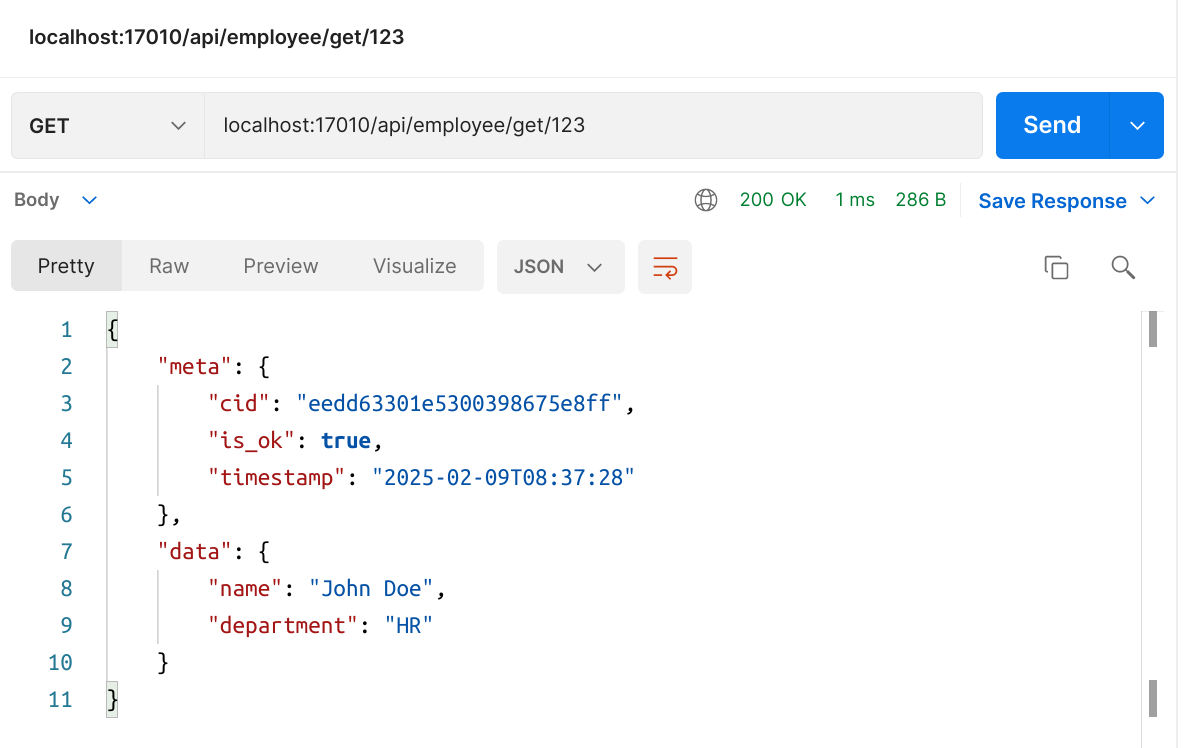
Invoke the newly created endpoint using the GET HTTP method:
curl -X GET localhost:17010/api/employee/get/123
{"name":"John Doe","employee_no":123,"department":"HR"}
That's the gist of it. Now, let's talk more about REST principles, what this architectural style is about and the details of what it offers.
Afterwards, we'll create a full Employee API in Python, use Postman to invoke it, and we'll also write API tests in plain English.
Clients may potentially use HTTP methods to tell your services what they want to happen with a given resource - for instance, whether they would do GET the details of it, or to the contrary, whether they want to DELETE it.
For instance, you can design your APIs that will let the clients differentiate between the two:
While elegant in theory, real-world implementations rarely follow such a clean pattern because real-world business processes and requirements rarely fit into such neat boxes with simple request-response cycles.
Nevertheless, the bare minimum when choosing which HTTP method to use should be:
| Method | Description |
|---|---|
| GET | GET is for reading, nothing else. It should return the requested resource - whether that's a single employee or a list of employees with their office locations - without modifying any business data. Never use a GET request as a trigger for other operations. If someone requests an employee record, just return it. Don't use this as an opportunity to clean up old data, remove unrelated archive files, or trigger background jobs. These kinds of side effects belong in different endpoints with appropriate HTTP methods. |
| DELETE | DELETE makes resources inaccessible. Whether it's a hard delete (removing database records) or a soft delete (marking records as inactive), the end result is the same: the resource becomes inaccessible through the API. |
| POST | POST can be used as a catch-all method for any other operation. Unlike its more specialized siblings, POST can handle any type of action. Whether you're creating resources or running complex business processes, POST works. But use this flexibility wisely - if another HTTP method fits your use case better, prefer that instead. |
GET is the only method you'll realistically cache in production.
Take employee data as an example: since it rarely changes, your response from "GET /api/employee/123" can be safely cached for hours or even days.
Instead of hitting the database on every request, you can serve employee details from cache, significantly reducing database load and response times.
You may come across two other HTTP methods, although they aren't used that commonly:
| Method | Description |
|---|---|
| PUT | PUT completely updates an existing resource. |
| PATCH | PATCH partially updates an existing resource. |
This sounds straightforward but the reality is messier than this idealized model suggests, and it's not always easy to say where to use which one, which in turn leads to confusion among the users of your APIs, and to completely unnecessary discussions among the teams that create them.
The boundaries between PUT and PATCH often blur in real-world APIs, leading to two problems: API clients struggle to predict the right method to use, and API design discussions get bogged down in lengthy debates about method choice. While the theory is elegant, practical implementation decisions require trade-offs.
Default to POST when the choice isn't obvious. It's the accepted catch-all for data modifications, and every developer understands this convention. Save your energy for solving real business problems rather than debating HTTP method semantics. Your API clients will understand the intent: if it's not reading (GET) or removing (DELETE) data, POST is the safe choice.
The DELETE method itself raises interesting questions too. Consider soft deletion: if you're just marking an employee as inactive while keeping their records accessible to admins for six months, is DELETE the right choice? Or should you PATCH the status field instead? And when do you perform the actual deletion?
This ambiguity explains why it's often better to opt for a simpler approach: stick to GET and POST, encoding the intended action in the URL path. Instead of debating HTTP methods, you might use endpoints like:
GET  /api/employee/read/{employee_name}
POST /api/employee/deactivate/{employee_name}
POST /api/employee/archive/{employee_name}
POST /api/employee/remove/{employee_name}
You'll inevitably encounter clients that only support POST requests - especially in enterprise environments. In such a case, embrace a practical solution: move the action into your URL path instead of depending on HTTP methods to convey intent:
Also, you'll sometimes meet API clients that understand only two actions: GET and POST. Use GET for getting things out of your systems (read-only operations), and then POST for everything else. Design your URLs as above to handle API clients of this sort.
Finally, the HTTP protocol lets you define your own custom HTTP methods, such as "MODIFY" or "REVOKE", but don't do it. Use only standard HTTP methods - don't make life difficult for other people.
What does "stateless" mean in REST APIs? Let's analyze it through a real-world example: a train connection search engine. Consider two approaches to designing this API:
Bad design (stateful)
The stateful approach creates several problems:
Good design (stateless)
Every request contains all the needed information:
In a stateless design, each request stands alone. It doesn't matter which server handles it or when it arrives - all the information needed is right there in the URL.
This makes the API:
This illustrates why REST APIs should be stateless: avoid storing request context on the server when you can include it in the request itself.
GET is unique among HTTP methods because it's designed to be read-only. But let's look at what "read-only" really means in production systems when you send multiple requests asking for the same resource.
When you GET a resource, your monitoring system might log the request, your analytics might track the access pattern, and your audit system might record who accessed what. These operations do modify server state, so maybe you shouldn't use GET after all?
The answer is that you can still use GET because the key distinction is this: GET should never modify the resource state itself or any business-relevant data. System-level operations like logging, monitoring, and auditing are acceptable side effects that don't violate GET's core principle of being safe for resource state.
So the practical rule is simple: if a GET request changes something that a client cares about or could notice - that's a violation. If it only affects behind-the-scenes operational concerns - that's perfectly fine.
In real-world APIs, these status codes do the heavy lifting:
| Status code | Description |
|---|---|
| 200 OK | 200 OK is all you need for success. Use it for all successful operations - whether you're returning data, confirming a deletion, or completing any other action. While HTTP defines other 2xx status codes, they often create more confusion than clarity. Stick to 200 OK as your universal success indicator. |
| 400 Bad Request | 400 Bad Request - client-side errors is used whenever the client's request can't be processed due to their input - whether it's malformed data, invalid parameters, or a non-existent resource. This covers all client errors except security-related issues (that's what 403 is for). |
| 403 Forbidden | 403 Forbidden - all security issues. Use this status code for any security-related rejection: invalid credentials, missing authentication, or insufficient permissions. While HTTP defines 401 for missing or unknown credentials and 403 for permission issues, real-world APIs are simpler: your clients always know what credentials to use, they just might get them wrong. Standardize on 403 for all auth failures. |
When working with clients that can't process HTTP status codes properly, you'll need to always return 200 OK and include the real status in your response payload. This pattern looks like here:
# API client sends:
GET /api/create-employee/richard.roe

# You'll need to return:
HTTP status: 200 OK
Message: {"status":404, "message":"No such employee"}
| Status code | Description |
|---|---|
| 404 Not Found |
|
| 500 Internal Server Error | 500 Internal Server Error - unhandled exceptions only. Let this status code happen naturally when your code throws an unexpected error. Never return it explicitly in your error handling. This convention is deeply ingrained in web development, and deviating from it will only confuse your API clients. |
| 503 Service Unavailable | 503 Service Unavailable - who sent it really? While 503 seems perfect for indicating temporary system overload or downstream dependencies being down, it has a practical limitation: clients can't tell if the 503 comes from your API or from infrastructure components like load balancers, gateways, or proxies. This ambiguity makes it difficult to handle 503 responses meaningfully. |
HTTP status codes like 404 and 503 predate modern REST APIs - they were designed for web servers serving HTML pages, not for APIs exchanging data. While these codes made sense in their original context, they can create ambiguity in API scenarios.
This historical baggage explains why many modern APIs don't use them at all, or use them with extra care, preferring instead to return 200 OK with detailed status information in the response body. This approach gives you more control over error handling and eliminates ambiguity about where the status code originated.
HTTP status codes break down in practice for several reasons:
This is why robust APIs include a "meta" object in JSON responses to provide richer status information. Beyond basic HTTP status codes, this lets you communicate specific error conditions and helpful messages.
This is required because complex business systems create status code ambiguities that HTTP alone can't resolve:
For instance:
{
    "meta": {
        "status": 200,  // Same as the HTTP status
        "is_ok": false, // The actual status of the operation
        "error_code": "HR_NOT_FOUND",
        "message": "Employee exists in Payroll but not in HR"
    }
}
This helps to answer some nagging questions:
In these situations, you often need to balance competing concerns. For instance, in our example, using 200 OK with "is_ok: false" prioritizes encapsulation:
We consciously avoid 400 Bad Request because:
This separation achieves two goals:
Standardize on a clear meta response structure that can express these nuances. Keep your HTTP status codes simple (stick to 200, 400, 403, 503), and put the detailed business logic in your meta object. Don't venture into obscure HTTP status codes - they'll only add to the confusion.
Keeping detailed status information in your response's meta object gives your APIs one unexpected advantage - it increases the flexibility and portability of your APIs.
While your REST API uses HTTP status codes today, you might need to expose the same functionality over message queues (e.g. IBM MQ, AMQP), publish/subscribe, or other protocols tomorrow, so this is something to keep in mind too.
In REST, clean URLs are API endpoint addresses that humans can easily read and understand without documentation.
They follow logical patterns and clearly indicate what resource you're working with. For example, consider these two URLs for an employee API:
What makes a URL clean:
Some examples used by RESTful applications:
GET /api/departments/sales/employees  # Get all employees in Sales
GET /api/employee/123/projects/active # Get active projects for employee john.doe
GET /api/teams/engineering/managers   # Get Engineering team managers
Correlation IDs help track requests across distributed systems. Think of them as package tracking numbers - they let you, and your API clients, trace a single request's journey through multiple services, logs, and databases.
For example, when your API returns:
{
    "meta": {
        "cid": "3080a00bb34f4c7ebcb3e22f9cc41bd6", // Correlation ID
        "timestamp": "2025-07-19T14:30:00Z"        // Response timestamp on server
    },
    "data": {
        "employee_no": 123,
        "name": "John Doe"
    }
}
This ID becomes invaluable when:
In Zato, each time your service is invoked, it will have access to the current correlation ID via self.cid.
Best practices:
This simple addition makes production support significantly easier, especially in complex distributed systems.
With all the background information in mind, it's time for some Python programming now.
Here's how a complete CRUD set of operations will look like. You can copy-paste it into the same "api.py" file as previously. And by the way, "api.py" is just a name, you can as well call it "employee.py" or similar.
Create it in your IDE, and read the discussion that follows.
# -*- coding: utf-8 -*-

# stdlib
from dataclasses import dataclass

# Zato
from zato.common.typing_ import strdict
from zato.server.service import Model, Service

# ###################################################################################

@dataclass(init=False)
class Meta(Model):
    cid: 'str'
    is_ok: 'bool'
    timestamp: 'str'

# ###################################################################################

@dataclass(init=False)
class GetRequest(Model):
    employee_no: 'int'

@dataclass(init=False)
class GetResponseData(Model):
    name: 'str'
    department: 'str'

@dataclass(init=False)
class GetResponse(Model):
    meta: 'Meta'
    data: 'GetResponseData'

# ###################################################################################

@dataclass(init=False)
class CreateRequest(Model):
    name: 'str'
    department: 'str'

@dataclass(init=False)
class CreateResponseData(Model):
    is_success: 'int'

@dataclass(init=False)
class CreateResponse(Model):
    meta: 'Meta'
    data: 'CreateResponseData'

# ###################################################################################

@dataclass(init=False)
class UpdateRequest(Model):
    employee_no: 'int'
    name: 'str | None'
    department: 'str | None'

@dataclass(init=False)
class UpdateResponse(Model):
    meta: 'Meta'

# ###################################################################################

@dataclass(init=False)
class DeleteRequest(Model):
    employee_no: 'str'

@dataclass(init=False)
class DeleteResponse(Model):
    meta: 'Meta'

# ###################################################################################

class EmployeeService(Service):
    """ Base Python class for all employee-related services.
    """

    def get_meta(self, is_ok:'bool') -> 'Meta':

        # Build the model ..
        meta = Meta()

        # .. fill it out ..
        meta.cid = self.cid
        meta.is_ok = is_ok
        meta.timestamp = self.time.utcnow()

        # .. and return it to our caller.
        return meta

# ###################################################################################

class GetEmployee(EmployeeService):

    input  = GetRequest
    output = GetResponse

    def get_data(self, employee_no:'int') -> 'strdict':

        # Log what we're doing ..
        self.logger.info(f'cid:{self.cid} -> Returning employee data for {employee_no}')

        # .. and return the data to our caller.
        return {'EmployeeName':'John Doe', 'EmployeeDept':'HR'}

    def handle(self):

        # Add type hints
        input:'GetRequest' = self.request.input

        # Invoke our data source to obtain the employee data ..
        employee_data = self.get_data(input.employee_no)

        # .. prepare our business response ..
        response_data = GetResponseData()

        # .. map employee data to our model ..
        response_data.name = employee_data['EmployeeName']
        response_data.department = employee_data['EmployeeDept']

        # .. use True in is_ok to indicate that there were no errors ..
        meta = self.get_meta(True)

        # .. build our response ..
        response = GetResponse()

        # .. attach both meta and business data ..
        response.meta = meta
        response.data = response_data

        # .. and return everything to our API client.
        self.response.payload = response

# ###################################################################################

class CreateEmployee(EmployeeService):

    input  = CreateRequest
    output = CreateResponse

    def save_data(self, data:'CreateRequest') -> 'int':

        # Log what we're doing ..
        self.logger.info(f'cid:{self.cid} -> Adding employee: {data}')

        # This is the place in which your service
        # will communicate with a database to save the data ..

        # .. in this tutorial service, we're simply always returning the same ID ..
        employee_id = 123

        # .. we can return it now.
        return employee_id

    def handle(self):

        # Add type hints
        input:'GetRequest' = self.request.input

        # Invoke our data source to save the employee data ..
        employee_no = self.save_data(input)

        # .. prepare our business response ..
        response_data = CreateResponseData()
        response_data.employee_no = employee_no

        # .. use True in is_ok to indicate that there were no errors ..
        meta = self.get_meta(True)

        # .. build our response ..
        response = CreateResponse()

        # .. attach both meta and business data ..
        response.meta = meta
        response.data = response_data

        # .. and return everything to our API client.
        self.response.payload = response

# ###################################################################################

class UpdateEmployee(EmployeeService):

    input  = UpdateRequest
    output = UpdateResponse

    def save_data(self, data:'UpdateRequest') -> 'None':

        # Log what we're doing ..
        self.logger.info(f'cid:{self.cid} -> Updating employee: {data}')

        # This is the place in which your service
        # will communicate with a database to save the data.

    def handle(self):

        # Add type hints
        input:'UpdateRequest' = self.request.input

        # Invoke our data source to save the employee data ..
        self.save_data(input)

        # .. use True in is_ok to indicate that there were no errors ..
        meta = self.get_meta(True)

        # .. build our response ..
        response = UpdateResponse()

        # .. attach the meta object ..
        response.meta = meta

        # .. and return everything to our API client.
        self.response.payload = response

# ###################################################################################

class DeleteEmployee(EmployeeService):

    input  = DeleteRequest
    output = DeleteResponse

    def delete(self, data:'DeleteRequest') -> 'None':

        # Log what we're doing ..
        self.logger.info(f'cid:{self.cid} -> Deleting employee: {data}')

        # This is the place in which your service
        # will communicate with a database to delete the record.

    def handle(self):

        # Add type hints
        input:'DeleteRequest' = self.request.input

        # Invoke our data source to save the employee data ..
        self.delete(input)

        # .. use True in is_ok to indicate that there were no errors ..
        meta = self.get_meta(True)

        # .. build our response ..
        response = DeleteResponse()

        # .. attach the meta object ..
        response.meta = meta

        # .. and return everything to our API client.
        self.response.payload = response

# ###################################################################################
This REST implementation is an employee management API with basic operations (get, create, update, delete) for employee records.
What you see is a template for building REST APIs with consistent structure and error handling.
Each API operation is a regular Python class whose "handle" method handles incoming requests.
Because it's plain Python code, we can move the common functionality to a base class called "EmployeeService".
Each API operation has two main parts:
Every API response includes two sections:
Each operation (get, create, update, delete) follows the same pattern:
The code emphasizes good practices:
UpdateRequest demonstrates how Zato simplifies parameter handling in your API code:
Every line of code in your API services should tell a story through its comments. Think of these comments as signposts guiding future developers on their journey through your codebase. Since APIs often live for years or even decades, clear comments help maintainers understand your code's intent without having to decode each line. This documentation isn't just good practice - it's essential for long-term maintainability.
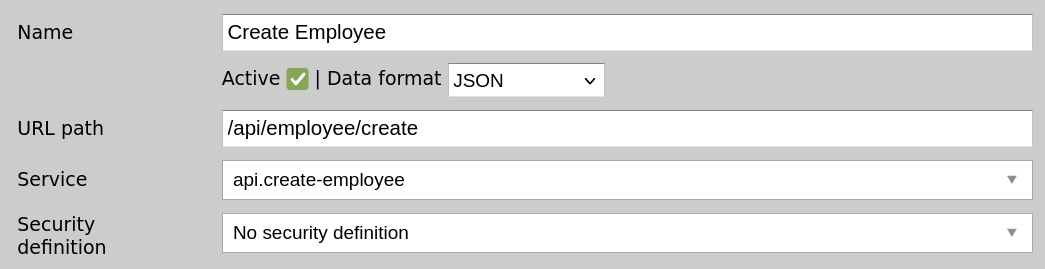
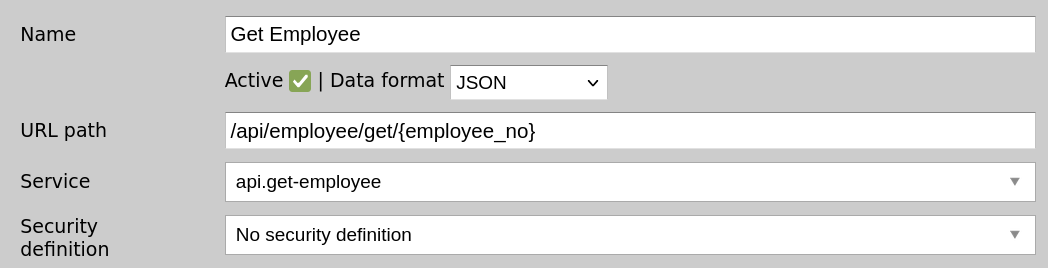
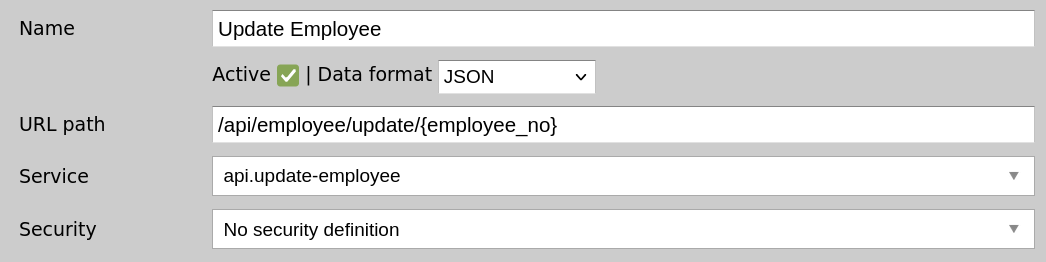
In your Zato dashboard at http://localhost:8183, go to Connections → Channels → REST and create a new REST channel (endpoint) for each of the services.
Choose "No security definition" for each of the channels - we'll get to that in a moment.
You should have a total of 4 channels for each of the CRUD operations:
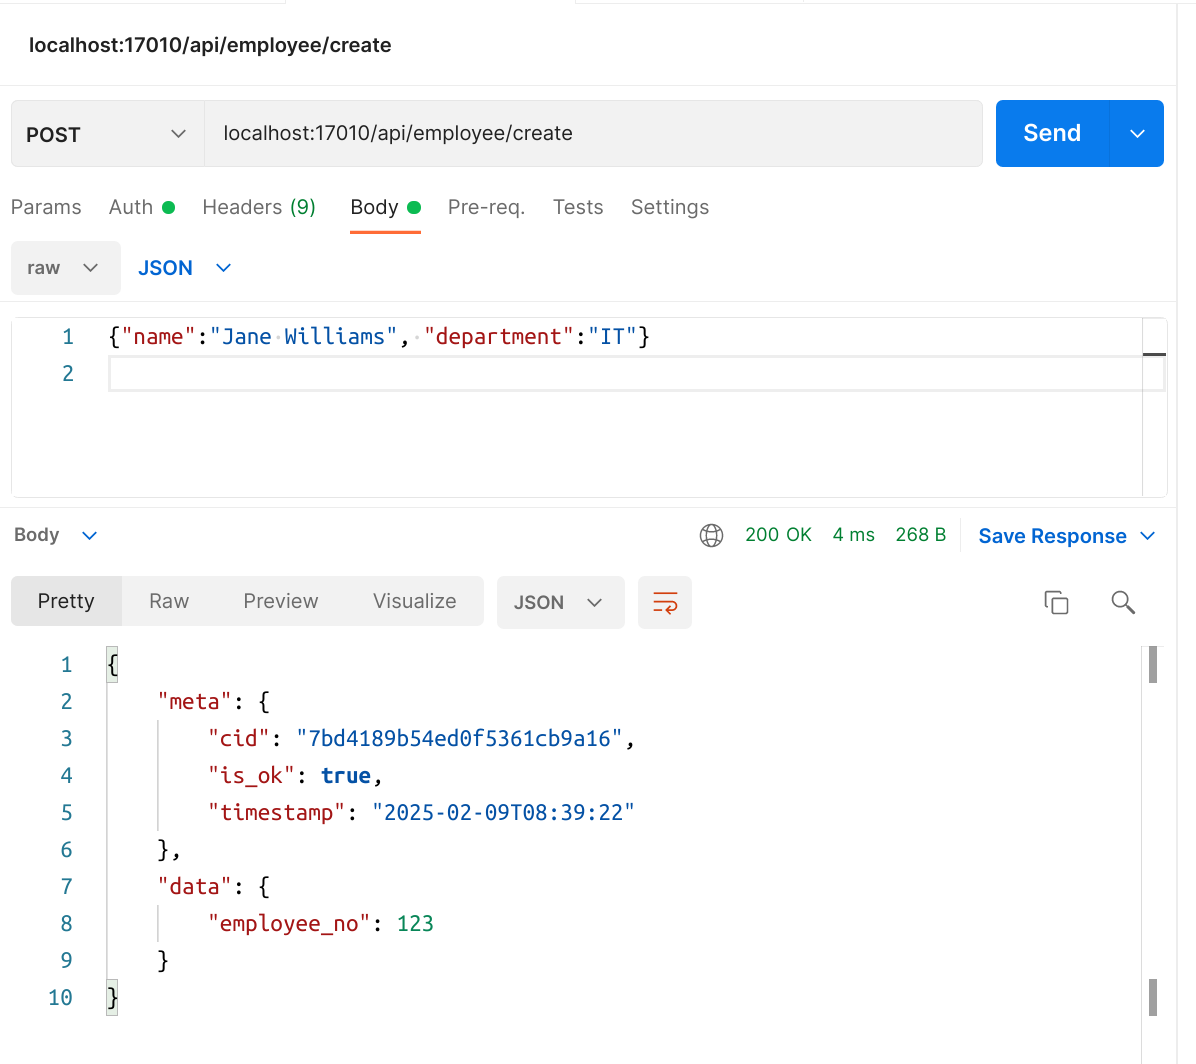
We can now use Postman to invoke our API endpoints on localhost:17010. Remember, localhost:8183 is where your dashboard is, but the actual API server is on port 17010.
Let's check JSON responses from two of them:
So far, none of the API calls required any credentials, and we need to change that.
To control access to our API endpoints, we need to add a security mechanism, and we have two options: HTTP Basic Auth or API keys.
While both HTTP Basic Auth and API keys provide robust security, Basic Auth is the recommended starting point. Its widespread support means better integration with development tools, testing frameworks, and client libraries.
In Zato, create a new HTTP Basic Auth Security for each API client that will be invoking your endpoints. For instance, your HR, Payroll or Onboarding systems will have their own credentials that won't be shared with any other.
Here, we're creating API credentials for HR and attach it to a REST channel (endpoint).
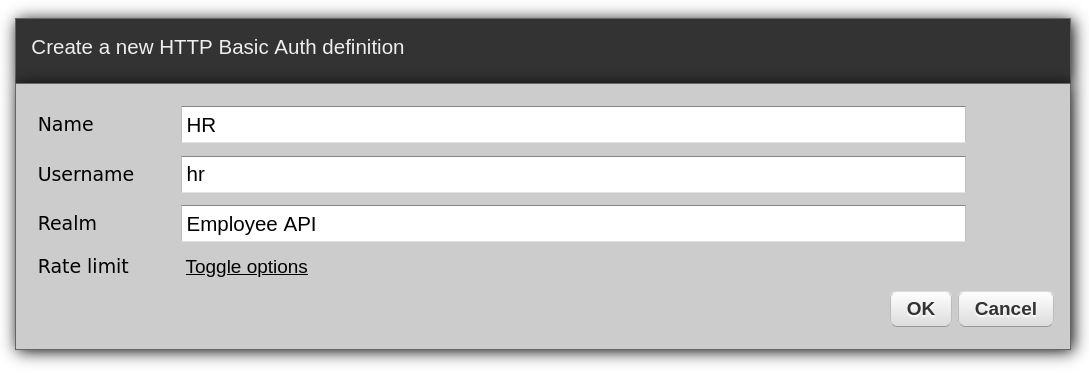
From now on, to access this endpoint, the correct username and password will have to be entered.
And by the way, what if you'd like to attach multiple security definitions to a channel? We're not going to show it here but to achieve that, use security groups - create a group, add individual API security definitions to it, and then attach a group to a channel.
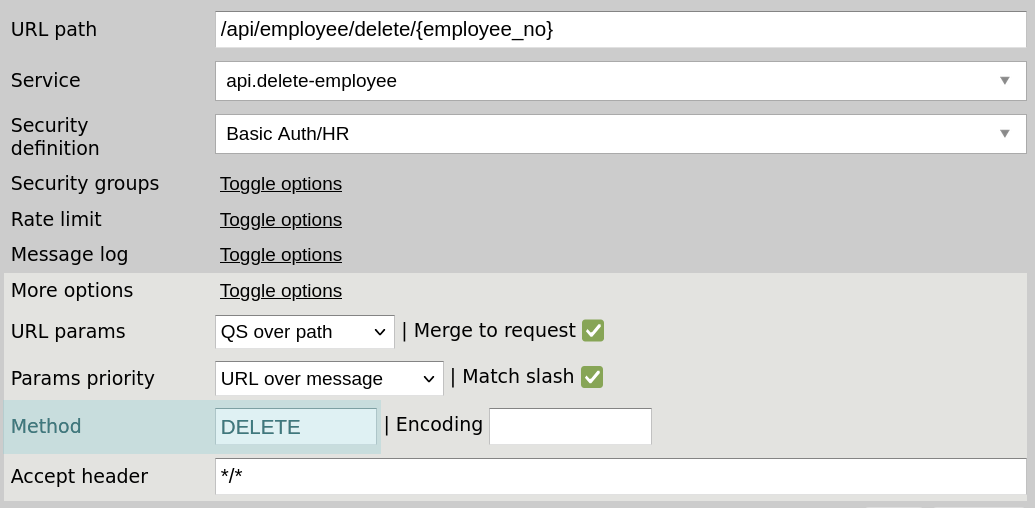
By default, Zato endpoints accept any HTTP method. This deliberate choice maximizes compatibility with API clients. Remember how some clients can only use POST, even for read or delete operations? This default configuration lets them work without modification.
However, if you need to restrict allowed methods, you can specify them in your channel configuration:
200 OK is what Zato returns by default unless you explicitly indicate a different status code. Similarly, it will only populate the "Content-Type" header, leaving it up to you to return other headers. So let's see how you can do both now.
# -*- coding: utf-8 -*-

# stdlib
from http.client import BAD_REQUEST

# Zato
from zato.server.service import Service

class MyService(Service):
    def handle(self):

        # Your implementation goes here
        pass

        # We want to send 400 Bad Request in the response
        self.response.status_code = BAD_REQUEST

        # We want to send these two custom headers in the response
        self.response.headers['X-My-Header-1'] = 'Hello'
        self.response.headers['X-My-Header-2'] = 'World'
At times, you'll need to check what API clients sent in via means other than JSON requests - HTTP headers are the most commonly used vessel, but it can be form data as well. Here's what you do then.
# -*- coding: utf-8 -*-

# Zato
from zato.server.service import Service

class MyService(Service):
    def handle(self):

        # GET, POST, DELETE etc.
        self.request.http.method

        # A dictionary of GET parameters
        self.request.http.GET

        # A dictionary of POST parameters
        self.request.http.POST

        # URL path of the request, e.g. /api/employee/create
        self.request.http.path

        #
        # A dictionary that combines GET parameters with URL path parameters
        # so that you can have one convenient place to access both regardless
        # of what the API client uses (because it doesn't matter).
        #
        # Example:
        #
        #  GET params are ?department=HR&unit=ABC
        #  Path params are /api/employee/get/123
        #  Now, self.request.http.params will be:
        #  {'department':'HR', 'unit':'ABC', 'employee_no':123}
        #
        self.request.http.params

        #
        # Some API clients, notably some WebHooks, will send requests to you using
        # HTTP form data, rather than JSON. In such a case, set the data format
        # to "Form" in your channel's definition, and then access the form data as below.
        #
        request = self.request.http.get_form_data()
Zato comes with its own API testing tool that lets you write API tests in plain English without programming knowledge, although you can always extend it in Python yourself.
Instead of writing code, you describe your test steps using natural language commands that specify which endpoints to call, what data to send, and what responses to expect.
Each test consists of clear, readable steps that outline the test scenario. You define the API address, URL path, HTTP method and any request data, then specify what should happen when the endpoint is invoked.
The tool validates responses against your expectations, checking status codes, response fields, and data types - all described in plain English commands.
It all resembles a unit-test, just one written in a natural language.
Feature: Employee API

Scenario: *** Get Employee API ***

    Given address "http://localhost:17010"
    Given URL path "/api/employee/get/123"
    Given REST method "GET"

    When the URL is invoked

    Then status is "200"
    And path "/meta/is_ok" is True
    And path "/meta/cid" is not empty
    And path "/meta/timestamp" is not empty
    And path "/data/name" is "John Doe"
    And path "/data/department" is "HR"
At the end of the day, REST is just one chapter in the long history of application interfaces, and APIs existed long before REST and HTTP. While REST is the dominant approach today, it's just one way to expose application functionality.
Here are two other common API styles you'll encounter:
So yes, while APIs can be, and have been built, using numerous other technologies (FTP, MQ, SQL procedures, and many others), REST should be your default choice for new projects unless you have specific requirements that demand otherwise.
REST APIs form the backbone of modern system integration, but real-world implementations often differ from theoretical models. Let's recap the key practical insights from this tutorial:
By following these principles, you'll build APIs that are easy to use, simple to maintain, and ready for production. The goal isn't to create perfectly RESTful services - it's to create reliable interfaces that solve real business problems.
Next steps? Start building. The best way to learn is through practice, and every API you create will teach you something new about practical system integration.
When your services need to call external REST endpoints, you'll use outgoing connections. These connections let you invoke third-party APIs or other services in your architecture.
To create outgoing connections, go to Connections → Outgoing → REST in the Dashboard. You can:
The OpenAPI import automatically creates connections and security definitions for all endpoints in the specification, saving time when integrating with third-party APIs.
Here's how to invoke an external REST endpoint from your service:
# -*- coding: utf-8 -*-

# Zato
from zato.server.service import Service

class InvokeExternalAPI(Service):
    def handle(self):

        # Prepare the data to send
        payload = {'customer_id': '12345', 'amount': '100.00'}

        # Prepare URL parameters
        params = {'priority': 'high'}

        # Prepare custom headers
        headers = {'X-API-Key': 'your-api-key'}

        # Get the connection object
        conn = self.outgoing.plain_http['MyExternalAPI'].conn

        # Invoke the external endpoint
        response = conn.post(self.cid, payload, params, headers=headers)

        # Process the response
        self.logger.info(f'Response: {response.text}')
When calling external REST endpoints, you can control how long your service waits for a response by setting a timeout parameter. In the example below, the timeout is set to 30 seconds:
Without an explicit timeout, the request will use the Linux kernel's default timeout, which is around 2 minutes.