
 Zato blueprint - new environments and GitOps deployments with Docker
The blueprint is how you set up a new Zato environment and deploy your Python code and configuration to it.

What the blueprint is
- The blueprint is a git repository - zato-project-blueprint - with a ready-to-use structure of a Zato project and a provisioning script that starts a new Zato environment from it.
- Whenever you need a new Zato environment - a new server for development, testing or production - you start from the blueprint. You clone it, run its script, and a new environment is created with your services and configuration already in it.
- The same blueprint is the template for your own projects - your services, enmasse configuration, Python requirements and config files all live in the structure that it defines, and the rest of this tutorial explains each part of it.
Learning objectives
- This hands-on tutorial will show you how to set up new Zato environments and deploy your Zato projects from git to Docker containers
- You'll learn how to structure your projects, where to keep configuration, and where to keep Zato services
- You'll have everything needed to move your projects from development, through testing, and to production
- You'll have a template for building your own provisioning scripts for Zato environments
- You'll see how the whole workflow is GitOps - git is the single source of truth and containers recreate the environment from it
- If you've ever asked yourself "How do I back up my configuration and how do I make it persist when I restart the container?", this is the tutorial for you
Remember: you can connect your AI copilot to Zato documentation.
Prerequisites
- Clone locally this blueprint git repository with a sample structure of a Zato project.
- Make sure you clone it on the same host system that your container is running on. That is, don't clone it inside the container, clone it on the host.
What this tutorial is for
- Objects created in the Dashboard - REST channels, scheduler jobs and the rest - are lost when you stop the container unless you first export them to enmasse, which is YAML that a new container can import
- The same goes for services created in the built-in IDE - save them on your host so that a new container can pick them up
- A starting container uses directory mappings and environment variables to find your configuration and services, and this tutorial shows what those mappings, variables and places are
- The same approach works with Compose, Kubernetes, Bash scripts, Azure Pipelines, Ansible playbooks or Terraform
- If your platform is Kubernetes, the Zato on Kubernetes guide shows how the same concepts - enmasse, hot deployment, environment variables - map to Helm and ConfigMaps
- When you decide which ports to publish or route to, consult the default ports reference
Structure of a Zato project
When a Docker container with Zato starts, it requires your project to follow a specific structure, which looks like this in the demo repository.
.
└── myproject
    ├── config
    │   ├── enmasse
    │   │   └── enmasse.yaml
    │   ├── python-reqs
    │   │   └── requirements.txt
    │   └── user-conf
    │       └── myproject.ini
    ├── impl
    │   ├── scripts
    │   │   ├── run-container.sh
    │   │   └── run-tests.sh
    │   └── src
    │       └── api
    │           └── crm.py
    └── testing
        └── tests
            ├── test_billing.py
            └── test_crm.py
Most of that structure is optional and whether you use a given element depends on the requirements of your project. So let's discuss it all in detail.
Blueprint for DevOps provisioning scripts
The blueprint comes with a script that starts and configures a container - this is how you create a new Zato environment.
It's under myproject/impl/scripts/run-container.sh and it's meant to be a blueprint for your own provisioning scripts, so feel free to modify it to suit your needs once you've completed this tutorial.
Make sure that you don't have other containers with Zato running, and then go ahead and run this script. It will start a new environment for you - a new Zato server in a Docker container, with your project mounted into it.
Most of this script is reusable across any kind of project, and you won't have to modify it much.
#!/bin/bash

# Common options
set -e
set -x
set -o pipefail
shopt -s compat31

# Find our current directory
CURDIR="${BASH_SOURCE[0]}";RL="readlink";([[ `uname -s`=='Darwin' ]] || RL="$RL -f")
while([ -h "${CURDIR}" ]) do CURDIR=`$RL "${CURDIR}"`; done
N="/dev/null";pushd .>$N;cd `dirname ${CURDIR}`>$N;CURDIR=`pwd`;popd>$N

# What environment this is
export env_name=myproject

# What password to use when logging in to the dashboard
export dashboard_password=${My_Password:-$(uuidgen)}

# What Zato version to use
export zato_version=4.1

# Name the container
export container_name=zato-$env_name

# Absolute path to where to install code in the container
export target=/opt/hot-deploy

# Full address of the remote Docker package
export package_address=zatosource/zato-$zato_version:latest

# Absolute path to our source code on host
export host_root_dir=`readlink -f $CURDIR/../../`

# Directory on host pointing to the git clone with our project
export zato_project_root=$host_root_dir

# Our enmasse file to use
export enmasse_file=enmasse.yaml
export enmasse_file_full_path=$host_root_dir/config/enmasse/$enmasse_file

# Directory for auto-generated environment variables
mkdir -p $host_root_dir/config/auto-generated

# Populate environment variables for the server
echo '[env]'                               > $host_root_dir/config/auto-generated/env.ini
echo My_API_Password_1=$My_API_Password_1 >> $host_root_dir/config/auto-generated/env.ini
echo My_API_Password_2=$My_API_Password_2 >> $host_root_dir/config/auto-generated/env.ini
echo Zato_Project_Root=$target/$env_name  >> $host_root_dir/config/auto-generated/env.ini

# Log what we're about to do
echo Starting container $container_name

docker rm --force $container_name &&
docker run                                                \
                                                          \
    --name $container_name                                \
    --restart unless-stopped                              \
                                                          \
    -p 22022:22                                           \
    -p 8183:8183                                          \
    -p 11223:11223                                        \
                                                          \
    -e Zato_Dashboard_Password=$dashboard_password        \
    -e Zato_Log_Env_Details=true                          \
                                                          \
    --mount type=bind,source=$zato_project_root,target=$target/$env_name,readonly \
    --mount type=bind,source=$enmasse_file_full_path,target=$target/enmasse/enmasse.yaml,readonly \
    --mount type=bind,source=$host_root_dir/config/auto-generated/env.ini,target=$target/enmasse/env.ini,readonly \
    --mount type=bind,source=$host_root_dir/config/python-reqs/requirements.txt,target=$target/python-reqs/requirements.txt,readonly \
    $package_address
The most important lines:
Line 15 - gives your environment a name, but observe that it must be the same as the name of the top-level directory of your project (here: myproject), so you need to keep the two in sync.
Line 18 - sets a password to log in to your Dashboard with (http://localhost:8183, user: admin). This password will likely be read from your host's environment variables, but you can just as well pull it from any other place, e.g. AWS Secrets Manager.
Lines 46-49 - export environment variables for the server to use. This is how you pass passwords and credentials from your host to the container (more about it below).
Lines 67-70 - mount all the project directories from the host to /opt/hot-deploy inside the container.
The mount on line 67 is also what makes hot deployment from your editor work - you edit a file in the clone on the host, the saved file is visible in the container through the mount and the server deploys it, with no plugin in the editor. Open the clone in VS Code or any other IDE and work in it as in any Python project.
In your own projects, you can leave the whole script untouched except for lines 15, 18, and the environment variables. The rest can stay as it is.
Remember - this script is a good template, but if you prefer to achieve the same using Docker Compose or other tools, that's fine as well, as long as you map the correct directories and provide the expected variables.
Where to put your code with Zato services
Your code goes to a directory called src. You need to use that name - otherwise, the server will not deploy your code.
Inside that directory, you can have a flat list of Python files with Zato services, or you can create a tree of directories with Python files, like in a regular Python project, but they must always be under the "src" path.
Whether it's a flat list of files, or directories with subdirectories and so on, they must be contained within directories whose names start with the prefixes listed below. Otherwise, the starting server won't pick them up and your code won't be deployed.
- Let's check a few examples of how you can lay out your code:
# A flat list of Python files
.
└── myproject
    └── impl
        └── src
            └── api                     # Matches prefix "api"  (exact match)
                ├── billing.py
                └── employee.py
# Two flat lists of Python files
.
└── myproject
    └── impl
        └── src
            └── api_internal            # Matches prefix "api"
            │   ├── billing.py
            │   └── employee.py
            └── adapter_external        # Matches prefix "adapter"
                ├── crm.py
                └── training.py
# A tree of directories with Python files
.
└── myproject
    └── impl
        └── src
            ├── api                     # Matches prefix "api" (exact match)
            │   └── dataverse
            │       └── invoices.py
            │       └── payments.py
            ├── channel_events          # Matches prefix "channel"
            │    └── jira
            │        └── hr.py
            │        └── onboarding.py
            └── core_integrations       # Matches prefix "core"
                └── salesforce
                    └── partners
                        └── crm.py
                        └── batch.py
You can use any files and any directories for your own code, but they all must be within the directories whose names match the prefixes listed above - this is how Zato recognises that the code contains services to deploy.
Remember to add the
__init__.pyfiles if you decide to use nested directories - just as you would in any Python library with subdirectories.Finally, "myproject" is just the name of the top-level directory, so you'll probably change it to the name of your company, but when you do, make sure to change it in the provisioning script too (line 15).
Understanding enmasse files
An enmasse file is a YAML representation of configuration that you create in the Zato dashboard - it's the GitOps format of the platform, the file that is kept in git and defines your environment.
Each entry in an enmasse file represents an object that you want to create. For instance, to create a REST channel, you write this:
channel_rest:
  - name: "api.dataverse.invoice.get"
    service: "mycompany.dataverse.invoices.get-invoice"
    url_path: "/api/dataverse/invoice/get"
When a Docker container starts, it tries to read a file with such entries from
/opt/hot-deploy/enmasse/enmasse.yamlinside the container. If you place anything there - and the blueprint script does - the server will read it and everything from that file will be imported. If the file doesn't exist, nothing is imported.The idea is that your team keeps adding more and more entries to this file over time, with each new project. Because the files are self-explanatory, everyone will learn how to do it in no time.
Using enmasse, you can import your configuration into new containers, and in this way your builds and your environments will be reproducible
A question you may be asking is: "Great, I have this sample enmasse file from your blueprint repo, but how do I create one myself?", and there are two ways.
Extend an existing enmasse file
- This is the easiest way. Simply take the sample file from the git repo, study it for a moment, and keep adding YAML entries to your own enmasse file for your own objects, your own REST channels and so on.
- This task is fairly repetitive, so you'll get the hang of it very quickly. Each type of object is very similar, and they typically differ only by name, so you may also want to tell your AI Copilot to do it, so that you don't need to do everything by hand. But even without a copilot, this is still a very easy task.
Create an enmasse file from scratch
- At times, you'll want to create an enmasse file from scratch. In this case, read the chapter about enmasse files - it will show you how to export objects to a new enmasse file, and other advanced scenarios such as include files.
- In short, you create such a file by clicking `System → Config → Export enmasse` in your Dashboard, and that will export all the definitions to a new file for you.
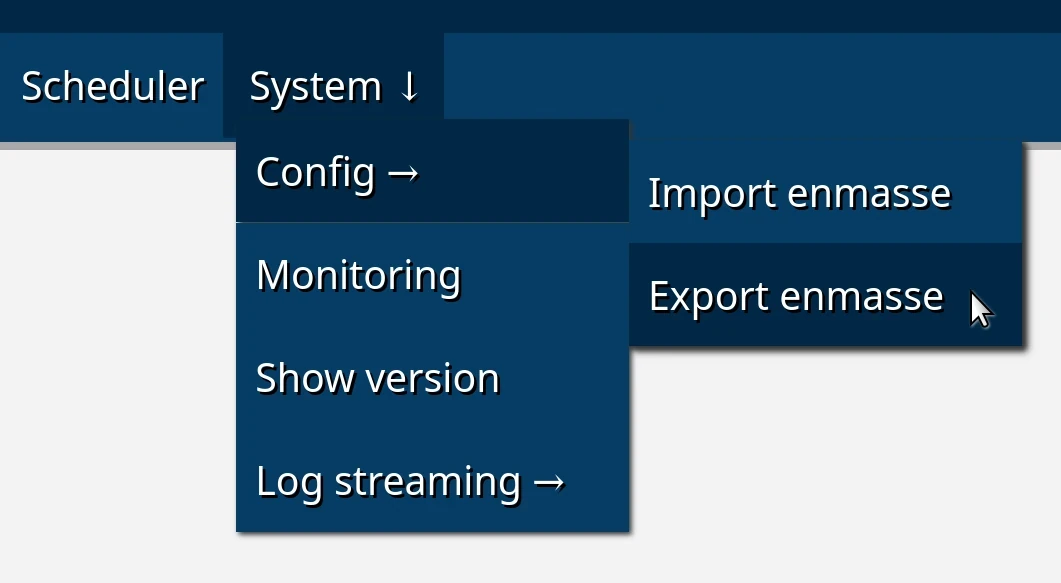
Enmasse reference
- For a complete list of all available options for each object type, see the enmasse reference.
- You can just point your AI Copilot to this reference and it'll build the files for you easily.
Referencing security definitions
You'll often come across situations where an object will depend on a security definition.
For instance, you'll have a security definition called "HR API Key", and you'll have two REST channels that make use of the same credentials from that security definition.
In such a case, refer to that security definition by its name, as below:
security:
  - name: "HR API Key"
    username: hr
    password: Zato_Enmasse_Env.My_API_Password_1
    type: basic_auth
    realm: MyProject

channel_rest:
  - name: api.dataverse.invoice.get
    service: mycompany.myapi.billing.get-invoice
    url_path: /api/billing/invoice/get
    data_format: json
    security: "HR API Key"
And this brings us to the question of how and where to keep passwords and other credentials, so let's talk about that now.
Passwords and other credentials
You certainly don't want to commit passwords, or any credentials, to your git repository, so the question arises: how can enmasse make use of them? For instance, when it creates a security definition, how does it know what password to use?
The easiest way to pass passwords to enmasse is to use environment variables. Any value in an enmasse file can be read from the server's environment by prefixing it with
Zato_Enmasse_Env.- that's the indicator, not the "$" dollar sign.For instance,
password: "Zato_Enmasse_Env.My_API_Password_1"will look up an environment key called "My_API_Password_1" when the server is starting and enmasse runs.But how do you pass environment variables to the container from your host? That's what lines 46-49 do in the sample provisioning script. They write the variables to config/auto-generated/env.ini on the host and mount that file read-only as /opt/hot-deploy/enmasse/env.ini inside the container. The server reads the file when it starts and all of its entries become environment variables that enmasse can use. To pass a variable of your own, add a line for it to the same list. To change a value, change it on the host and run the provisioning script again - the file is regenerated and the container replaced. The environment variables reference has the details of how the file is read.
Installing Python packages
To add a dependency from PyPI to your project, add it to config/python-reqs/requirements.txt. It's a regular pip requirements file, so you add one requirement per line.
For instance, let's say you need to work with Azure Blob files and you'd also like to have a nice way to convert XML into Python dicts. Here's what you'd add to the file:
- The requirements file is read when the container is starting, so if you need to use more dependencies, add them to this file and restart the container.
User config and rule engine files
Zato lets you keep your own custom configuration for super-fast retrieval directly from RAM, with zero network overhead.
You do it by creating .ini files in the config/user-conf directory.
At runtime, the contents of any .ini file from this directory are available to your services via
self.config. Let's analyze an example.Let's say we have a file called
myproject/config/user-conf/myproject.ini, with these entries:
- Now, in your service, you can do the following - and note that the entries can be nested.
def handle(self):

    # Will print "Type 1"
    self.logger.info('First type is: %s', self.config.myproject.employee.type1)

    # Will print "Type 2"
    self.logger.info('Second type is: %s', self.config.myproject.employee.type2)

    # Will print "Group 1"
    self.logger.info('First group is: %s', self.config.myproject.employee.group.group1)

    # Will print "Group 2"
    self.logger.info('Second group is: %s', self.config.myproject.employee.group.group2)
A great thing about such configuration files is that they are very, very fast to read at runtime. When the server starts, it reads the whole file and then you access it in RAM, so there's virtually zero overhead to using them, and yet they offer a very clean way to keep your configuration separate from code.
Your rule engine config files also go to the same config/user-conf directory, e.g. you'll create a file like config/user-conf/crm.zconf for your CRM-related rules. Follow this link to read more about the rule engine built into Zato.
Running custom startup scripts
- If you need to run custom initialization logic when the container starts, mount a script at
/opt/hot-deploy/startup.sh
- This script will be executed as root before the server starts
- Any errors from the script will be displayed on screen but will not stop the container from starting
- This script can execute any commands you need, giving you full flexibility for container initialization, for instance:
| Use case | Description |
|---|---|
| Installing system packages | Download or install additional packages that your services require, e.g. HashiCorp Terraform or any other |
| Third-party agent installation | Install and configure the monitoring agents your environment uses |
| Monitoring integration | Invoke your monitoring endpoints to signal that a Zato container is starting |
| Dynamic secret retrieval | Fetch credentials from Azure Key Vault, HashiCorp Vault or AWS Secrets Manager at container start time |
| Compliance auditing | Log container startup events to your SIEM system with full context about version, configuration, and environment |
| Dependency health checks | Verify that required databases, message queues, and external APIs are reachable before the server starts |
| Custom firewall rules | Configure ufw rules for container-specific network policies |
| Configuring system settings | Set up system permissions, kernel parameters, or other OS-level configuration |
Example startup script:
Configuring SSL/TLS
- Zato exposes SSL ports 11224 (for API invocations) and 8184 (for the Dashboard), and you can use your own certificate, or you can customize the self-signed certificate that a container uses.
- Read this dedicated guide for the details of configuring SSL.
CI/CD testing pipelines
The blueprint includes ready-to-use CI/CD pipeline configurations for automated testing:
├── .github
│   └── workflows
│       └── test.yml
├── azure-pipelines.yml
└── myproject
    └── testing
        └── tests
            └── test_crm.py
- .github/workflows/test.yml - GitHub Actions workflow
- azure-pipelines.yml - Azure DevOps pipeline
- myproject/testing/tests - Your unit tests
See the CI/CD integration guide for details on how the pipelines work.
The workflow again
This is a GitOps workflow - and that's how you deploy your Zato projects and solutions:
- Use the blueprint repo as the basis for your own code
- Modify the provisioning script as needed, or use your own tools, such as Docker Compose, Kubernetes or any other
- Keep adding entries to enmasse, Python requirements and your own config files
- Store your code in a well-defined place, either as a flat list of Python files, or as nested directories
- Restart your container at any time, knowing that it will always recreate the same environment, giving you reproducible builds
Everything above applies to connection types you build yourself with the Connector SDK too - a connector is a regular Python module that hot-deploys like a service and its definitions live in enmasse under custom_ keys.
More resources
- Security defaults
Password policies, the SSH user and default API credentials in new environments
- Channel security
How to secure API channels with the authentication methods that Zato supports
- Rate limiting and firewall
Burst control, request caps, IP filtering, time-based rules and silent drops
- Environment variables
The complete reference of environment variables for Zato containers - ports, databases, brokers and monitoring
- Architecture
How to design production setups, from single-server to multi-server environments with high availability
- Production checklist
What to confirm before the environment you just deployed to handles real traffic
- Monitoring with Prometheus
The /metrics endpoint, RED metrics, scraping configuration and PromQL queries