
 Python API Integrations In-Depth Tutorial
Build a Python service that orchestrates two remote systems, secure it, expose it over REST and schedule it - in about 1-2 hours.
In this tutorial you will build a working API integration service in Python that orchestrates two remote systems, secure it with an API key, expose it as a REST endpoint, schedule it for background execution, and more. It takes about 1-2 hours to complete.
Here's what you'll have at the end:
- A complete, working environment that you can use for development, testing, and production.
- A reusable integration service that orchestrates and integrates remote APIs.
- A REST API channel for external API clients to invoke your service.
- A job scheduled in the platform's scheduler to invoke the service periodically.
In this tutorial
- Getting started
- Connecting to external systems
- Building and exposing your service
- Built-in API Management
- Beyond REST - what else can you build
- From development to production
Remember: you can connect your AI copilot to Zato documentation.
Getting started
First, let's install the platform, take a quick look at its architecture and invoke your first service from the built-in IDE.
Installing Zato
The recommended way to install Zato is via Docker. Both Desktop and Docker command line can be used.
Our quick-start image will auto-create an entire environment and various pieces of configuration for you, all set up and ready to work, and all in under 5 minutes. It includes preinstalled demo config - REST APIs and HL7 MLLP with FHIR among them.
You use the same Docker image for development, testing and production, so it's a great time saver that helps you focus on things that are immediately useful, like the actual API integrations.
So, go to the Docker installation page, select Docker Desktop if you're on Windows or Mac, or select Docker command line if you're on Linux, fill out the details and we can resume the tutorial once you're back.
Zato architecture
- There are one or more servers running in an environment. Servers are where your services are deployed.
- You configure your services and integrations in the browser-based Dashboard.
- Background jobs run in the built-in scheduler. You create the jobs in the Dashboard, the scheduler keeps track of which services to invoke when, and then it invokes them according to their schedule. We'll see how it works later in the tutorial.

Zato offers connectors to all the popular technologies and vendors - REST, SQL, Kafka, AMQP, cloud platforms such as Azure, AWS, Microsoft 365 or Google Cloud, and many more - the programming examples have the full list. On the AI side, MCP gateways expose your services as tools for AI agents, and LLM connections let your services invoke OpenAI, Claude, Gemini and compatible models.
The core mental model is simple: a service is a small Python class with a handle method. Services are made available to the outside world through channels - REST, scheduler, MCP and others - and they are hot-deployed to servers without restarts. You'll see all of this in practice in a moment.
Useful shortcuts
Here are a few useful details to keep in mind.
- http://localhost:8183 - the address of your Dashboard. The default username is "admin" and the password is what you set it to when the environment was starting.
- https://localhost:8183 - Same as 8183, but using SSL.
- http://localhost:11223 - TCP port 11223 is the default one that servers use - that's where external REST clients connect by default. There are no default credentials and we'll create some later on.
- https://localhost:11224 - Same as 11223, but using SSL.
- http://localhost:11223/zato/ping - a built-in endpoint that will confirm the server is up. You can use it to check whether your firewalls allow connections to Zato servers.
You can confirm right now that this page can reach your environment - the button below invokes the built-in ping endpoint in your own installation:
Python cloud IDE for API integrations
Before we start, it makes sense to note that you don't need anything besides Zato to go through the tutorial. In particular, Zato ships with its own, browser-based Python IDE that will be used here.
And by the way, you can certainly use VS Code with Zato too, but it's not really needed for the tutorial, so we'll be using the built-in, cloud IDE.

Invoking API services
Now that you have Zato installed, let's invoke a service and see some action.
- Go to http://localhost:8183
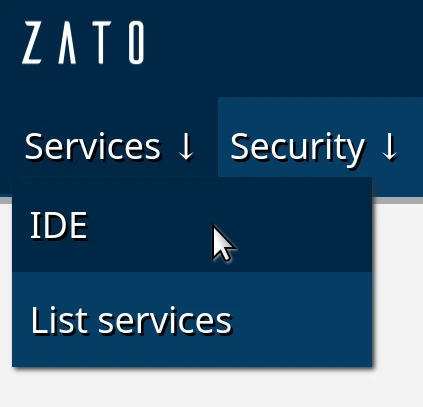
- In the top menu, select Services -> IDE, and you'll see the demo service ready to be invoked
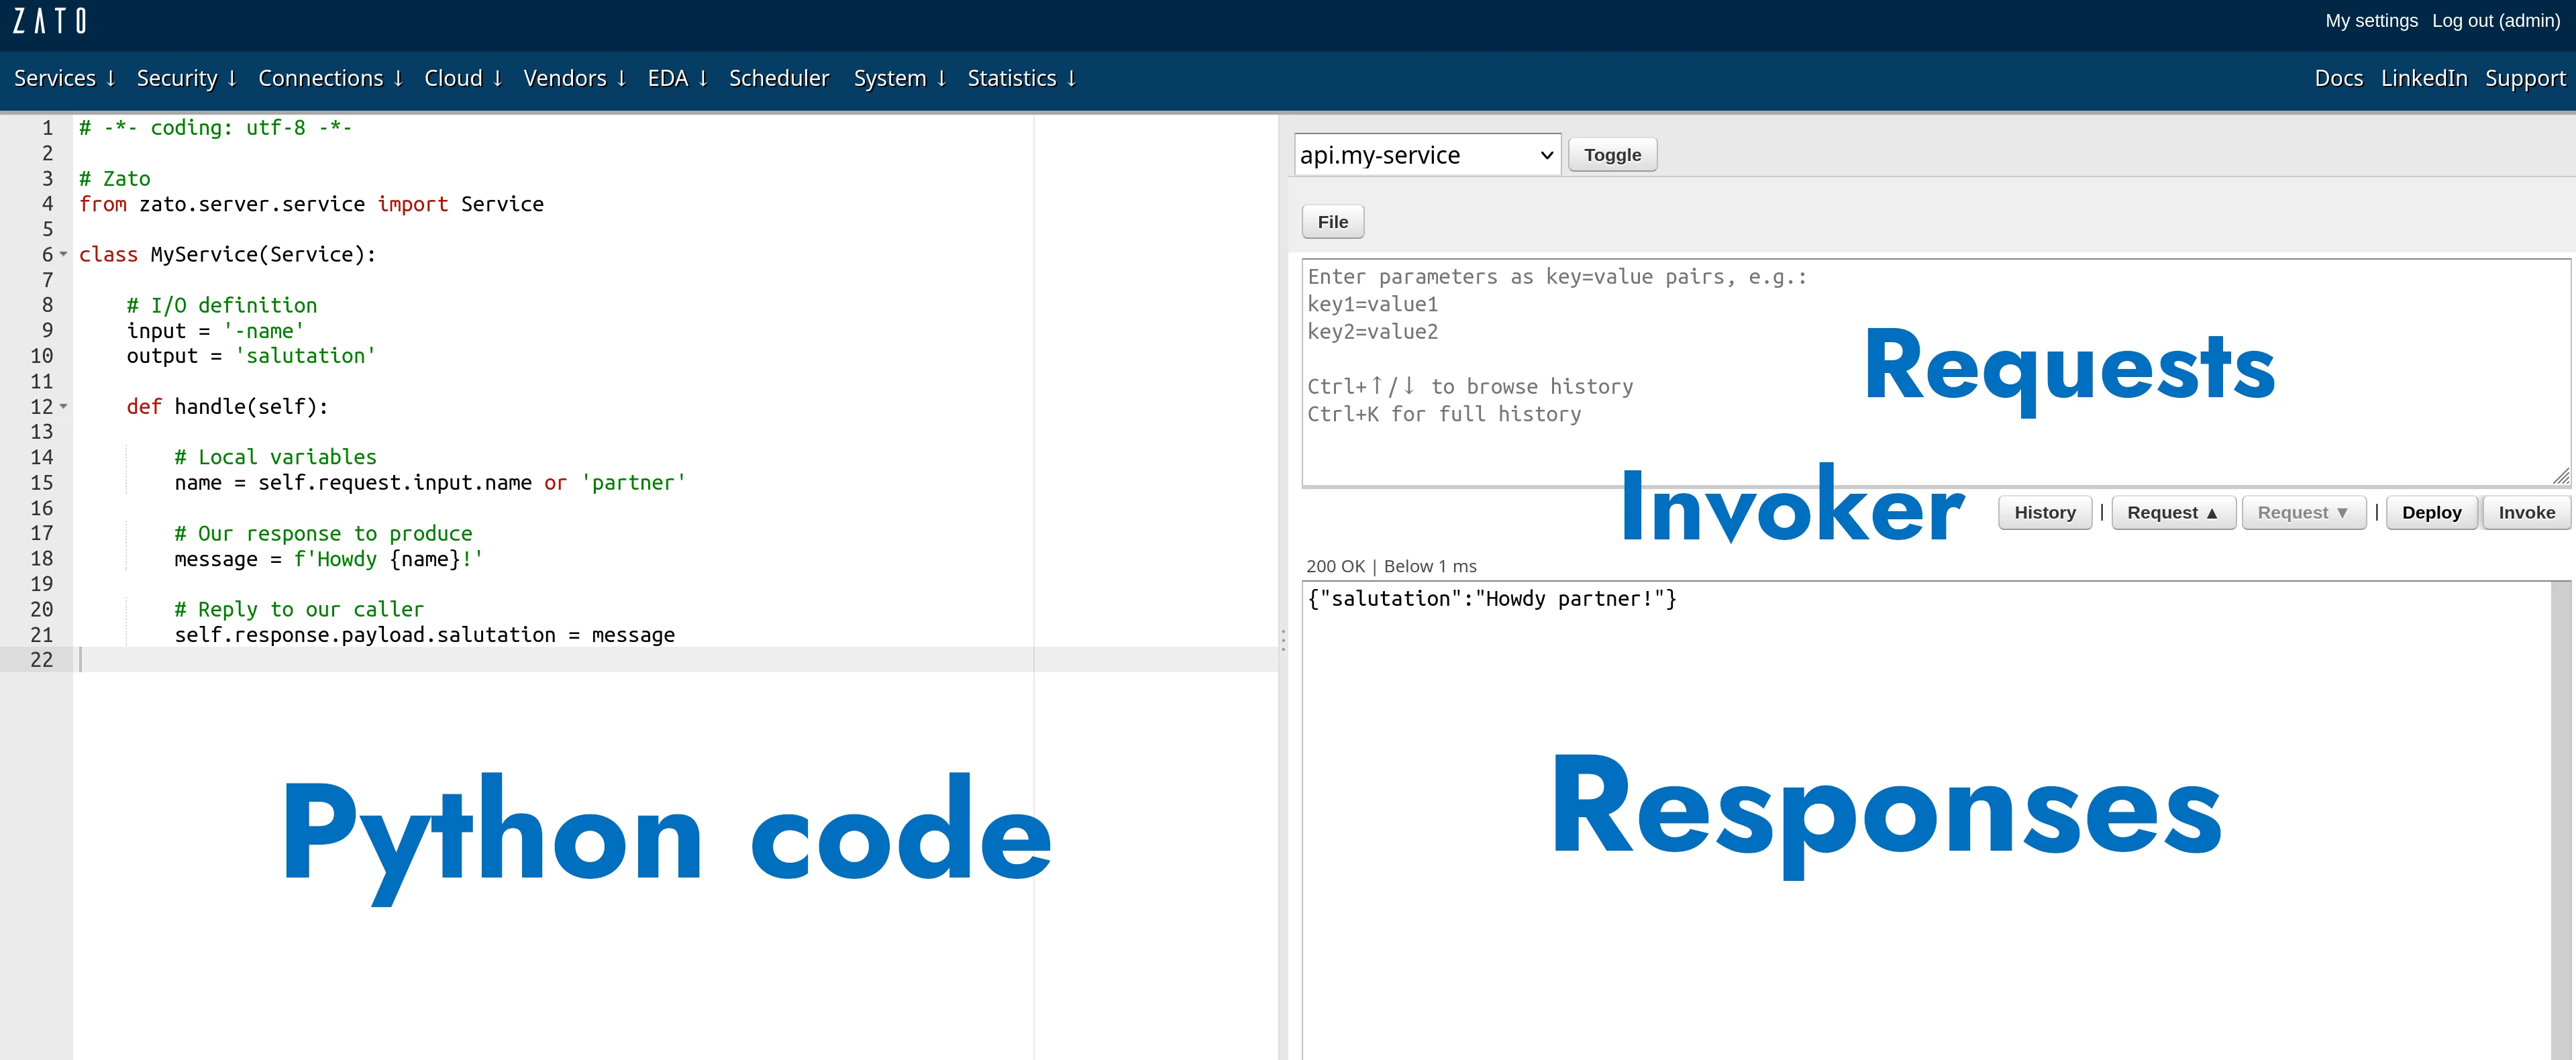
The screen is divided into several parts:
- On the left-hand side, you have your code editor that you use for Python programming
- Parameters that your services expect can be entered in the upper area on the right-hand side
- All the responses from services, whether in JSON or any other format, are returned in the lower area of the right-hand side
Enter "name=Mike Johnson" in the parameters field and click Invoke. This will invoke the service on the server and return a response to you.
- Speaking of input parameters, it's convenient to use "key=value" to invoke your services from the Dashboard, but you can also use JSON on input. For instance,
{"name":"Mike Johnson"}means the same asname=Mike Johnson, but it's almost always more convenient to enter key=value parameters, so that's what the tutorial uses.
- Clicking "History" will show you a list of all the recent requests and their last responses.

- You can also browse your server logs directly from the Dashboard. Press F12 to bring up your browser's developer console and set its logging level to "Info" - this is required because otherwise the browser would show you many completely unrelated messages. With the level set, your server logs are shown in the browser's console.

Importing the tutorial's config
In Dashboard, go to Services -> List services and click Import demo config - it sets up everything from the tutorial in one click, so you can see a complete, working integration right away.
Connecting to external systems
Your service will orchestrate two remote systems - CRM, which is a REST endpoint, and Billing, which is an SQL database. Let's configure a connection to each.
Connecting to REST endpoints
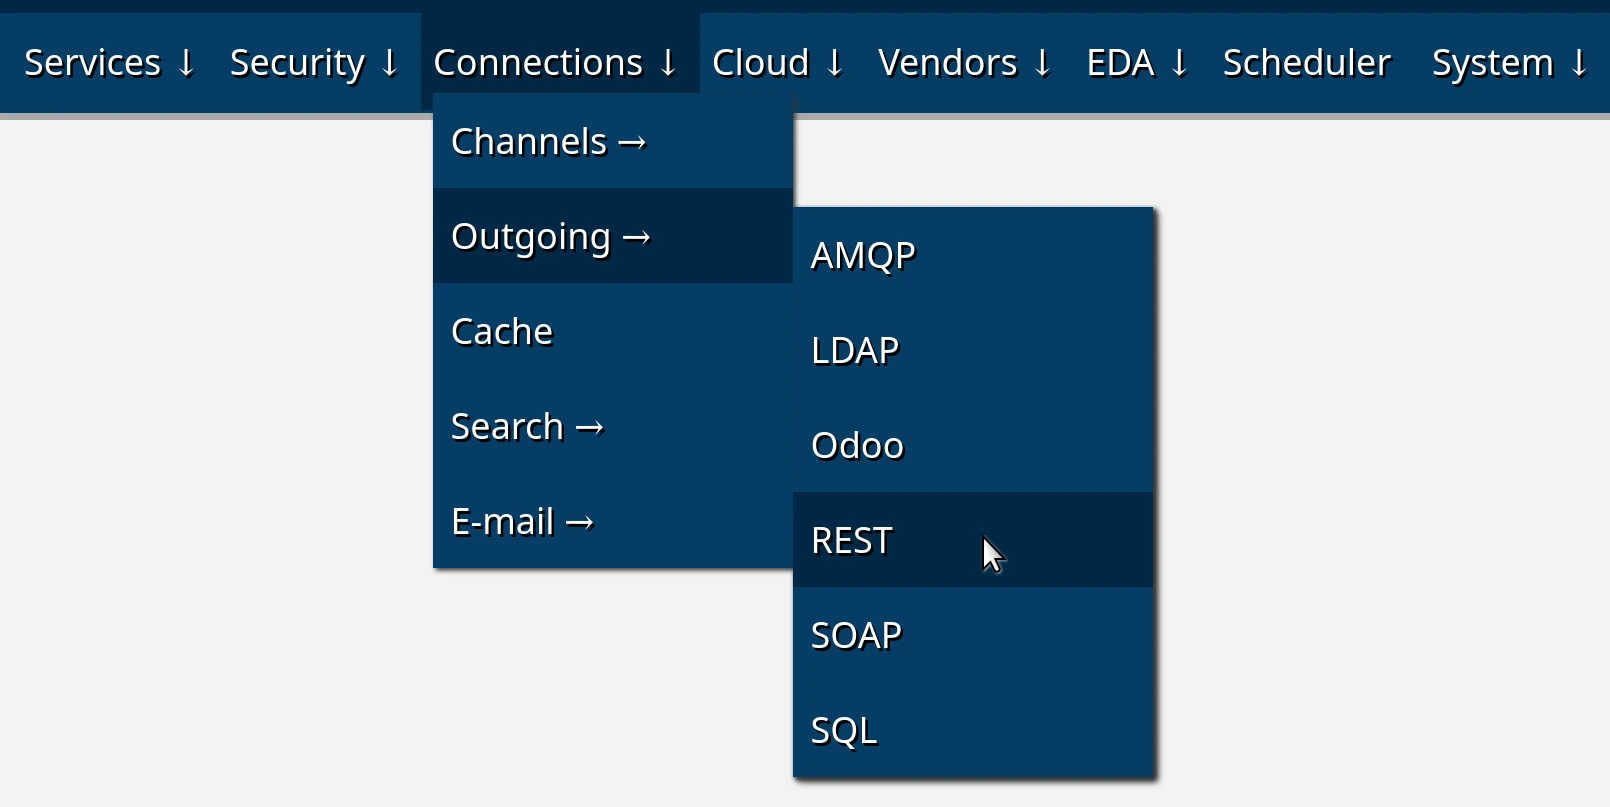
- In Dashboard, go to Connections -> Outgoing -> REST
There are two ways to create outgoing connections:
- Create individually - Click "Create a new REST outgoing connection" to manually configure each connection
- Import from OpenAPI - Click "Import OpenAPI" to bulk-create connections from an OpenAPI/Swagger specification
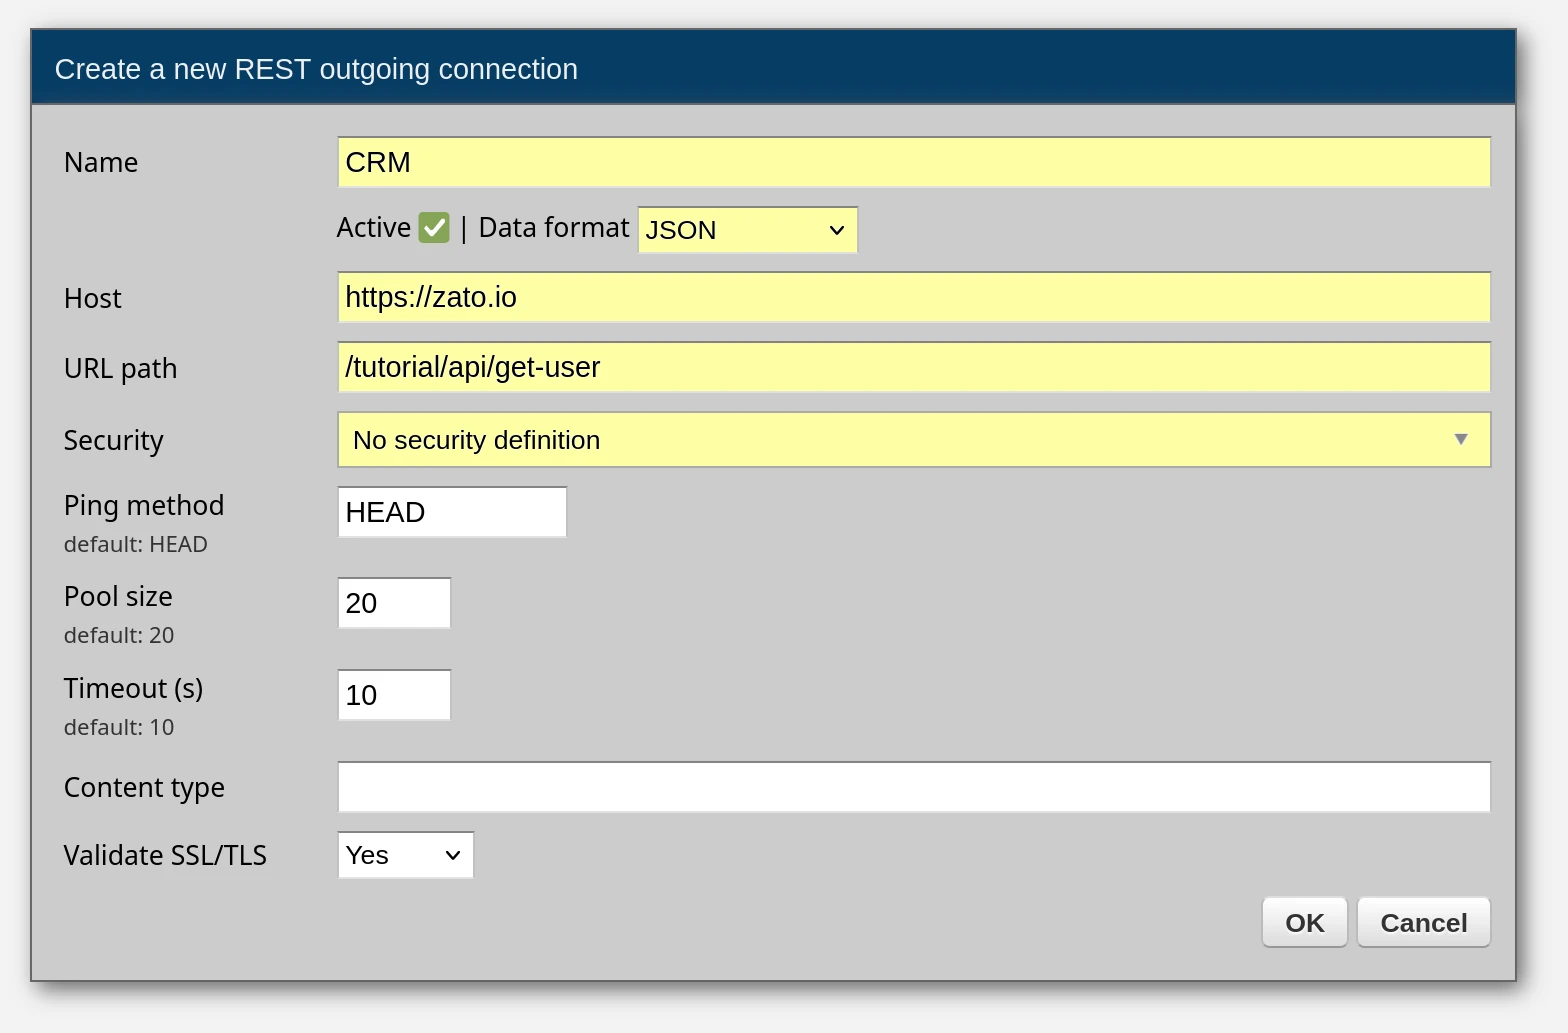
For this tutorial, we'll create connections manually. Click "Create a new REST outgoing connection" and a form will appear. We need one REST connection, to CRM, so fill it out as below and click "OK" to save the changes.
Here are the connection details to provide in the form.
| Header | Value |
|---|---|
| Name | CRM |
| Data format | JSON |
| Host | https://zato.io |
| URL path | /tutorial/api/get-user |
| Security | No security |
Here's what the form looks like when filled out with the connection's details. The fields to enter new information in are highlighted in yellow. The rest can stay with the default values. Once the connection is on the list, you can use its Ping link to confirm that the server - not your localhost - can actually reach the remote endpoint.
Connecting to SQL databases
The second system your service will talk to is Billing, and this one is an SQL database. We're using PostgreSQL as the example engine here, but the steps are the same for all the SQL databases that Zato supports.
The same design principle applies as with REST - the connection is configured in Dashboard under a name, your Python code refers to it by that name only, and the platform takes care of the rest, including connection pooling and credentials.
The tutorial's Billing database is available on the Internet and here is the table your service will query - it's called balance and this is its schema:
| Column | Type | Sample value |
|---|---|---|
| id | integer | 1 |
| user_name | text | Mike Johnson |
| account_balance | text | 357.9 |
Now, let's create the connection.
- In Dashboard, go to Connections -> Outgoing -> SQL
- Click Create a new outgoing SQL connection and fill out the form as below, then click OK.
| Header | Value |
|---|---|
| Name | Billing |
| Type | PostgreSQL |
| Host | zato.io |
| Port | 35432 |
| Database name | billing |
| User | tutorial |
Note the port - the form pre-fills it with the engine's default one, so make sure to replace it with 35432, which is the port that the tutorial's database runs on. Everything else, like the pool size, can stay with the default values.
- Passwords of new SQL connections are initially set to random values, so the next step is to set the actual one. Click Change password next to the newly created connection and enter "demo" as the password, then click OK. With the password in place, the connection's Ping link will confirm that the server can reach the database.
Building and exposing your service
With both connections in place, it's time to write the service, secure it and expose it to external REST clients.
Your first API service
In the IDE, click File -> New file, enter api.py as the file name and wait for a confirmation that a new service is ready to be invoked.
You'll note that the default contents of a new file are the same demo code as previously. That's on purpose. Let's now build your integration service step by step.
Step 1: A minimal service
First, replace the demo code with this minimal service and click Deploy:
# -*- coding: utf-8 -*-

# Zato
from zato.server.service import Service

# ##############################################################################

class MyService(Service):
    """ Returns user details by the person's name.
    """
    name = 'api.my-service'

    def handle(self):
        self.logger.info(f'cid:{self.cid} Received a new request')

        self.response.payload.user_type = ''
        self.response.payload.account_no = ''
        self.response.payload.account_balance = ''

# ##############################################################################
Click Invoke. You'll get a response with three empty fields - that's expected, the service doesn't connect to any systems yet.
Note that no declarations of any kind were needed - whatever you assign to self.response.payload through plain dot access becomes the JSON response, and self.request.input always holds the incoming request. The message building examples show this pattern in full.
Step 2: Declare your input and output
Declarations are the validation step. They pin down what may go in and out - anything undeclared is rejected - and, as you'll see later in the tutorial, they are also what the auto-generated OpenAPI documentation is built from.
Replace the code with this version and click Deploy:
# -*- coding: utf-8 -*-

# Zato
from zato.server.service import Service

# ##############################################################################

class MyService(Service):
    """ Returns user details by the person's name.
    """
    name = 'api.my-service'

    # I/O definition
    input = '-name'
    output = 'user_type', 'account_no', 'account_balance'

    def handle(self):
        name = self.request.input.name or 'partner'
        self.logger.info(f'cid:{self.cid} Received request for {name}')

        self.response.payload.user_type = ''
        self.response.payload.account_no = ''
        self.response.payload.account_balance = ''

# ##############################################################################
Enter "name=Mike Johnson" and click Invoke. The response is the same as before, but now the API's input and output are declared explicitly. The minus sign in input = '-name' means the parameter is optional.
Step 3: The complete service
Now, add the calls to CRM and Billing. Replace the handle method:
    def handle(self):

        name = self.request.input.name or 'partner'

        # Get data from CRM ..
        crm_conn = self.rest['CRM']
        crm_request = {'UserName':name}
        crm_data = crm_conn.get(self.cid, crm_request).data
        user_type = crm_data['UserType']
        account_no = crm_data['AccountNumber']

        # .. then query Billing ..
        billing_conn = self.out.sql['Billing']
        billing_query = 'SELECT account_balance FROM balance WHERE user_name = :name'
        billing_data = billing_conn.one(billing_query, {'name': name})
        account_balance = billing_data['account_balance']

        self.logger.info(f'cid:{self.cid} Returning user details for {name}')

        # .. and produce the response.
        self.response.payload.user_type = user_type
        self.response.payload.account_no = account_no
        self.response.payload.account_balance = account_balance
Click Deploy, then Invoke with "name=Mike Johnson". All three fields are now populated - your service orchestrates two independent systems and returns a unified response.
Let's analyze a few key points about the complete service:
We refer to the previously created connections by their names, CRM and Billing. We don't hardcode any information about the connections inside the Python code. This promotes reusability because it lets us reconfigure the connection without having to redeploy the service.
The two systems use different technologies - CRM is a REST endpoint invoked with the GET method while Billing is an SQL database queried with a SELECT statement - yet from the service's perspective both are simply named connections that return data.
The Billing query uses a named parameter (:name) instead of embedding the value in the SQL itself - the database driver handles the substitution securely.
We extract the information from both systems using Python's regular dict notation - a REST response and an SQL row are both dicts to your code. Note that CRM and Billing use different naming conventions, e.g. UserType vs. account_balance.
We return a response to our caller using our own preferred data format, which is "lower_case", e.g. user_type or account_no, even though the source systems were using different naming formats.
At its core, that's how an API service works: accept input, connect to external resources, map data from one format to another and provide a response in your canonical data format. All using simple Python code.
Now, let's let external REST clients invoke this service too. For that, we need security credentials first.
API security
- In Dashboard, go to Security -> API Keys.
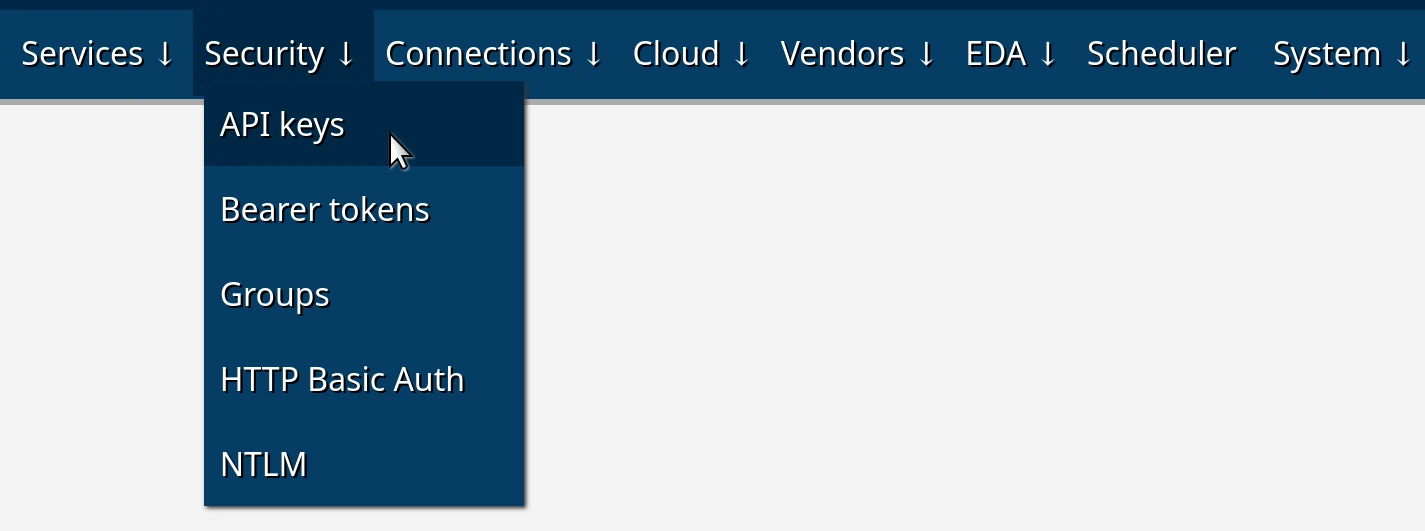
Click Create a new API key and enter "My API Key" as the name of the security definition, then OK to create it.
Click Change API key in the newly created API key and enter any value for the key, e.g. let's say it will be "abc", then OK to set it. This step is required because, by default, all the passwords and secrets in Zato are random uuid4 strings.
What you've just created is a reusable security definition - you can attach it to multiple REST channels, which means that you can secure access to multiple REST endpoints of yours using such definitions. We're not limited to API keys, though - the same goes for Basic Auth or SSL/TLS, for instance.
Let's create a REST channel now, that is, let's make it possible for external API clients to invoke your services.
Creating REST channels
- In Dashboard, go to Connections -> Channels -> REST.
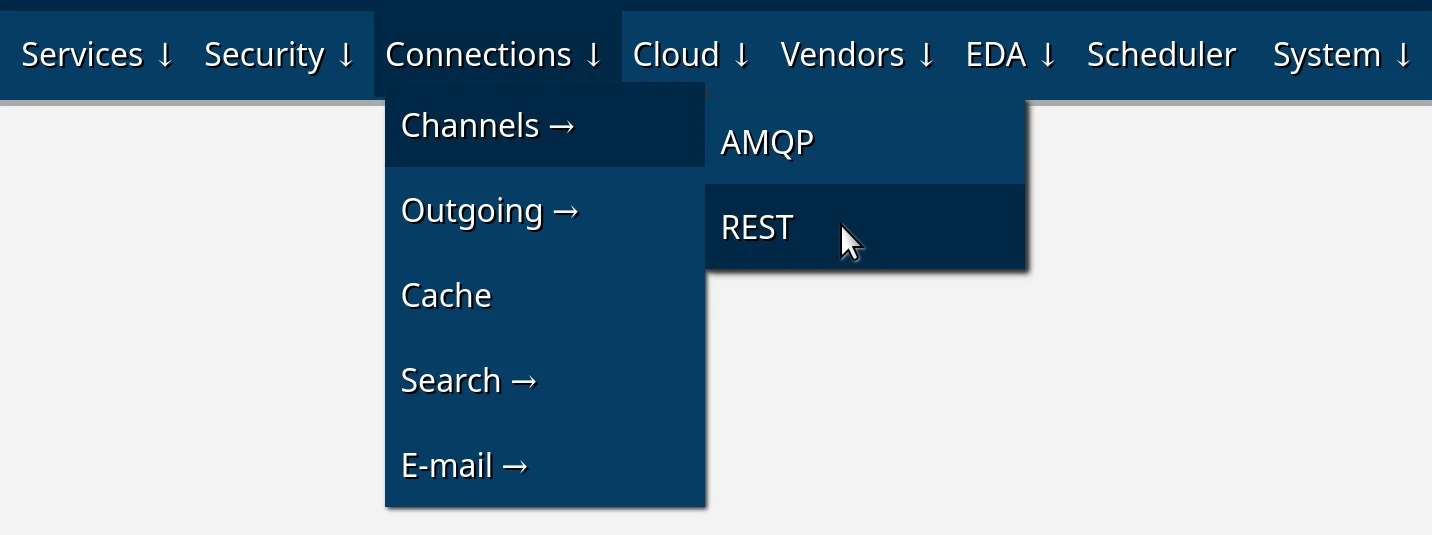
Click Create a new REST channel, enter the values as below and click OK.
Header Value Name My REST Channel Data format JSON URL path /tutorial/api/get-user-details Service api.my-service Security API key/My API Key As previously, the fields to enter new information in are highlighted in yellow. The rest can stay with the default values. You can toggle the options to check what else is possible but we don't need it during the tutorial.
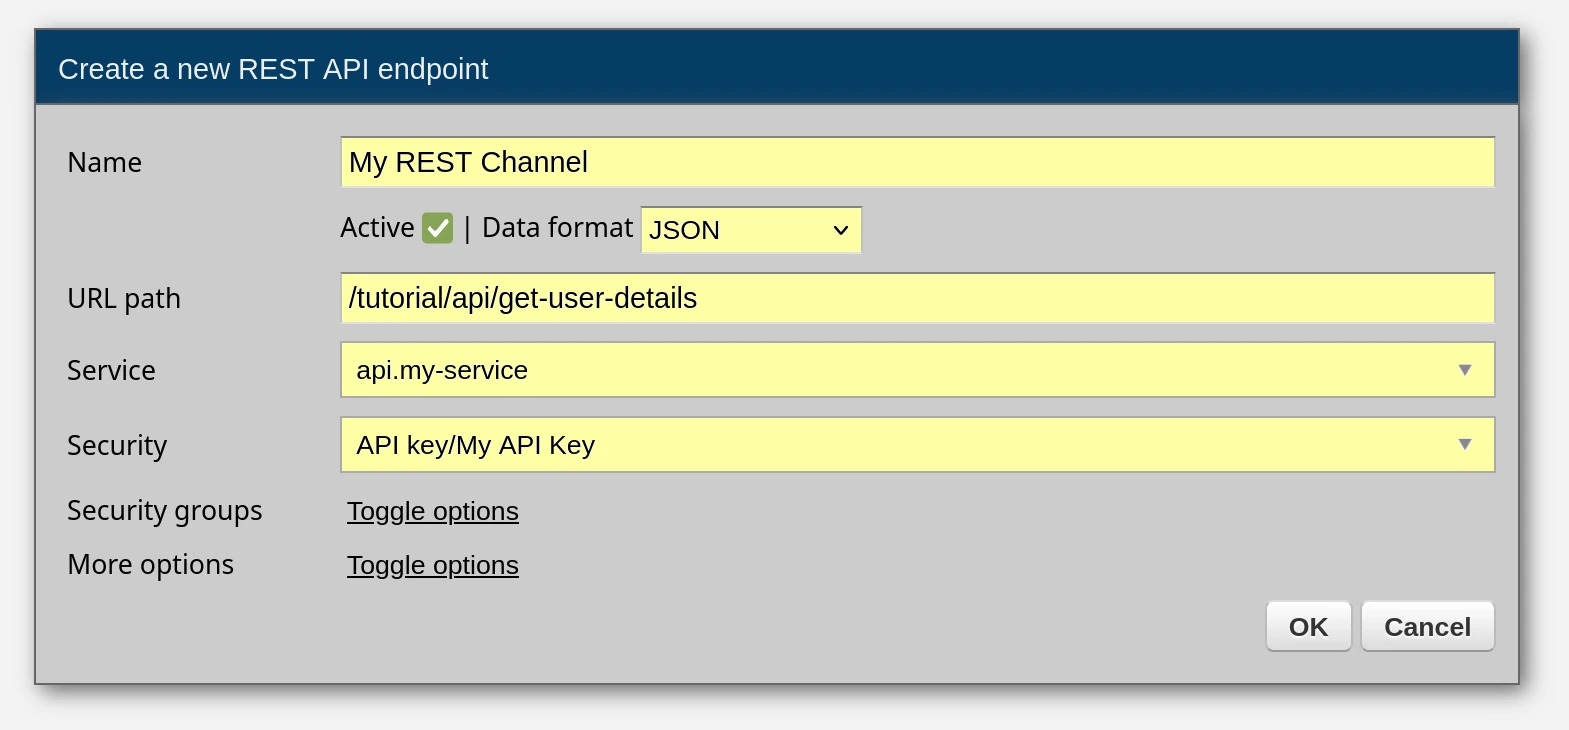
A channel is a definition of an API endpoint. That's how you make your services available to external callers, to apps and systems that want to make use of your services.
But note that an endpoint is not the same as a service, because a single service can be mounted on multiple channels, for instance, each channel with a different security definition or a rate-limiting strategy.
OK, good, we have a channel so let's invoke it now.
Invoking REST channels
Since a REST channel is just a regular REST endpoint, we can use any REST client to invoke it. Let's use Postman and curl - the result will be the same in either case.
Here are our endpoint's details:
- Address: http://localhost:11223/tutorial/api/get-user-details
- API Key Header: X-API-Key
- API Key Value: abc
- Sample request: {"name":"Mike Johnson"}
- REST method: Any will work because we haven't set any limits in the channel's definition - you can use GET or POST, it doesn't matter - so let's use GET because we're getting data from our endpoint.
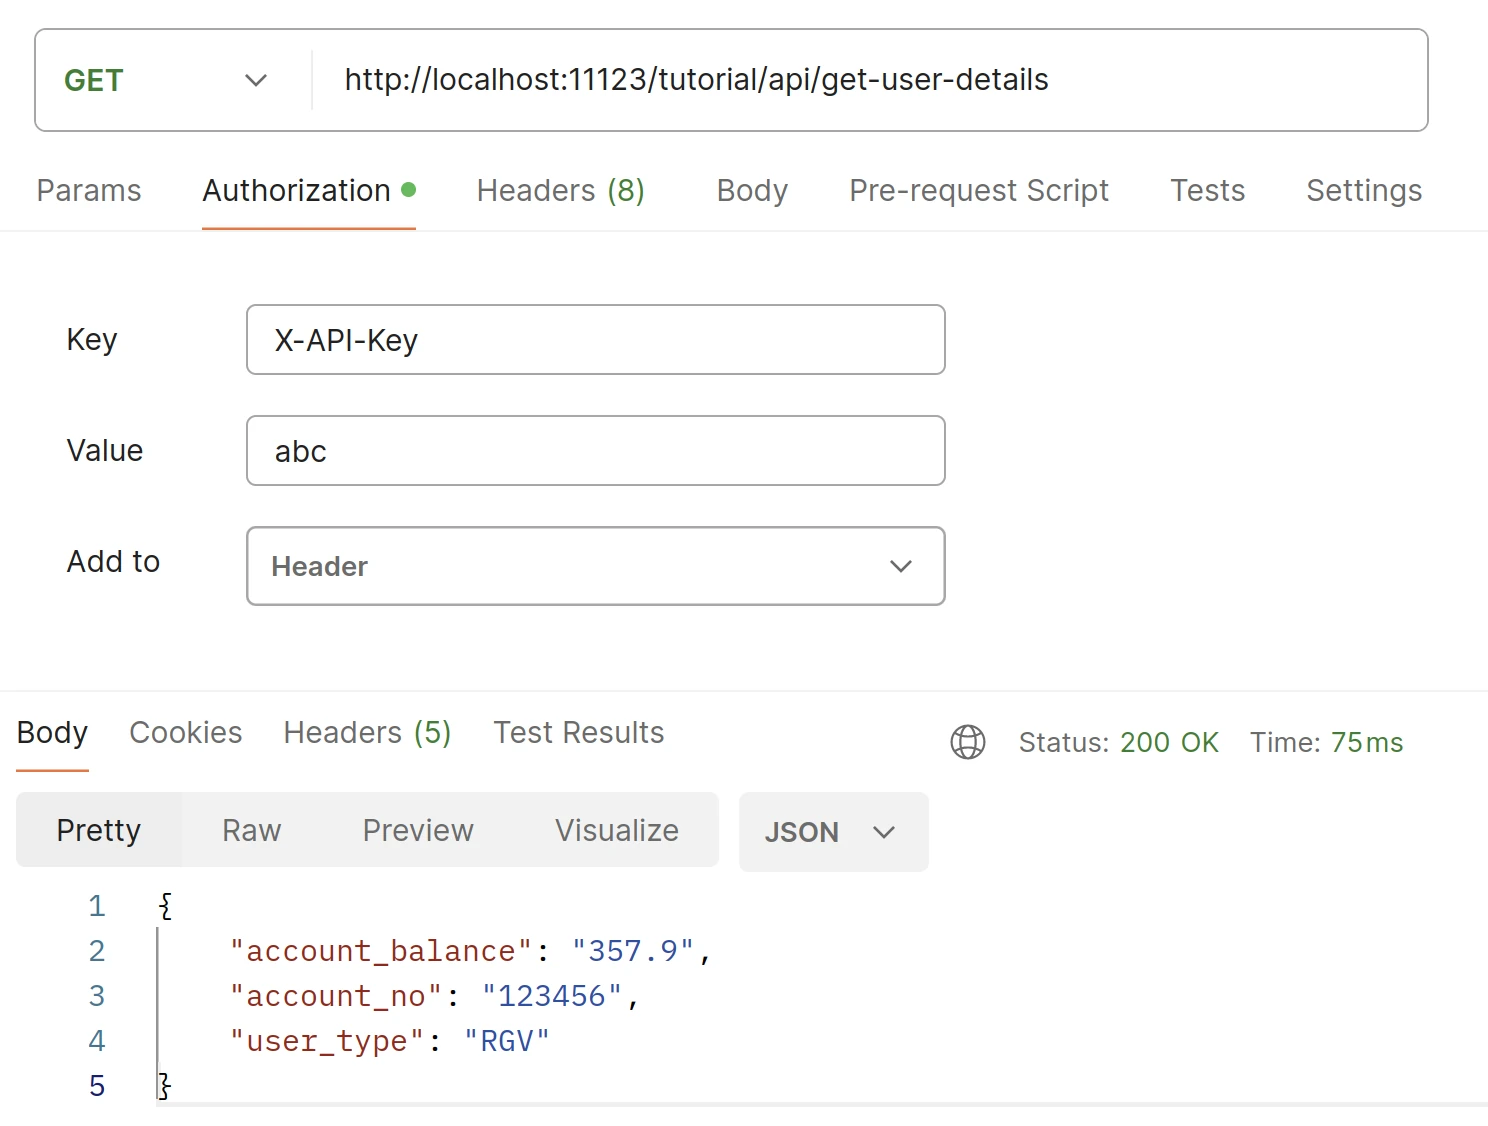
You can also invoke the endpoint from this page - the request below goes to your own environment, using the address and the API key from the connect panel above:
Interestingly, since your browser receives all the server log messages, you can check in your browser's developer console what your service and the outgoing connections are doing while you're invoking them from Postman (remember, press F12 and make sure to set the level to "Info" only).

Here's a brief overview of what you will observe in the logs that your browser is receiving:
- Invocation of the REST channel: Entries indicating the invocation of the REST channel will show details such as the specific channel invoked and the details of the remote API client initiating the request.
- Requests to and responses from CRM and Billing: Following the invocation of the REST channel, you'll see entries corresponding to the REST request sent to CRM and the SQL query sent to the Billing database. These entries can be correlated with the same correlation ID (CID) as the initial REST channel invocation, providing clear traceability of the request flow through the system.
- Custom log messages: Additionally, custom log messages added within the service implementation will also be captured in the log file. These messages can provide additional context or insights into the service's behavior and processing steps.
And there you have it, a reusable API endpoint, implemented in Python and secured with an API key.
Before moving on, let the page verify your work - the button below invokes your endpoint and confirms that the response contains the expected values. If anything is off, you'll get a pointer to the step that most likely needs another look.
Let's now check how to use the scheduler - how to invoke services in the background periodically.
Python task scheduler
In Dashboard, go to Scheduler, click Create a new job: interval-based
A form will show on screen, fill it out as below:
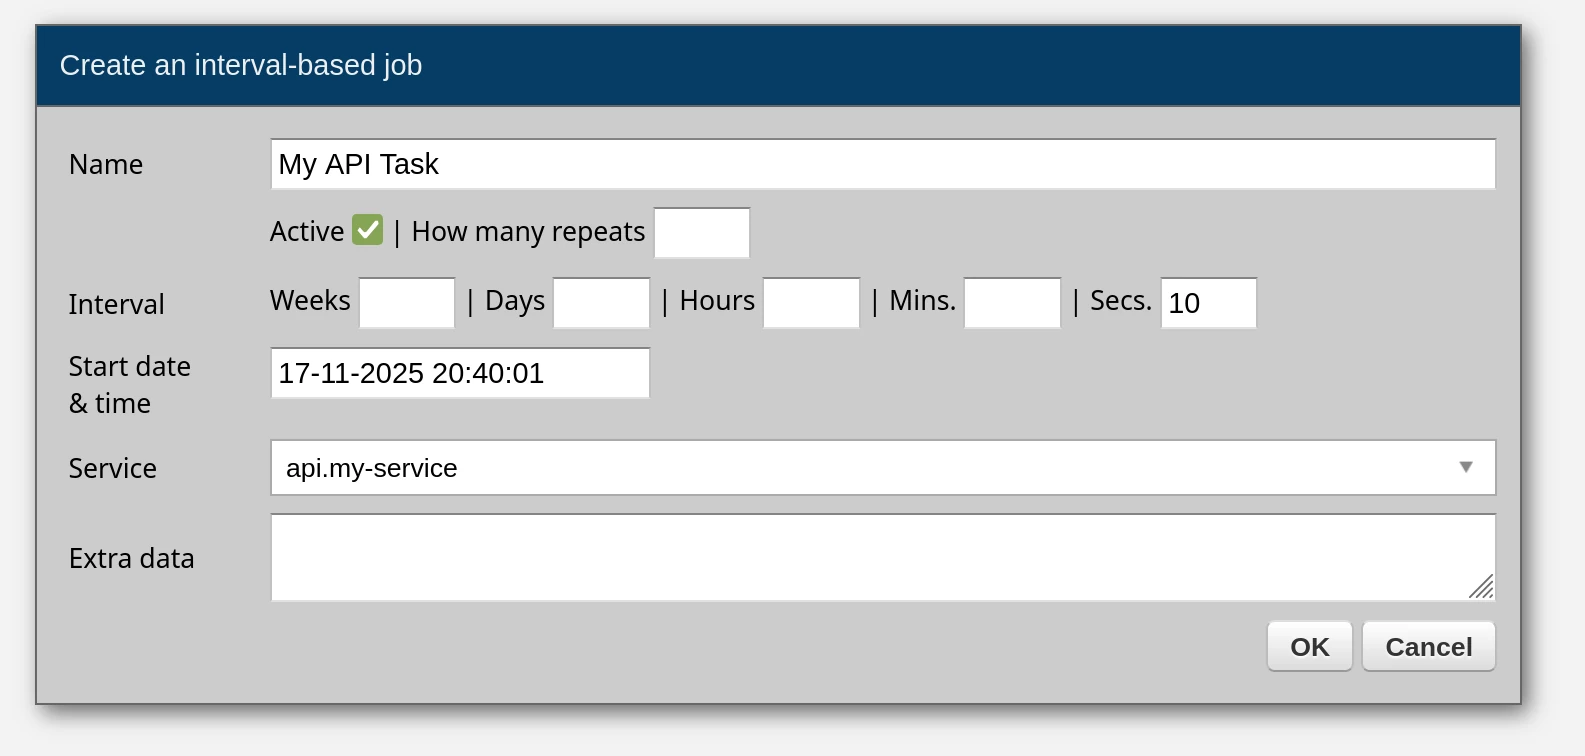
And you're done. You've just scheduled your service to be invoked in the background once every 10 seconds, indefinitely, using an interval-based job.
The scheduler supports per-job timezones, jitter (to prevent multiple servers from firing at the same instant), max execution time (to kill hung jobs), one-time jobs, and full YAML export for reproducible deployments:
scheduler:
  - name: my.report.job
    service: api.my-service
    job_type: interval_based
    seconds: 10
    timezone: Europe/Berlin
    jitter_ms: 5000
    max_execution_time_ms: 15000
For the complete guide, see the Python scheduler tutorial.
Built-in API Management
Here's something you didn't have to do in this tutorial: write API documentation. It already exists.
When you deployed your service and created its REST channel, the platform generated an OpenAPI document for it - from the service's own input and output declarations. The document is published in the OpenAPI console, a browsable portal where API consumers sign in, read the documentation and invoke the endpoints, and everything you'd expect from API Management - publishing, per-caller access, a try-it client - was set up automatically by the steps you have already completed.
Let's see it.
Go to http://localhost:8185/openapi/console - this is the console's address in your environment.
Sign in with the API key you created earlier - the key's name is the username and the key itself is the password:
Field Value Username My API Key Password abc

- You're in, and the document contains exactly one endpoint -
/tutorial/api/get-user-details, the channel your API key is assigned to. That's the core of the security model: a caller sees only what their credentials can invoke, and the filtering happens on the servers, before anything reaches the browser.

Note the endpoint's documentation - the
nameinput and theuser_type,account_noandaccount_balanceoutput are taken from the service's I/O definition. You never wrote a spec file, and the document always matches the code because it is generated from what is actually deployed.Now click Try it on the endpoint, enter
{"name":"Mike Johnson"}as the request body and send it. The console invokes the real service with your credentials - the same call you made from Postman earlier, this time from within the documentation.

The document is also plain OpenAPI 3.1, served under the console's address at /openapi/console/openapi.json and /openapi/console/openapi.yaml - paste either URL into Postman or a code generator and authenticate with the same credentials.
That's the whole API Management workload - documentation, publishing and access control - and none of it was a task on your list. Read more in Using the OpenAPI console and, if you run the platform, in OpenAPI administration. The console is one part of a larger whole - the API Management overview shows the full layer, and the API Management documentation collects every chapter, from quota tiers to traffic analytics.
Beyond REST - what else can you build
The REST service you've just built is only one example of what's possible. Here are other integration patterns that follow the same pattern - you write a service, and the platform provides the connectivity.
OpenAPI channels
Beyond the live console you saw above, you can also group REST channels into downloadable OpenAPI specifications. Create an OpenAPI channel in Dashboard under Connections -> Channels -> OpenAPI, assign REST channels to it, and Zato generates a standard OpenAPI 3.1 spec - downloadable as YAML or accessible via HTTP. See OpenAPI docs.
Event streaming with Kafka
Create a Kafka channel in Dashboard, point it to a topic, and your service is invoked for each message - no Kafka client code is needed:
class MyService(Service):
    def handle(self):
        data = self.request.input
        self.logger.info('Kafka message: %s', data)
Publishing is just as simple - self.out.kafka['my-publisher'].send({'event': 'order.created'}). See the full Kafka examples.
GraphQL
Create a GraphQL outgoing connection in Dashboard and query any GraphQL server directly from your services:
class MyService(Service):
    def handle(self):
        conn = self.out.graphql['ms365-graph']
        result = conn.execute('{ users { id displayName mail } }')
        self.logger.info('Users: %s', result)
Variables are passed via the params argument - conn.execute(query, params={'user_id': 'abc-123'}). See the full GraphQL examples.
Publish/subscribe messaging
Zato has a built-in pub/sub broker. Services publish to topics, external applications subscribe and pull messages from their queues via REST. No external broker required:
See pub/sub docs.
AMQP and RabbitMQ
Same pattern as Kafka - create an AMQP channel in Dashboard pointing to a queue, and your service is invoked for each message. Publishing goes through self.outgoing.amqp.send. See AMQP examples.
Rule engine
Express business rules in a way that both technical and business people can read and maintain. Rules are evaluated by the platform and can gate, route, or transform requests without touching service code. See the rule engine tutorial.
Rate limiting
Protect your endpoints with per-channel or per-client rate limits - requests per minute, per hour, with burst allowances, time-of-day windows, and IP-based blocking. All configured in Dashboard, no code changes needed. See rate limiting docs.
Healthcare - HL7v2
Zato is used in hospitals, labs, and health information exchanges. HL7v2 fields are accessed by semantic name rather than cryptic positions:
MLLP channels handle framing and ACKs automatically.
From development to production
The service works, so let's look at what surrounds it in a real project - tests, automation and the tools that help you extend it further.
Unit testing
Well, we do have an API service but we don't have any tests for it.
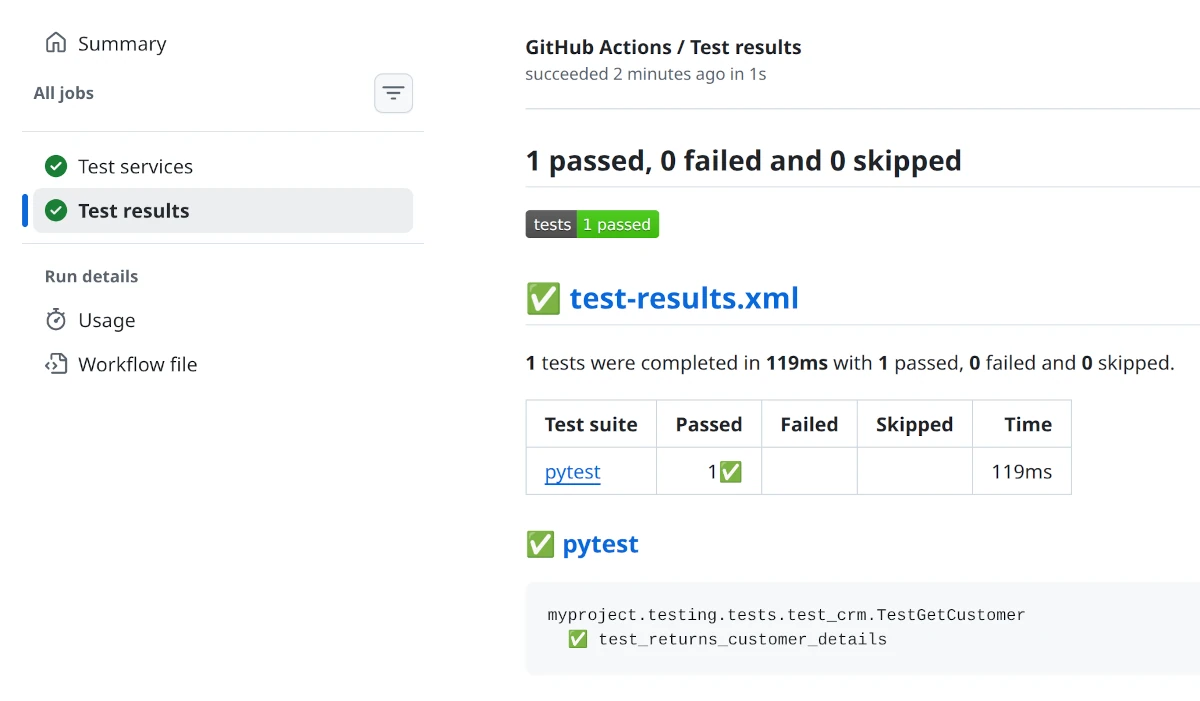
Zato ships with a unit testing framework that lets you test your services without running a server. You write tests using Python's standard unittest module, mock external connections, and verify your service logic works correctly.
GitOps and CI/CD automation
Throughout the tutorial, you may have been wondering about one thing.
OK, we have Python services and unit tests, but how am I actually going to provision my new environments? It's good that there's the Dashboard, but am I supposed to keep clicking and filling out forms each time I have a new environment? If I create a few dozen REST channels and other connections, how do I automate the process of deploying it all? How do I make my builds reproducible?
These are good questions and there's a good answer to them too. You can automate it all very easily.
There's an entire chapter about it but, in short, everything you do in Dashboard can be exported to YAML, stored in git, and imported elsewhere.
Such a file will have entries like these here:
security:
  - name: My API Key
    type: apikey
    username: My API Key
    password: Zato_Enmasse_Env.My_API_Key

channel_rest:
  - name: My REST Channel
    service: api.my-service
    security: My API Key
    url_path: /tutorial/api/get-user-details
    data_format: json
You can easily recognize the same configuration that you previously added using Dashboard. It's just in YAML now.
You push files with such configuration to git and that lets you have reproducible builds - you're always able to reproduce the exact same setup in other systems or environments. This is GitOps - git is the single source of truth for your configuration.
Connect your AI copilot or LLM
If you ever need any live assistance during the tutorial, remember that you can connect your AI copilot or LLM and ask it questions about the tutorial and other parts of the documentation.
Zato exposes its documentation via MCP (Model Context Protocol) at https://zato.io/mcp. You can connect Claude, Cursor, VS Code, or any other MCP-compatible tool:
Ask it a question and it searches the documentation, reads the pages it needs and answers from them:
What next?
If you're building integrations and you'd like a trusted partner to guide you on architecture and design, get in touch and let's see what we can do together.
More resources
- MCP gateways tutorial
Expose your Python services as tools that AI agents and copilots can discover and invoke
- LLM connections
Invoke OpenAI, Claude, Gemini and compatible models from your services, with multi-turn chat history
- Deploying Zato projects
A DevOps tutorial on how to deploy your code and configuration from git to Docker containers
- Publish/subscribe
How topics and message queues let systems exchange information without being directly connected
- Modern REST API tutorial
How to design and build REST APIs in Python, from the basics to production practices
- Unit testing Zato services
Simulate external connections, invoke services and verify their responses, all without running a server
Schedule a meaningful demo
Book a demo with an expert who will help you build meaningful systems that match your ambitions
"For me, Zato Source is the only technology partner to help with operational improvements."
 - John Adams
Program Manager of Channel Enablement at Keysight 